Cette activité pratique est divisée en deux parties.
Tout d’abord, vous allez réaliser une série d’exercices pour vous familiariser avec les fonctions et la visibilité des variables.
C’est une notion fondamentale à acquérir dans tout langage de programmation.
Ensuite, vous approfondirez la création de modules Python.
Avec ceux-ci, vous pourrez organiser vos codes et les rendre plus faciles à réutiliser dans de futurs projets.
Pour illustrer cela, nous proposons d’écrire une petite bibliothèque de fonctions qui implémente un régressseur linéaire.
Important
Le but de cette séance est de vous aider à maîtriser des notions importantes en informatique.
Un assistant de programmation intelligent tel que GitHub Copilot, que vous avez peut-être déjà installé, pourra vous fournir une solution à ces exercices uniquement à partir d’un nom de fichier judicieusement choisi.
Pour l’entraînement, nous vous conseillons de désactiver d’abord ces outils.
À la fin de l’activité pratique, nous vous suggérons de retravailler l’exercice avec ces outils activés.
Suivre ces deux étapes améliorera vos compétences à la fois fondamentalement et pratiquement.
De plus, nous vous fournissons les solutions aux exercices.
Assurez-vous de ne les consulter qu’après avoir une solution aux exercices, à des fins de comparaison !
Même si vous êtes sûr que votre solution est correcte, veuillez les regarder, car elles fournissent parfois des éléments supplémentaires que vous auriez pu manquer.
Contenu de l’activité (partie 1)
1 — Liste de nombres aléatoires
Vous vous souvenez de l’activité pratique de la session de programmation 1 ?
Nous avons un peu joué avec des nombres aléatoires, notamment pour produire une liste de tels nombres.
C’est une chose très courante à faire en programmation, il peut donc être judicieux d’en faire une fonction.
Plus tard, lorsque nous aurons besoin d’une liste de nombres aléatoires, nous pourrons ainsi en générer une avec la fonction au lieu de copier-coller le même code encore et encore.
Écrivez une fonction qui retourne une liste de nombres naturels générés aléatoirement dans un intervalle.
La fonction prend en entrée le nombre de valeurs à générer ainsi que les bornes de l’intervalle d’acceptabilité.
Vous devez utiliser une fonction de la bibliothèque random qui génère un entier dans un intervalle donné.
Voici le prototype de cette fonction : def rand_ints (min: int, max:int, nb: int) -> List[int].
Le hint de type pour List se trouve dans la bibliothèque typing.
Une valeur par défaut peut être donnée à chaque paramètre.
Dans le cas où une fonction est appelée sans argument pour un paramètre, alors sa valeur par défaut est utilisée.
Assurez-vous que votre fonction génère 10 nombres entre 0 et 100 si aucun argument n’est donné.
N’oubliez pas de typer le prototype de votre fonction (i.e., ses paramètres et valeur retournée) et de la commenter.
Correction
# Needed imports from typing import List
from random import randint
defrand_ints (min: int =0, max: int =100, nb: int =10) -> List[int]:
"""
Generate a list of random integers between min (included) and max (included).
In:
* min: The minimum value for the random integers.
* max: The maximum value for the random integers.
* nb: The number of random integers to generate.
Out:
* A list of random integers.
"""# Generate nb random integers rand_ints = []
for i in range(nb):
rand_ints.append(randint(min, max))
# Return the list of random integers return rand_ints
# Example usage with default parameters random_numbers = rand_ints()
print(random_numbers)
# Example usage with custom parameters custom_random_numbers = rand_ints(10, 50, 5)
print(custom_random_numbers)
// Needed imports import java.util.ArrayList;
import java.util.List;
import java.util.Random;
/**
* To run this code, you need to have Java installed on your computer, then:
* - Create a file named `Main.java` in a directory of your choice.
* - Copy this code in the file.
* - Open a terminal in the directory where the file is located.
* - Run the command `javac Main.java` to compile the code.
* - Run the command `java -ea Main` to execute the compiled code.
* Note: '-ea' is an option to enable assertions in Java.
*/publicclassMain {
/**
* Generate a list of random integers between min (included) and max (included).
*
* @param min The minimum value for the random integers.
* @param max The maximum value for the random integers.
* @param nb The number of random integers to generate.
* @return A list of random integers.
*/publicstatic List<Integer>randInts(int min, int max, int nb) {
// Create a list to store the random integers List<Integer> randInts =new ArrayList<>();
Random rand =new Random();
// Generate nb random integers for (int i = 0; i < nb; i++) {
int randomInt = rand.nextInt((max - min) + 1) + min;
randInts.add(randomInt);
}
// Return the list of random integers return randInts;
}
/**
* Overloaded method to use default parameters.
*
* @return 10 random integers in [0, 100].
*/publicstatic List<Integer>randInts() {
return randInts(0, 100, 10);
}
/**
* This is the entry point of your program.
* It contains the first codes that are going to be executed.
*
* @param args Command line arguments received.
*/publicstaticvoidmain(String[] args) {
// Example usage with default parameters List<Integer> randomNumbers = randInts();
System.out.println(randomNumbers);
// Example usage with custom parameters List<Integer> customRandomNumbers = randInts(10, 50, 5);
System.out.println(customRandomNumbers);
}
}
2 — Filtrer une liste
Les fonctions peuvent prendre de nombreux types de paramètres différents : types de base, structures de données, objets, fonctions, etc.
Commencez par définir deux fonctions simples acceptant en paramètres un entier n.
Chacune doit retourner un booléen :
La première fonction vérifie que n est un nombre premier.
La seconde vérifie que n est pair.
Correction
defis_prime (n: int) -> bool:
"""
This function tests if a number is prime or not.
In:
* n: The number to be tested.
Out:
* True if the number is prime, False otherwise.
"""# Must be greater than 1 if n <=1:
returnFalse# Test all dividers for i in range(2, n):
if n % i ==0:
returnFalse# If we reach here, it is prime returnTruedefis_even (n: int) -> bool:
"""
This function tests if a number is even or not.
In:
* n: The number to be tested.
Out:
* True if the number is even, False otherwise.
"""# Check modulo 2 return n %2==0# Test is_prime print(29, "is prime:", is_prime(29))
print(15, "is prime:", is_prime(15))
# Test is_even print(29, "is even:", is_even(29))
print(14, "is even:", is_even(14))
/**
* To run this code, you need to have Java installed on your computer, then:
* - Create a file named `Main.java` in a directory of your choice.
* - Copy this code in the file.
* - Open a terminal in the directory where the file is located.
* - Run the command `javac Main.java` to compile the code.
* - Run the command `java -ea Main` to execute the compiled code.
* Note: '-ea' is an option to enable assertions in Java.
*/publicclassMain {
/**
* This function tests if a number is prime or not.
*
* @param n The number to be tested.
* @return True if the number is prime, False otherwise.
*/publicstaticbooleanisPrime(int n) {
// Must be greater than 1 if (n <= 1) {
returnfalse;
}
// Test all dividers for (int i = 2; i < n; i++) {
if (n % i == 0) {
returnfalse;
}
}
// If we reach here, it is prime returntrue;
}
/**
* This function tests if a number is even or not.
*
* @param n The number to be tested.
* @return True if the number is even, False otherwise.
*/publicstaticbooleanisEven(int n) {
// Check modulo 2 return n % 2 == 0;
}
/**
* This is the entry point of your program.
* It contains the first codes that are going to be executed.
*
* @param args Command line arguments received.
*/publicstaticvoidmain(String[] args) {
// Test isPrime System.out.println(29 +" is prime: "+ isPrime(29));
System.out.println(15 +" is prime: "+ isPrime(15));
// Test isEven System.out.println(29 +" is even: "+ isEven(29));
System.out.println(14 +" is even: "+ isEven(14));
}
}
Définissez une fonction filter_list qui prend en paramètres une liste d’entiers et une fonction de test dont le prototype est similaire aux deux fonctions définies précédemment.
Cette fonction de filtrage retourne la liste des éléments qui passent le test de la fonction.
Correction
# Needed imports from typing import List, Callable
defis_prime (n: int) -> bool:
"""
This function tests if a number is prime or not.
In:
* n: The number to be tested.
Out:
* True if the number is prime, False otherwise.
"""# Must be greater than 1 if n <=1:
returnFalse# Test all dividers for i in range(2, n):
if n % i ==0:
returnFalse# If we reach here, it is prime returnTruedefis_even (n: int) -> bool:
"""
This function tests if a number is even or not.
In:
* n: The number to be tested.
Out:
* True if the number is even, False otherwise.
"""return n %2==0deffilter_list (l: List[int], f: Callable[[int], bool]) -> List[int]:
"""
This function filters a list based on a given function.
In:
* l: The list to be filtered.
* f: The function to be used for filtering.
Out:
* A new list containing only the elements that pass the filter.
"""# Iterate over the list new_list = []
for elem in l:
if f(elem):
new_list.append(elem)
# Return the new list return new_list
# Test is_prime print(29, "is prime:", is_prime(29))
print(15, "is prime:", is_prime(15))
# Test is_even print(29, "is even:", is_even(29))
print(14, "is even:", is_even(14))
# Test filter_list l = list(range(100))
print("Even numbers:", filter_list(l, is_even))
print("Prime numbers:", filter_list(l, is_prime))
// Needed imports import java.util.ArrayList;
import java.util.List;
import java.util.function.Predicate;
/**
* To run this code, you need to have Java installed on your computer, then:
* - Create a file named `Main.java` in a directory of your choice.
* - Copy this code in the file.
* - Open a terminal in the directory where the file is located.
* - Run the command `javac Main.java` to compile the code.
* - Run the command `java -ea Main` to execute the compiled code.
* Note: '-ea' is an option to enable assertions in Java.
*/publicclassMain {
/**
* This function tests if a number is prime or not.
*
* @param n The number to be tested.
* @return True if the number is prime, False otherwise.
*/publicstaticbooleanisPrime(int n) {
// Must be greater than 1 if (n <= 1) {
returnfalse;
}
// Test all dividers for (int i = 2; i < n; i++) {
if (n % i == 0) {
returnfalse;
}
}
// If we reach here, it is prime returntrue;
}
/**
* This function tests if a number is even or not.
*
* @param n The number to be tested.
* @return True if the number is even, False otherwise.
*/publicstaticbooleanisEven(int n) {
// Check modulo 2 return n % 2 == 0;
}
/**
* This function filters a list based on a given function.
*
* @param l The list to be filtered.
* @param f The function to be used for filtering.
* @return A new list containing only the elements that pass the filter.
*/publicstatic List<Integer>filterList(List<Integer> l, Predicate<Integer> f) {
// Iterate over the list List<Integer> newList =new ArrayList<>();
for (int elem : l) {
if (f.test(elem)) {
newList.add(elem);
}
}
// Return the new list return newList;
}
/**
* This is the entry point of your program.
* It contains the first codes that are going to be executed.
*
* @param args Command line arguments received.
*/publicstaticvoidmain(String[] args) {
// Test isPrime System.out.println(29 +" is prime: "+ isPrime(29));
System.out.println(15 +" is prime: "+ isPrime(15));
// Test isEven System.out.println(29 +" is even: "+ isEven(29));
System.out.println(14 +" is even: "+ isEven(14));
// Test filterList List<Integer> l =new ArrayList<>();
for (int i = 0; i < 100; i++)
{
l.add(i);
}
System.out.println("Even numbers: "+ filterList(l, Main::isEven));
System.out.println("Prime numbers: "+ filterList(l, Main::isPrime));
}
}
lambda functions permettent de définir des fonctions sans avoir à leur donner un nom.
Voici un exemple d’utilisation d’une fonction lambda passée en argument de la fonction filter_list :
# Same result as is_even, using a lambda function l = list(range(100))
print("Even numbers:", filter_list(l, lambda x : x %2==0))
/**
* To run this code, you need to have Java installed on your computer, then:
* - Create a file named `Main.java` in a directory of your choice.
* - Copy this code in the file.
* - Open a terminal in the directory where the file is located.
* - Run the command `javac Main.java` to compile the code.
* - Run the command `java -ea Main` to execute the compiled code.
* Note: '-ea' is an option to enable assertions in Java.
*/publicclassMain {
/**
* This is the entry point of your program.
* It contains the first codes that are going to be executed.
*
* @param args Command line arguments received.
*/publicstaticvoidmain(String[] args) {
// Initialize the list List<Integer> l =new ArrayList<>();
for (int i = 0; i < 100; i++) {
l.add(i);
}
// Filter the list using a lambda function to find even numbers List<Integer> evenNumbers = filterList(l, x -> x % 2 == 0);
}
}
3 — Visibilité
Python utilise deux structures de données (dictionnaires) pour stocker les variables locales et globales.
Testez le code suivant et analysez sa sortie :
# Define a global string val_str ="global func1"deffunc_1 () ->None:
"""
A simple function to test local/global visibility.
In:
* None.
Out:
* None.
"""# Define a local string val_str : str ="local func1" print(val_str)
# Print the local and global variables print("Local variables in func1:", locals())
print("Global variables in func1:", globals())
deffunc_2 () ->None:
"""
A simple function to test local/global visibility.
In:
* None.
Out:
* None.
"""# Print a string print(val_str)
# Print the local and global variables print("Local variables in func1:", locals())
print("Global variables in func1:", globals())
# Call the functions func_1()
func_2()
# Print the local and global variables print("Local variables in main:", locals())
print("Global variables in main:", globals())
/**
* To run this code, you need to have Java installed on your computer, then:
* - Create a file named `Main.java` in a directory of your choice.
* - Copy this code in the file.
* - Open a terminal in the directory where the file is located.
* - Run the command `javac Main.java` to compile the code.
* - Run the command `java -ea Main` to execute the compiled code.
* Note: '-ea' is an option to enable assertions in Java.
*/publicclassMain {
/** Define a global string (class-level variable). */static String valStr ="global func1";
/**
* A simple function to test local/global visibility.
*/publicstaticvoidfunc1() {
// Define a local string String valStr ="local func1";
System.out.println(valStr);
// Print the local variable (valStr) and global variable (Main.valStr) System.out.println("Local valStr in func1: "+ valStr);
System.out.println("Global valStr in func1: "+ Main.valStr);
}
/**
* A simple function to test local/global visibility.
*/publicstaticvoidfunc2() {
// Print the global string System.out.println(Main.valStr);
// In Java, we can't directly access the local variables of another method System.out.println("Global valStr in func2: "+ Main.valStr);
}
/**
* This is the entry point of your program.
* It contains the first codes that are going to be executed.
*
* @param args Command line arguments received.
*/publicstaticvoidmain(String[] args) {
// Call the functions func1();
func2();
// Print the global variable in the main method System.out.println("Global valStr in main: "+ Main.valStr);
}
}
Modifiez le code de func_1 de manière à ce que sa première instruction modifie la valeur de la variable globale val_str.
Correction
deffunc_1 ():
"""
A simple function to test local/global visibility.
In:
* None.
Out:
* None.
"""# Declare the string global to modify it global val_str
val_str ="modified global" print(val_str)
/**
* To run this code, you need to have Java installed on your computer, then:
* - Create a file named `Main.java` in a directory of your choice.
* - Copy this code in the file.
* - Open a terminal in the directory where the file is located.
* - Run the command `javac Main.java` to compile the code.
* - Run the command `java -ea Main` to execute the compiled code.
* Note: '-ea' is an option to enable assertions in Java.
*/publicclassMain {
/**
* A simple function to test local/global visibility.
*/publicstaticvoidfunc1() {
// Modify the global string Main.valStr="modified global";
System.out.println(Main.valStr);
}
}
4 — Paramètres immuables vs. mutables
Un concept clé à gérer concernant les variables est la différence entre types mutables et immutables.
Pour expérimenter la différence entre types immuables et mutables, exécutez le code suivant et analysez sa sortie.
# Needed imports from typing import List
deffunc_1 (a : int) ->None:
"""
A simple function to test mutability.
In:
* a: A non-mutable parameter.
Out:
* None.
"""# Increment a a +=1deffunc_2 (b : List[int]) ->None:
"""
A simple function to test mutability.
In:
* b: A mutable parameter.
Out:
* None.
"""# Append an element to the list b.append(0)
# Call func_1 x =1func_1(x)
print(x)
# Call func_2 y = []
func_2(y)
print(y)
// Needed imports import java.util.ArrayList;
import java.util.List;
/**
* To run this code, you need to have Java installed on your computer, then:
* - Create a file named `Main.java` in a directory of your choice.
* - Copy this code in the file.
* - Open a terminal in the directory where the file is located.
* - Run the command `javac Main.java` to compile the code.
* - Run the command `java -ea Main` to execute the compiled code.
* Note: '-ea' is an option to enable assertions in Java.
*/publicclassMain {
/**
* A simple function to test mutability.
*
* @param a A non-mutable parameter.
*/publicstaticvoidfunc1(int a) {
a += 1;
}
/**
* A simple function to test mutability.
*
* @param b A mutable parameter.
*/publicstaticvoidfunc2(List<Integer> b) {
b.add(0);
}
/**
* This is the entry point of your program.
* It contains the first codes that are going to be executed.
*
* @param args Command line arguments received.
*/publicstaticvoidmain(String[] args) {
// Call func1 int x = 1;
func1(x);
System.out.println(x);
// Call func2 List<Integer> y =new ArrayList<>();
func2(y);
System.out.println(y);
}
}
Chaque variable possède un identifiant qui peut être récupéré avec la fonction id(variable).
Comparez l’identifiant des variables et des arguments des fonctions pour comprendre pourquoi les paramètres d’un type mutable peuvent être modifiés dans les fonctions.
Correction
# Needed imports from typing import List
deffunc_1 (a : int) ->None:
"""
A simple function to test mutability.
In:
* a: A non-mutable parameter.
Out:
* None.
"""# Show ID print("ID of a in func_1 (before increase): ", id(a))
a +=1 print("ID of a in func_1 (after increase): ", id(a))
deffunc_2 (b : List[int]) ->None:
"""
A simple function to test mutability.
In:
* b: A mutable parameter.
Out:
* None.
"""# Show ID print("ID of b in func_2 (before append): ", id(b))
b.append(0)
print("ID of b in func_2 (after append): ", id(b))
# Call func_1 x =1print("ID of x (before call): ", id(x))
func_1(x)
print("ID of x (after call): ", id(x))
# Call func_2 y = []
print("ID of y (before call): ", id(y))
func_2(y)
print("ID of y (after call): ", id(y))
// Needed imports import java.util.ArrayList;
import java.util.List;
/**
* To run this code, you need to have Java installed on your computer, then:
* - Create a file named `Main.java` in a directory of your choice.
* - Copy this code in the file.
* - Open a terminal in the directory where the file is located.
* - Run the command `javac Main.java` to compile the code.
* - Run the command `java -ea Main` to execute the compiled code.
* Note: '-ea' is an option to enable assertions in Java.
*/publicclassMain {
/**
* A simple function to test mutability.
*
* @param a A non-mutable parameter.
*/publicstaticvoidfunc1(int a) {
// Show ID System.out.println("ID of a in func1 (before increase): "+ System.identityHashCode(a));
a += 1;
System.out.println("ID of a in func1 (after increase): "+ System.identityHashCode(a));
}
/**
* A simple function to test mutability.
*
* @param b A mutable parameter.
*/publicstaticvoidfunc2(List<Integer> b) {
// Show ID System.out.println("ID of b in func2 (before append): "+ System.identityHashCode(b));
b.add(0);
System.out.println("ID of b in func2 (after append): "+ System.identityHashCode(b));
}
/**
* This is the entry point of your program.
* It contains the first codes that are going to be executed.
*
* @param args Command line arguments received.
*/publicstaticvoidmain(String[] args) {
// Call func1 int x = 1;
System.out.println("ID of x (before call): "+ System.identityHashCode(x));
func1(x);
System.out.println("ID of x (after call): "+ System.identityHashCode(x));
// Call func2 List<Integer> y =new ArrayList<>();
System.out.println("ID of y (before call): "+ System.identityHashCode(y));
func2(y);
System.out.println("ID of y (after call): "+ System.identityHashCode(y));
}
}
Dans certaines situations, il peut être nécessaire d’éviter la modification des arguments d’une fonction même s’ils sont de type mutable.
Après avoir compris l’opération de copie de valeur, modifiez l’appel à func_2 de manière à ce que la liste locale passée en paramètre ne soit pas modifiée.
Correction
# Call func_2
y = []
print("ID of y (before call): ", id(y))
func_2(y.copy())
print("ID of y (after call): ", id(y))
/**
* To run this code, you need to have Java installed on your computer, then:
* - Create a file named `Main.java` in a directory of your choice.
* - Copy this code in the file.
* - Open a terminal in the directory where the file is located.
* - Run the command `javac Main.java` to compile the code.
* - Run the command `java -ea Main` to execute the compiled code.
* Note: '-ea' is an option to enable assertions in Java.
*/publicclassMain {
/**
* This is the entry point of your program.
* It contains the first codes that are going to be executed.
*
* @param args Command line arguments received.
*/publicstaticvoidmain(String[] args) {
// Call func2 List<Integer> y =new ArrayList<>();
System.out.println("ID of y (before call): "+ System.identityHashCode(y));
func2(new ArrayList<>(y));
System.out.println("ID of y (after call): "+ System.identityHashCode(y));
}
}
5 — Revenons aux bonnes pratiques de programmation
En Python, la Python Enhancement Proposal 8 (PEP8) est un guide de style de programmation à utiliser autant que possible.
Pour vérifier l’adéquation de votre code par rapport à ce guide, le Pylint peut être utilisé.
Il retourne un score d’adéquation ainsi que des recommandations pour améliorer la qualité de lecture de votre code.
Utilisez Pylint pour évaluer puis améliorer la qualité du code que vous avez produit pour les deux premiers exercices de cette session (Liste de nombres aléatoires et Filtrer une liste).
6 — Vérification statique des types
Parmi les erreurs découvertes à l’exécution, le décalage de type est l’une d’elles.
En lisant simplement le code suivant, essayez d’identifier quelle erreur d’exécution va se produire.
defprime_number(n: int) -> bool:
"""
Check if a number is prime.
In:
* n: The number to check.
Out:
* True if the number is prime, False otherwise.
"""# A prime number is a number greater than 1 that has no divisors other than 1 and itself if n <2:
returnFalse# Check if the number is divisible by any number from 2 to the square root of the number for i in range(2, int(n **0.5) +1):
if n % i ==0:
returnFalse# Return True if we can recach this point returnTrue# Test the function num_test = input("Give a number to check if it is prime: ")
print(f"Is {num_test} a prime number? = {prime_number(num_test)}")
Exécutez le code pour bien faire apparaître l’erreur.
Testez le vérificateur de type Mypy, qui aurait identifié cette erreur sans avoir à l’exécuter.
Avoir un outil pour vérifier l’adéquation des types d’un code de plusieurs milliers de lignes peut être utile, n’est-ce pas ?
Ce que vous pouvez faire maintenant est d’utiliser des outils d’IA tels que GitHub Copilot ou ChatGPT, soit pour générer la solution, soit pour améliorer la première solution que vous avez proposée !
Essayez de le faire pour tous les exercices ci-dessus, pour voir les différences avec vos solutions.
Contenu de l’activité (partie 2)
8 — Construire un régressseur linéaire
Le but de cet exercice est de vous guider pas à pas vers l’implémentation d’un régressseur linéaire.
Il met l’accent sur la nécessité d’organiser votre code en petites fonctions.
Alors, qu’est-ce qu’un régressseur linéaire ?
La plupart d’entre vous devraient déjà être familiers avec cette technique d’apprentissage automatique.
Sinon, voici une très courte vidéo d’introduction :
8.1 — Préparation
Le point de départ est le code suivant qui vous fournit des fonctions basiques pour générer aléatoirement des points et les afficher.
Copiez-collez ce code dans un fichier nommé data_manipulation.py.
# Needed imports from typing import List, Tuple, Optional
import numpy as np
import matplotlib.pyplot as plt
defgenerate_data ( nb_points: int =10,
slope: float =0.4,
noise: float =0.2,
min_val: float =-1.0,
max_val: float =1.0,
random_seed: Optional[int] =None ) -> Tuple[List[float], List[float]]:
"""
Generate linearly distributed 2D data with added noise.
This function generates a set of data points (x, y) where x is uniformly distributed between predefined minimum and maximum values.
Value y is calculated as a linear function of x with a specified inclination and an added random noise within a specified range.
In:
* nb_points: The number of data points to generate.
* slope: The slope of the linear function used to generate y values.
* noise: The range within which random noise is added to the y values.
* min_val: The minimum value of the x coordinates.
* max_val: The maximum value of the x coordinates.
* random_seed: The random seed used to generate the points.
Out
* The x coordinates in a first list.
* The y coordinates in a second list.
"""# Set the random seed if random_seed isnotNone:
np.random.seed(random_seed)
# Generate the data xrand = np.random.uniform(min_val, max_val, size=(nb_points,))
delta = np.random.uniform(0, noise, size=(nb_points,))
ymod = slope * xrand + delta
return list(xrand), list(ymod)
defscatter_data ( xvals: List[float],
yvals: List[float]
) ->None:
"""
Plot the data in 2D space.
In:
* x: The x-coordinates of the data points.
* y: The y-coordinates of the data points.
Out:
* None.
"""# Set a margin for a nice plot margin =1.1# Plot the data axis = plt.gca()
axis.set_xlim((min(xvals) * margin, max(xvals) * margin))
axis.set_ylim((min(yvals) * margin, max(yvals) * margin))
plt.scatter(xvals, yvals, color ="firebrick")
// Needed imports import java.util.ArrayList;
import java.util.List;
import java.util.Random;
import org.knowm.xchart.SwingWrapper;
import org.knowm.xchart.XYChart;
import org.knowm.xchart.XYChartBuilder;
/**
* This class should appear in a file named "DataManipulation.java".
*/publicclassDataManipulation {
/**
* Generate linearly distributed 2D data with added noise. This method generates a set of data points (x, y) where x is uniformly distributed between predefined minimum and maximum values.
* Value y is calculated as a linear function of x with a specified inclination and an added random noise within a specified range.
*
* @param nbPoints The number of data points to generate.
* @param slope The slope of the linear function used to generate y values.
* @param noise The range within which random noise is added to the y values.
* @param minVal The minimum value of the x coordinates.
* @param maxVal The maximum value of the x coordinates.
* @param randomSeed The random seed used to generate the points.
* @return A pair of lists: The first list contains the x coordinates, and the second list contains the y coordinates.
*/publicstatic List<List<Double>>generateData(int nbPoints,
double slope,
double noise,
double minVal,
double maxVal,
Integer randomSeed) {
// Set the random seed Random rand = randomSeed !=null?new Random(randomSeed) : new Random();
// Generate the data List<Double> xVals =new ArrayList<>();
List<Double> yVals =new ArrayList<>();
for (int i = 0; i < nbPoints; i++) {
double x = minVal + rand.nextDouble() * (maxVal - minVal);
double delta = rand.nextDouble() * noise;
double y = slope * x + delta;
xVals.add(x);
yVals.add(y);
}
List<List<Double>> result =new ArrayList<>();
result.add(xVals);
result.add(yVals);
return result;
}
/**
* Plot the data in 2D space.
*
* @param xVals The x-coordinates of the data points.
* @param yVals The y-coordinates of the data points.
*/publicvoidscatterData(List<Double> xVals, List<Double> yVals) {
// Plot the data XYChart chart =new XYChartBuilder()
.width(800)
.height(600)
.title("Scatter Plot")
.xAxisTitle("X")
.yAxisTitle("Y")
.build();
chart.addSeries("Data Points", xVals, yVals);
new SwingWrapper<>(chart).displayChart();
}
}
Information
Pour exécuter ce code, vous aurez probablement besoin d’installer la bibliothèque matplotlib.
Consultez le cours sur l’installation des modules pour un rappel.
Maintenant, mettez à jour le fichier ci-dessus pour ajouter quelques tests simples afin de vérifier que les fonctions fonctionnent comme prévu.
Puisque nous allons les utiliser comme module, n’oubliez pas de mettre ces tests dans le bloc if __name__ == "__main__":.
Correction
if __name__ =="__main__":
# Test the generate_data and scatter_data functions x, y = generate_data(20, 0.5, 0.2, -1, 1, 42)
scatter_data(x, y)
# Display the plot plt.show()
// Needed imports import java.util.List;
/**
* To run this code, you need to have Java installed on your computer, then:
* - Create a file named `Main.java` in a directory of your choice.
* - Copy this code in the file.
* - Open a terminal in the directory where the file is located.
* - Run the command `javac Main.java` to compile the code.
* - Run the command `java -ea Main` to execute the compiled code.
* Note: '-ea' is an option to enable assertions in Java.
*/publicclassMain {
/**
* This is the entry point of your program.
* It contains the first codes that are going to be executed.
*
* @param args Command line arguments received.
*/publicstaticvoidmain(String[] args) {
// Test the generateData and scatterData functions DataManipulation dm =new DataManipulation();
List<List<Double>> data = dm.generateData(10, 0.4, 0.2, -1.0, 1.0, 42);
dm.scatterData(data.get(0), data.get(1));
}
}
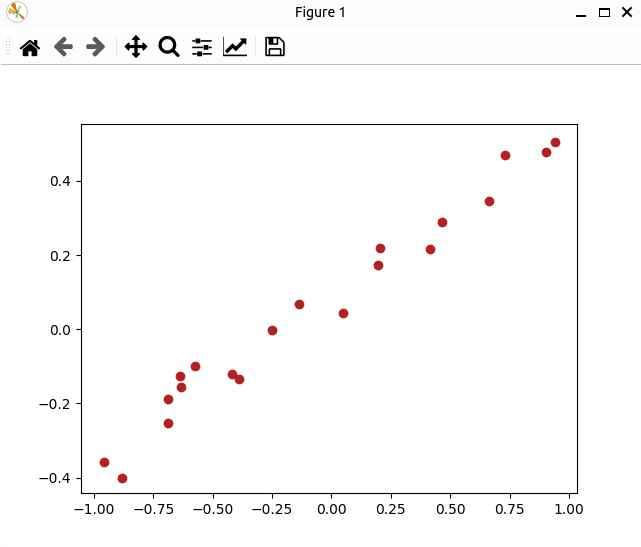
En exécutant le fichier data_manipulation.py, vous devriez observer la sortie suivante :
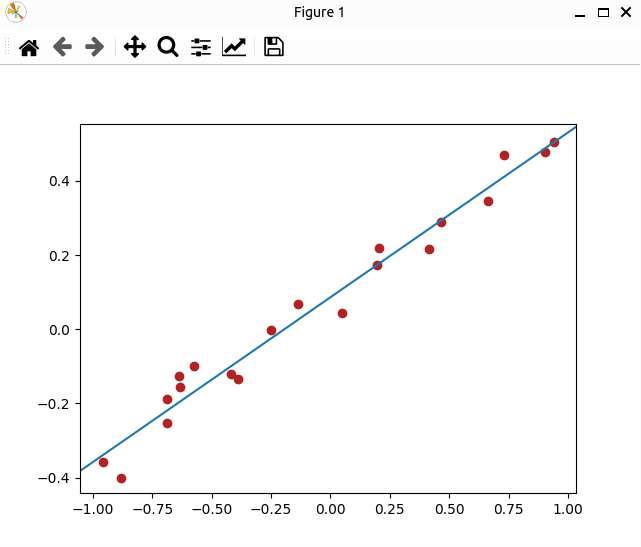
Le but maintenant est d’implémenter, pas à pas, une méthode simple mais fondamentale d’analyse de données : la régression linéaire.
L’objectif de cet exercice est de se concentrer sur votre code plutôt que sur les formules utilisées pour effectuer la régression linéaire, que vous étudierez certainement plus en détail par la suite.
Comme montré dans la figure suivante, le but est de trouver la droite $y = ax+b$ qui s’ajuste le mieux à la distribution des points.
8.2 — Quantifier l’erreur induite par la fonction estimée
La stratégie est d’inférer une droite minimisant une distance orthogonale globale par rapport à un ensemble de points d’entraînement.
Il est donc nécessaire de définir une fonction qui calcule cette distance orthogonale globale.
Une mesure d’erreur couramment utilisée est la Residual Sum of Squares Error (RSSE).
Considérant un ensemble de $n$ points $\mathcal{X} : \{ (x_1, y_1), \ldots, (x_n, y_n) \}$, la pente $a$ et l’ordonnée à l’origine $b$ de la droite estimée, le RSSE est calculé comme suit (pour simplifier et sans perte de généralité, des points bidimensionnels sont utilisés dans cet exercice) :
$$RSSE(\mathcal{X}, a, b) = \sum_{i=1}^n (y_i -(a x_i + b))^2$$
Dans un nouveau fichier nommé linear_regression.py, implémentez la fonction ayant le prototype suivant et qui retourne le RSSE.
defrsse ( a: float,
b: float,
x: List[float],
y: List[float]
) -> float:
"""
Compute the RSSE of the line defined by a and b acording to the data x and y.
In:
* a: Slope.
* b: Intercept.
* x: x values of the points.
* y: y values of the points.
Out:
* The computed RSSE.
"""
La droite $y = 0.39x + 0.13$ ajuste les points suivants avec un RSSE $\approx 0.019$ : $$\{ (0.11, 0.08), (-0.6, -0.02), (0.7, 0.4), (-0.12, 0.03), (-0.82, -0.2), (-0.36, 0.01) \}$$
Vérifiez que pour cet exemple votre fonction retourne le RSSE attendu.
Correction
# Needed imports from typing import List
defrsse ( a: float,
b: float,
x: List[float],
y: List[float]
) -> float:
"""
Compute the Residual Sum of Squares Error of the line defined by a and b acording to the data x and y.
In:
* a: Slope.
* b: Intercept.
* x: x values of the points.
* y: y values of the points.
Out:
* The computed RSSE.
"""# Compute the RSSE rsse =0.0for i in range(len(x)):
rsse += (y[i] - (a * x[i] + b)) **2return rsse
if __name__ =="__main__":
# Test the function x = [0.11, -0.6, 0.7, -0.12, -0.82, -0.36]
y = [0.08, -0.02, 0.4, 0.03, -0.2, 0.01]
a =0.39 b =0.13 print("RSSE: ", rsse(a, b, x, y))
// Needed imports import java.util.Arrays;
import java.util.List;
/**
* This class should appear in a file named "LinearRegression.java".
*/publicclassLinearRegression {
/**
* Compute the Residual Sum of Squares Error (RSSE) of the line defined by a and b according to the data x and y.
*
* @param a Slope.
* @param b Intercept.
* @param x x values of the points.
* @param y y values of the points.
* @return The computed RSSE.
*/publicdoublersse(double a, double b, List<Double> x, List<Double> y) {
// Compute the RSSE double rsse = 0.0;
for (int i = 0; i < x.size(); i++) {
rsse += Math.pow((y.get(i) - (a * x.get(i) + b)), 2);
}
return rsse;
}
}
/**
* To run this code, you need to have Java installed on your computer, then:
* - Create a file named `Main.java` in a directory of your choice.
* - Copy this code in the file.
* - Open a terminal in the directory where the file is located.
* - Run the command `javac Main.java` to compile the code.
* - Run the command `java -ea Main` to execute the compiled code.
* Note: '-ea' is an option to enable assertions in Java.
*/publicclassMain {
/**
* This is the entry point of your program.
* It contains the first codes that are going to be executed.
*
* @param args Command line arguments received.
*/publicstaticvoidmain(String[] args) {
// Test the RSSE function LinearRegression lr =new LinearRegression();
List<Double> x = Arrays.asList(0.11, -0.6, 0.7, -0.12, -0.82, -0.36);
List<Double> y = Arrays.asList(0.08, -0.02, 0.4, 0.03, -0.2, 0.01);
double a = 0.39;
double b = 0.13;
System.out.println("RSSE: "+ lr.rsse(a, b, x, y));
}
}
8.3 — Le gradient de la fonction d’erreur
Afin de minimiser l’erreur, il est maintenant nécessaire de déterminer comment ajuster la pente et l’ordonnée à l’origine de la droite courante.
L’ajustement sera fait dans le sens inverse du gradient.
La fonction d’erreur ayant deux variables, son gradient est calculé comme suit, où $n$ est le nombre de points :
Dans votre fichier linear_regression.py, implémentez une fonction ayant le prototype suivant qui retourne les deux valeurs du gradient.
La fonction implique seulement une boucle sur les points pour mettre à jour les deux composantes du gradient.
Vous pouvez utiliser les valeurs x et y du premier point pour initialiser les deux composantes du gradient.
defgradient_rsse ( slope: float,
intercept: float,
xvals: List[float],
yvals : List[float]
) -> Tuple[float, float]:
"""
Compute the gradient of the RSSE.
In:
* slope: The slope of the current function.
* intercept: The intercept of the current function.
* xvals: x values of the points to fit.
* yvals: y values of the points to fit.
Out:
* The gradient of the RSSE.
"""
Correction
# Needed imports from typing import List, Tuple
defrsse ( a: float,
b: float,
x: List[float],
y: List[float]
) -> float:
"""
Compute the Residual Sum of Squares Error of the line defined by a and b acording to the data x and y.
In:
* a: Slope.
* b: Intercept.
* x: x values of the points.
* y: y values of the points.
Out:
* The computed RSSE.
"""# Compute the RSSE rsse =0.0for i in range(len(x)):
rsse += (y[i] - (a * x[i] + b)) **2return rsse
defgradient_rsse ( slope: float,
intercept: float,
xvals: List[float],
yvals : List[float]
) -> Tuple[float, float]:
"""
Compute the gradient of the RSSE.
In:
* slope: The slope of the current function.
* intercept: The intercept of the current function.
* xvals: x values of the points to fit.
* yvals: y values of the points to fit.
Out:
* The gradient of the RSSE.
"""# Compute the gradient grad_a =0.0 grad_b =0.0for i in range(len(xvals)):
grad_a +=-2* xvals[i] * (yvals[i] - (slope * xvals[i] + intercept))
grad_b +=-2* (yvals[i] - (slope * xvals[i] + intercept))
return grad_a, grad_b
if __name__ =="__main__":
# Test the RSSE function x = [0.11, -0.6, 0.7, -0.12, -0.82, -0.36]
y = [0.08, -0.02, 0.4, 0.03, -0.2, 0.01]
a =0.39 b =0.13 print("RSSE: ", rsse(a, b, x, y))
# Test the gradient_rsse function slope =0.4 intercept =0.2 print("Gradient: ", gradient_rsse(slope, intercept, x, y))
// Needed imports import java.util.List;
import java.util.Arrays;
/**
* This class should appear in a file named "LinearRegression.java".
*/publicclassLinearRegression {
/**
* Compute the Residual Sum of Squares Error (RSSE) of the line defined by a and b according to the data x and y.
*
* @param a Slope.
* @param b Intercept.
* @param x x values of the points.
* @param y y values of the points.
* @return The computed RSSE.
*/publicdoublersse(double a, double b, List<Double> x, List<Double> y) {
// Compute the RSSE double rsse = 0.0;
for (int i = 0; i < x.size(); i++) {
rsse += Math.pow((y.get(i) - (a * x.get(i) + b)), 2);
}
return rsse;
}
/**
* Compute the gradient of the RSSE.
*
* @param slope The slope of the current function.
* @param intercept The intercept of the current function.
* @param xvals x values of the points to fit.
* @param yvals y values of the points to fit.
* @return A pair of gradients (grad_a, grad_b).
*/publicdouble[]gradientRSSE(double slope, double intercept, List<Double> xvals, List<Double> yvals) {
// Compute the gradient double gradA = 0.0;
double gradB = 0.0;
for (int i = 0; i < xvals.size(); i++) {
gradA +=-2 * xvals.get(i) * (yvals.get(i) - (slope * xvals.get(i) + intercept));
gradB +=-2 * (yvals.get(i) - (slope * xvals.get(i) + intercept));
}
returnnewdouble[] {gradA, gradB};
}
}
/**
* To run this code, you need to have Java installed on your computer, then:
* - Create a file named `Main.java` in a directory of your choice.
* - Copy this code in the file.
* - Open a terminal in the directory where the file is located.
* - Run the command `javac Main.java` to compile the code.
* - Run the command `java -ea Main` to execute the compiled code.
* Note: '-ea' is an option to enable assertions in Java.
*/publicclassMain {
/**
* This is the entry point of your program.
* It contains the first codes that are going to be executed.
*
* @param args Command line arguments received.
*/publicstaticvoidmain(String[] args) {
// Test the RSSE function LinearRegression lr =new LinearRegression();
List<Double> x = Arrays.asList(0.11, -0.6, 0.7, -0.12, -0.82, -0.36);
List<Double> y = Arrays.asList(0.08, -0.02, 0.4, 0.03, -0.2, 0.01);
double a = 0.39;
double b = 0.13;
System.out.println("RSSE: "+ lr.rsse(a, b, x, y));
// Test the gradientRSSE function double slope = 0.4;
double intercept = 0.2;
double[] gradients = lr.gradientRSSE(slope, intercept, x, y);
System.out.println("Gradient: grad_a = "+ gradients[0]+", grad_b = "+ gradients[1]);
}
}
8.4 — La descente de gradient
La dernière étape de l’approche est de tirer parti des composantes du gradient pour ajuster la pente et l’ordonnée à l’origine de la droite.
Pour ce faire, nous allons utiliser un algorithme appelé descente de gradient, qui met à jour itérativement les paramètres pour minimiser le gradient d’une fonction.
Ce dernier processus nécessite deux hyper-paramètres, le nombre de tours d’ajustements appelés “epochs” et le “learning rate”, qui décrit la quantité d’ajustements que nous faisons à chaque epoch.
Définissez une fonction appelée gradient_descent qui prend en paramètres :
les x_values des points.
les y_values des points.
la initial_slope dont la valeur par défaut est 0.
l’initial_intercept dont la valeur par défaut est 0.
le learning_rate dont la valeur par défaut est 0.02.
les epochs dont la valeur par défaut est 100.
La fonction retourne la pente et l’ordonnée à l’origine obtenues après epochs tours.
Correction
# Needed imports from typing import List, Tuple
defrsse ( a: float,
b: float,
x: List[float],
y: List[float]
) -> float:
"""
Compute the Residual Sum of Squared Errors of the line defined by a and b acording to the data x and y.
In:
* a: Slope.
* b: Intercept.
* x: x values of the points.
* y: y values of the points.
Out:
* The computed RSSE.
"""# Compute the RSSE rsse =0.0for i in range(len(x)):
rsse += (y[i] - (a * x[i] + b)) **2return rsse
defgradient_rsse ( slope: float,
intercept: float,
xvals: List[float],
yvals : List[float]
) -> Tuple[float, float]:
"""
Compute the gradient of the RSSE.
In:
* slope: The slope of the current function.
* intercept: The intercept of the current function.
* xvals: x values of the points to fit.
* yvals: y values of the points to fit.
Out:
* The gradient of the RSSE.
"""# Compute the gradient grad_a =0.0 grad_b =0.0for i in range(len(xvals)):
grad_a +=-2* xvals[i] * (yvals[i] - (slope * xvals[i] + intercept))
grad_b +=-2* (yvals[i] - (slope * xvals[i] + intercept))
return grad_a, grad_b
defgradient_descent ( x_values: List[float],
y_values: List[float],
initial_slope: float =0,
initial_intercept: float =0,
learning_rate: float =0.02,
epochs: int =100 ) -> Tuple[float, float]:
"""
Perform a gradient descent to fit a line to the data.
In:
* x_values: The x values of the data points.
* y_values: The y values of the data points.
* initial_slope: The initial slope of the line.
* initial_intercept: The initial intercept of the line.
* learning_rate: The learning rate of the gradient descent.
* epochs: The number of epochs to perform.
Out:
* The slope and intercept of the fitted line.
"""# Initialize the slope and intercept slope = initial_slope
intercept = initial_intercept
# Perform the gradient descent for i in range(epochs):
# Compute the gradient grad_a, grad_b = gradient_rsse(slope, intercept, x_values, y_values)
# Update the slope and intercept slope -= learning_rate * grad_a
intercept -= learning_rate * grad_b
return slope, intercept
if __name__ =="__main__":
# Test the RSSE function x = [0.11, -0.6, 0.7, -0.12, -0.82, -0.36]
y = [0.08, -0.02, 0.4, 0.03, -0.2, 0.01]
a =0.39 b =0.13 print("RSSE: ", rsse(a, b, x, y))
# Test the gradient_rsse function slope =0.4 intercept =0.2 print("Gradient: ", gradient_rsse(slope, intercept, x, y))
# Test the gradient_descent function slope, intercept = gradient_descent(x, y)
print("Slope: ", slope)
// Needed imports import java.util.List;
import java.util.Arrays;
/**
* This class should appear in a file named "LinearRegression.java".
*/publicclassLinearRegression {
/**
* Compute the Residual Sum of Squares Error (RSSE) of the line defined by a and b according to the data x and y.
*
* @param a Slope.
* @param b Intercept.
* @param x x values of the points.
* @param y y values of the points.
* @return The computed RSSE.
*/publicdoublersse(double a, double b, List<Double> x, List<Double> y) {
// Compute the RSSE double rsse = 0.0;
for (int i = 0; i < x.size(); i++) {
rsse += Math.pow((y.get(i) - (a * x.get(i) + b)), 2);
}
return rsse;
}
/**
* Compute the gradient of the RSSE.
*
* @param slope The slope of the current function.
* @param intercept The intercept of the current function.
* @param xvals x values of the points to fit.
* @param yvals y values of the points to fit.
* @return A pair of gradients (grad_a, grad_b).
*/publicdouble[]gradientRSSE(double slope, double intercept, List<Double> xvals, List<Double> yvals) {
// Compute the gradient double gradA = 0.0;
double gradB = 0.0;
for (int i = 0; i < xvals.size(); i++) {
gradA +=-2 * xvals.get(i) * (yvals.get(i) - (slope * xvals.get(i) + intercept));
gradB +=-2 * (yvals.get(i) - (slope * xvals.get(i) + intercept));
}
returnnewdouble[] {gradA, gradB};
}
/**
* Perform a gradient descent to fit a line to the data.
*
* @param xValues The x values of the data points.
* @param yValues The y values of the data points.
* @param initialSlope The initial slope of the line.
* @param initialIntercept The initial intercept of the line.
* @param learningRate The learning rate of the gradient descent.
* @param epochs The number of epochs to perform.
* @return The slope and intercept of the fitted line.
*/publicdouble[]gradientDescent(
List<Double> xValues,
List<Double> yValues,
double initialSlope,
double initialIntercept,
double learningRate,
int epochs) {
// Initialize the slope and intercept double slope = initialSlope;
double intercept = initialIntercept;
// Perform the gradient descent for (int i = 0; i < epochs; i++) {
// Compute the gradient double[] gradients = gradientRSSE(slope, intercept, xValues, yValues);
double gradA = gradients[0];
double gradB = gradients[1];
// Update the slope and intercept slope -= learningRate * gradA;
intercept -= learningRate * gradB;
}
returnnewdouble[] {slope, intercept};
}
}
/**
* To run this code, you need to have Java installed on your computer, then:
* - Create a file named `Main.java` in a directory of your choice.
* - Copy this code in the file.
* - Open a terminal in the directory where the file is located.
* - Run the command `javac Main.java` to compile the code.
* - Run the command `java -ea Main` to execute the compiled code.
* Note: '-ea' is an option to enable assertions in Java.
*/publicclassMain {
/**
* This is the entry point of your program.
* It contains the first codes that are going to be executed.
*
* @param args Command line arguments received.
*/publicstaticvoidmain(String[] args) {
// Test the RSSE function LinearRegression lr =new LinearRegression();
List<Double> x = Arrays.asList(0.11, -0.6, 0.7, -0.12, -0.82, -0.36);
List<Double> y = Arrays.asList(0.08, -0.02, 0.4, 0.03, -0.2, 0.01);
double a = 0.39;
double b = 0.13;
System.out.println("RSSE: "+ lr.rsse(a, b, x, y));
// Test the gradientRSSE function double slope = 0.4;
double intercept = 0.2;
double[] gradients = lr.gradientRSSE(slope, intercept, x, y);
System.out.println("Gradient: grad_a = "+ gradients[0]+", grad_b = "+ gradients[1]);
// Test the gradientDescent function double[] result = lr.gradientDescent(x, y, 0, 0, 0.02, 100);
System.out.println("Fitted line: slope = "+ result[0]+", intercept = "+ result[1]);
}
}
Mettez à jour votre fichier data_manipulation.py, et créez une nouvelle fonction pour tracer la droite obtenue.
Vous pouvez enrichir une figure existante en utilisant plt.gca() pour y accéder.
Correction
# Needed imports from typing import List, Tuple, Optional
import numpy as np
import matplotlib.pyplot as plt
defgenerate_data ( nb_points: int =10,
slope: float =0.4,
noise: float =0.2,
min_val: float =-1.0,
max_val: float =1.0,
random_seed: Optional[int] =None ) -> Tuple[List[float], List[float]]:
"""
Generate linearly distributed 2D data with added noise.
This function generates a set of data points (x, y) where x is uniformly distributed between predefined minimum and maximum values.
Value y is calculated as a linear function of x with a specified inclination and an added random noise within a specified range.
In:
* nb_points: The number of data points to generate.
* slope: The slope of the linear function used to generate y values.
* noise: The range within which random noise is added to the y values.
* min_val: The minimum value of the x coordinates.
* max_val: The maximum value of the x coordinates.
* random_seed: The random seed used to generate the points.
Out
* The x coordinates in a first list.
* The y coordinates in a second list.
"""# Set the random seed if random_seed isnotNone:
np.random.seed(random_seed)
# Generate the data xrand = np.random.uniform(min_val, max_val, size=(nb_points,))
delta = np.random.uniform(0, noise, size=(nb_points,))
ymod = slope * xrand + delta
return list(xrand), list(ymod)
defscatter_data ( xvals: List[float],
yvals: List[float]
) ->None:
"""
Plot the data in 2D space.
In:
* x: The x-coordinates of the data points.
* y: The y-coordinates of the data points.
Out:
* None.
"""# Set a margin for a nice plot margin =1.1# Plot the data axis = plt.gca()
axis.set_xlim((min(xvals) * margin, max(xvals) * margin))
axis.set_ylim((min(yvals) * margin, max(yvals) * margin))
plt.scatter(xvals, yvals, color ="firebrick")
defplot_line (a: float, b: float):
"""
Plot a line in the current plot.
In:
* a: The slope of the line.
* b: The intercept of the line.
Out:
* None.
"""# Plot the line ax = plt.gca()
ax.axline((0, b), slope=a, color='C0')
if __name__ =="__main__":
# Test the generate_data and scatter_data functions x, y = generate_data(20, 0.5, 0.2, -1, 1, 42)
scatter_data(x, y)
# Test the plot_line function plot_line(-0.5, 0.0)
# Display the plot plt.show()
// Needed imports import java.util.ArrayList;
import java.util.List;
import java.util.Random;
import org.knowm.xchart.SwingWrapper;
import org.knowm.xchart.XYChart;
import org.knowm.xchart.XYChartBuilder;
/**
* This class should appear in a file named "DataManipulation.java".
*/publicclassDataManipulation {
/**
* Generate linearly distributed 2D data with added noise. This method generates a set of data points (x, y) where x is uniformly distributed between predefined minimum and maximum values.
* Value y is calculated as a linear function of x with a specified inclination and an added random noise within a specified range.
*
* @param nbPoints The number of data points to generate.
* @param slope The slope of the linear function used to generate y values.
* @param noise The range within which random noise is added to the y values.
* @param minVal The minimum value of the x coordinates.
* @param maxVal The maximum value of the x coordinates.
* @param randomSeed The random seed used to generate the points.
* @return A pair of lists: The first list contains the x coordinates, and the second list contains the y coordinates.
*/publicstatic List<List<Double>>generateData(
int nbPoints,
double slope,
double noise,
double minVal,
double maxVal,
Integer randomSeed) {
// Set the random seed Random rand = randomSeed !=null?new Random(randomSeed) : new Random();
// Generate the data List<Double> xVals =new ArrayList<>();
List<Double> yVals =new ArrayList<>();
for (int i = 0; i < nbPoints; i++) {
double x = minVal + rand.nextDouble() * (maxVal - minVal);
double delta = rand.nextDouble() * noise;
double y = slope * x + delta;
xVals.add(x);
yVals.add(y);
}
List<List<Double>> result =new ArrayList<>();
result.add(xVals);
result.add(yVals);
return result;
}
/**
* Plot the data in 2D space.
*
* @param xVals The x-coordinates of the data points.
* @param yVals The y-coordinates of the data points.
*/public XYChart scatterData(List<Double> xVals, List<Double> yVals) {
// Plot the data XYChart chart =new XYChartBuilder()
.width(800)
.height(600)
.title("Scatter Plot")
.xAxisTitle("X")
.yAxisTitle("Y")
.build();
chart.addSeries("Data Points", xVals, yVals);
return chart;
}
/**
* Plot a line in the current plot.
*
* @param a The slope of the line.
* @param b The intercept of the line.
*/publicvoidplotLine(double a, double b, XYChart chart) {
// Generate the x values (start and end points) double xMin = chart.getStyler().getXAxisMin() !=null? chart.getStyler().getXAxisMin() : 0;
double xMax = chart.getStyler().getXAxisMax() !=null? chart.getStyler().getXAxisMax() : 1;
// Calculate corresponding y values double yMin = a * xMin + b;
double yMax = a * xMax + b;
// Add the line to the chart chart.addSeries("Line", newdouble[] {xMin, xMax}, newdouble[] {yMin, yMax}).setMarker(null);
}
}
/**
* To run this code, you need to have Java installed on your computer, then:
* - Create a file named `Main.java` in a directory of your choice.
* - Copy this code in the file.
* - Open a terminal in the directory where the file is located.
* - Run the command `javac Main.java` to compile the code.
* - Run the command `java -ea Main` to execute the compiled code.
* Note: '-ea' is an option to enable assertions in Java.
*/publicclassMain {
/**
* This is the entry point of your program.
* It contains the first codes that are going to be executed.
*
* @param args Command line arguments received.
*/publicstaticvoidmain(String[] args) {
// Test the generateData and scatterData functions DataManipulation dm =new DataManipulation();
List<List<Double>> data = dm.generateData(10, 0.4, 0.2, -1.0, 1.0, 42);
var chart = dm.scatterData(data.get(0), data.get(1));
// Test the plotLine function dm.plotLine(-0.5, 0, chart);
// Display the chart new SwingWrapper<>(chart).displayChart();
}
}
Il est maintenant temps de packager votre application.
Après avoir suivi les tutoriels sur l’organisation du code et la gestion des modules, écrivez un script dans un fichier nommé main.py, qui importera les fonctions nécessaires de data_manipulation.py et linear_regression.py pour :
Créer une liste de points.
Ajuster une régression linéaire sur ces points.
Tracer le résultat.
Les modules requis doivent être installés dans un environnement virtuel.
Correction
# Needed imports from data_manipulation import*from gradient_descent import*# Generate the data x, y = generate_data(nb_points=100, slope=0.5, noise=0.2, random_seed=42)
# Scatter the data scatter_data(x, y)
# Perform the gradient descent slope, intercept = gradient_descent(x, y, learning_rate=0.001, epochs=100)
# Plot the line plot_line(slope, intercept)
# Show the plot plt.show()
// Needed imports import java.util.List;
import org.knowm.xchart.SwingWrapper;
import org.knowm.xchart.XYChart;
/**
* To run this code, you need to have Java installed on your computer, then:
* - Create a file named `Main.java` in a directory of your choice.
* - Copy this code in the file.
* - Open a terminal in the directory where the file is located.
* - Run the command `javac Main.java` to compile the code.
* - Run the command `java -ea Main` to execute the compiled code.
* Note: '-ea' is an option to enable assertions in Java.
*/publicclassMain {
/**
* This is the entry point of your program.
* It contains the first codes that are going to be executed.
*
* @param args Command line arguments received.
*/publicstaticvoidmain(String[] args) {
// Create an instance of DataManipulation DataManipulation dm =new DataManipulation();
// Generate the data List<List<Double>> data = DataManipulation.generateData(100, 0.5, 0.2, -1.0, 1.0, 42);
List<Double> xVals = data.get(0);
List<Double> yVals = data.get(1);
// Scatter the data XYChart chart = dm.scatterData(xVals, yVals);
// Perform the gradient descent double[] result = GradientDescent.gradientDescent(xVals, yVals, 0, 0, 0.001, 100);
double slope = result[0];
double intercept = result[1];
System.out.println("Slope: "+ slope +", Intercept: "+ intercept);
// Plot the line dm.plotLine(slope, intercept, chart);
// Show the plot new SwingWrapper<>(chart).displayChart();
}
}
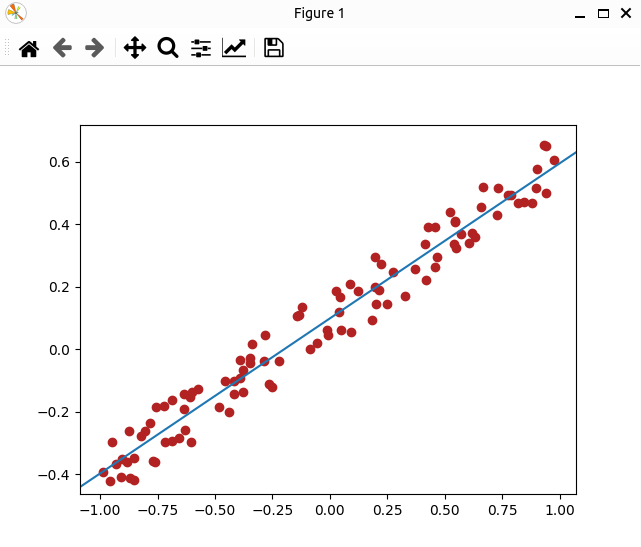
Nous obtenons le résultat suivant :
9 — Optimisez vos solutions
Ce que vous pouvez faire maintenant est d’utiliser des outils d’IA tels que GitHub Copilot ou ChatGPT, soit pour générer la solution, soit pour améliorer la première solution que vous avez proposée !
Essayez de le faire pour tous les exercices ci-dessus, pour voir les différences avec vos solutions.
10 — Utiliser le régressseur linéaire
Continuons l’exercice 8 en introduisant une “séparation train/test”.
La droite retournée par la régression linéaire peut être utilisée pour prédire la valeur y d’autres points en fonction de leur valeur x.
Pour expérimenter et tester le pouvoir prédictif d’une droite inférée, considérons deux ensembles de points, l’un appelé données d’entraînement pour inférer la droite et l’autre appelé données de test pour évaluer la prédiction.
Voici une fonction que vous pouvez utiliser pour diviser naïvement une liste de points en deux listes selon un ratio.
Ajoutez-la à votre module data_manipulation.py.
defsplit_data_train_test ( x: List[float],
y: List[float],
ratio: float =0.8 ) -> Tuple[List[float], List[float], List[float], List[float]]:
"""
Returns the ratio of the data as train points and the remaining points to testing.
In:
* x: The x-coordinates of the data points.
* y: The y-coordinates of the data points.
* ratio: The ratio of the data to use for training.
Out:
* The x values for training.
* The y values for training.
* The x values for testing.
* The y values for testing.
"""# Compute the split index split_index = int(len(x) * ratio)
# Split the data x_train = x[:split_index]
y_train = y[:split_index]
x_test = x[split_index:]
y_test = y[split_index:]
return x_train, y_train, x_test, y_test
// Needed imports import java.util.ArrayList;
import java.util.List;
/**
* This class should appear in a file named "DataManipulation.java".
*/publicclassDataManipulation {
/**
* Split the data into training and testing sets.
*
* @param x The x-coordinates of the data points.
* @param y The y-coordinates of the data points.
* @param ratio The ratio of the data to use for training.
* @return A list containing the x and y values for training and testing.
*/public List<List<Double>>splitDataTrainTest(List<Double> x, List<Double> y, double ratio) {
// Compute the split index int splitIndex = (int) (x.size() * ratio);
// Split the data List<Double> xTrain =new ArrayList<>(x.subList(0, splitIndex));
List<Double> yTrain =new ArrayList<>(y.subList(0, splitIndex));
List<Double> xTest =new ArrayList<>(x.subList(splitIndex, x.size()));
List<Double> yTest =new ArrayList<>(y.subList(splitIndex, y.size()));
// Return the split data as a list of lists List<List<Double>> result =new ArrayList<>();
result.add(xTrain);
result.add(yTrain);
result.add(xTest);
result.add(yTest);
return result;
}
}
Utilisez votre fonction RSSE pour évaluer la qualité de la prédiction, pour 1 000 points et une séparation à 0.8.
Correction
# Needed imports from data_manipulation import*from gradient_descent import*# Generate the data x, y = generate_data(nb_points=1000, slope=0.5, noise=0.2, random_seed=42)
x_train, y_train, x_test, y_test = split_data_train_test(x, y, ratio=0.8)
# Perform the gradient descent slope, intercept = gradient_descent(x_train, y_train, learning_rate=0.001, epochs=100)
# Compute average RSSE on training set average_rsse_train = rsse(slope, intercept, x_train, y_train) / len(x_train)
print("Average RSSE on training set:", average_rsse_train)
# Compute average RSSE on test set average_rsse_test = rsse(slope, intercept, x_test, y_test) / len(x_test)
print("Average RSSE on test set:", average_rsse_test)
// Needed imports import java.util.List;
/**
* To run this code, you need to have Java installed on your computer, then:
* - Create a file named `Main.java` in a directory of your choice.
* - Copy this code in the file.
* - Open a terminal in the directory where the file is located.
* - Run the command `javac Main.java` to compile the code.
* - Run the command `java -ea Main` to execute the compiled code.
* Note: '-ea' is an option to enable assertions in Java.
*/publicclassMain {
/**
* This is the entry point of your program.
* It contains the first codes that are going to be executed.
*
* @param args Command line arguments received.
*/publicstaticvoidmain(String[] args) {
// Create an instance of DataManipulation DataManipulation dm =new DataManipulation();
// Generate the data List<List<Double>> data = DataManipulation.generateData(1000, 0.5, 0.2, -1.0, 1.0, 42);
List<Double> xVals = data.get(0);
List<Double> yVals = data.get(1);
// Split the data into training and testing sets List<List<Double>> splitData = dm.splitDataTrainTest(xVals, yVals, 0.8);
List<Double> xTrain = splitData.get(0);
List<Double> yTrain = splitData.get(1);
List<Double> xTest = splitData.get(2);
List<Double> yTest = splitData.get(3);
// Perform the gradient descent on training data double[] result = GradientDescent.gradientDescent(xTrain, yTrain, 0, 0, 0.001, 100);
double slope = result[0];
double intercept = result[1];
System.out.println("Slope: "+ slope +", Intercept: "+ intercept);
// Compute average RSSE on training set double averageRsseTrain = LinearRegression.rsse(slope, intercept, xTrain, yTrain) / xTrain.size();
System.out.println("Average RSSE on training set: "+ averageRsseTrain);
// Compute average RSSE on test set double averageRsseTest = LinearRegression.rsse(slope, intercept, xTest, yTest) / xTest.size();
System.out.println("Average RSSE on test set: "+ averageRsseTest);
}
}
Pour aller plus loin
12 — Un Space Invaders textuel basique
Pour continuer à expérimenter avec les fonctions, passons à une application moins scientifique en implémentant ce que votre père considérera sûrement comme le meilleur jeu vidéo de tous les temps : Space Invaders (en mode textuel).
L’implémentation du jeu repose sur deux types de structures de données non explicitement vues jusqu’à présent : les listes et les dictionnaires.
Des introductions courtes à ces deux structures de données intégrées sont disponibles ici.
12.1 — Affichage du jeu et interactions clavier
Créez un nouvel espace de travail VSCode qui contiendra votre implémentation du jeu Space Invaders.
Copiez le fichier keyboardcapture.py dans votre espace de travail.
Il fournit une fonction pour capturer certaines touches de votre clavier sans bloquer le reste du jeu.
Les touches utilisées sont :
‘k’ pour déplacer le canon vers la gauche.
’m’ pour déplacer le canon vers la droite.
‘o’ pour tirer
‘q’ pour quitter le jeu.
Puis initiez un fichier nommé spaceinvaders.py avec le contenu suivant, qui affiche simplement le plateau de jeu et exécute la boucle principale.
"""
A homemade simplified version of the Space Invaders game.
"""# Needed imports import os
from typing import List, Dict, Tuple, Any, Optional
import keyboardcapture
from time import sleep
# Constants WIDTH =30HEIGHT =15SLEEP_TIME =0.08LEFT_KEY ="k"RIGHT_KEY ="m"SHOOT_KEY ="o"QUIT_KEY ="q"defdisplay_game ( game: Dict[str, int],
cannon: Dict[str, Any],
aliens: List[Dict[str, Any]]
) ->None :
"""
Function to display the game board.
In:
* game: The game dictionnary, containing the parameters of the game board (life, score, level).
* cannon: The cannon dictionnary, containing the parameters of the player's cannon (pos_x, tir).
* aliens: The aliens list containing the parameters of the aliens (pos_x, pos_y, direction).
Out:
* None.
"""# Clear the screen os.system("clear")
# Display the top info print("+"+"-"* WIDTH +"+", " Left: <"+ LEFT_KEY +">")
print("|"+"SCORE LIFE LEVEL".center(WIDTH, " ") +"|", " Right: <"+ RIGHT_KEY +">")
print("|"+ (str(game["score"]).center(5, " ") +" "+ str(game["life"]).center(4, " ") +" "+ str(game["level"]).center(5, " ")).center(WIDTH, " ") +"|", " Shoot: <"+ SHOOT_KEY +">")
print("+"+"-"* WIDTH +"+", " Quit: <"+ QUIT_KEY +">")
# Scan all the cells of the game board to check what has to be displayeed for i in range(HEIGHT):
print("|", end="")
for j in range(WIDTH):
# Display the cannon where needed if i == HEIGHT -1and cannon["pos_x"] == j:
print("#", end="")
# If there is nothing, we draw a blank cell else:
print(" ", end="")
# Next line print("|")
# Display the top separation line print("+"+"-"* WIDTH +"+")
defstart () ->None:
"""
The main function of the game.
In:
* None.
Out:
* None.
"""# Initialize the game game = {"life": 1, "score": 0, "level": 1}
cannon = {"pos_x": WIDTH //2, "shoot": 1}
aliens = []
# To get the keyboard hit kb = keyboardcapture.KeyboardCapture()
# Main loop of the game current_action =""while current_action != QUIT_KEY:
# Catch the keyboard hit in the list of possible keys current_action = kb.get_char([LEFT_KEY, RIGHT_KEY, SHOOT_KEY, QUIT_KEY])
# Display the current state of the game and sleep for a while display_game(game, cannon, aliens)
sleep(SLEEP_TIME / game["level"])
# Reset the terminal kb.set_normal_term()
# When this script is run directly, execute the following code if __name__ =="__main__":
# Start the game start()
// Not available yet
12.2 — Initialiser et afficher les aliens
Définissez une fonction qui prend en paramètres :
Un paramètre optionnel pour le nombre d’aliens à créer (valeur par défaut 20)
Un paramètre optionnel indiquant le pourcentage de ligne à remplir avec des aliens (valeur par défaut 0.4).
Vous devez créer un dictionnaire pour chaque alien contenant les clés suivantes :
pos_x – Sa position horizontale.
pos_y – Sa position verticale.
direction – Un indicateur indiquant si les aliens se déplacent vers la droite ou vers la gauche.
Notez que tous les aliens se déplacent dans la même direction au début.
Votre fonction doit retourner une liste de tels dictionnaires.
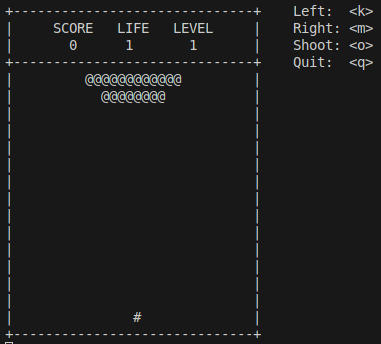
Complétez les fonctions display_game et start pour intégrer les aliens dans le plateau de jeu.
Voici une figure montrant un positionnement possible initial des aliens :
Correction
"""
A homemade simplified version of the Space Invaders game.
"""# Needed imports import os
from typing import List, Dict, Tuple, Any, Optional
import keyboardcapture
from time import sleep
# Constants WIDTH =30HEIGHT =15SLEEP_TIME =0.08LEFT_KEY ="k"RIGHT_KEY ="m"SHOOT_KEY ="o"QUIT_KEY ="q"defdisplay_game ( game: Dict[str, int],
cannon: Dict[str, Any],
aliens: List[Dict[str, Any]]
) ->None:
"""
Function to display the game board.
In:
* game: The game dictionnary, containing the parameters of the game board (life, score, level).
* cannon: The cannon dictionnary, containing the parameters of the player's cannon (pos_x, tir).
* aliens: The aliens list containing the parameters of the aliens (pos_x, pos_y, direction).
Out:
* None.
"""# Clear the screen os.system("clear")
# Display the top info print("+"+"-"* WIDTH +"+", " Left: <"+ LEFT_KEY +">")
print("|"+"SCORE LIFE LEVEL".center(WIDTH, " ") +"|", " Right: <"+ RIGHT_KEY +">")
print("|"+ (str(game["score"]).center(5, " ") +" "+ str(game["life"]).center(4, " ") +" "+ str(game["level"]).center(5, " ")).center(WIDTH, " ") +"|", " Shoot: <"+ SHOOT_KEY +">")
print("+"+"-"* WIDTH +"+", " Quit: <"+ QUIT_KEY +">")
# Scan all the cells of the game board to check what has to be displayeed for i in range(HEIGHT):
print("|", end="")
for j in range(WIDTH):
################################### NEW # Determine if an alien is present at this position alien_present =Falsefor alien in aliens:
if alien["pos_x"] == j and alien["pos_y"] == i:
alien_present =Truebreak################################### /NEW # Display the cannon where needed if i == HEIGHT -1and cannon["pos_x"] == j:
print("#", end="")
################################### NEW # Display the aliens where needed elif alien_present:
print("@", end="")
################################### /NEW # If there is nothing, we draw a blank cell else:
print(" ", end="")
# Next line print("|")
# Display the top separation line print("+"+"-"* WIDTH +"+")
################################### NEW definit_aliens ( nb_aliens: int =20,
ratio_line_filled: float =0.4 ) -> List[Dict[str, Any]]:
"""
Function to initialize the list of the aliens.
In this version, they start on top at the center.
In:
* nb_aliens: The number of aliens.
* ratio_line_filled: The ratio of the line to be filled with aliens.
Out:
* aliens: The list of aliens, each alien being a dictionnary with the parameters (pos_x, pos_y, direction).
"""# Initialize the list of aliens aliens = []
# Determine the number of alien lines full_line_size = int(WIDTH * ratio_line_filled)
nb_full_lines = nb_aliens // full_line_size
final_line = nb_aliens % full_line_size
full_line_margin = (WIDTH - full_line_size) //2 final_line_margin = (WIDTH - final_line) //2# Create the aliens for l in range(nb_full_lines):
for c in range(full_line_size):
aliens.append({"pos_x": full_line_margin + c, "pos_y": l, "direction": "right"})
for c in range(final_line):
aliens.append({"pos_x": final_line_margin + c, "pos_y": nb_full_lines, "direction": "right"})
# Return the list of aliens return aliens
################################### /NEW defstart () ->None:
"""
The main function of the game.
In:
* None.
Out:
* None.
"""# Initialize the game game = {"life": 1, "score": 0, "level": 1}
cannon = {"pos_x": WIDTH //2, "shoot": False}
################################### NEW aliens = init_aliens()
################################### /NEW # To get the keyboard hit kb = keyboardcapture.KeyboardCapture()
# Main loop of the game current_action =""while current_action != QUIT_KEY:
# Catch the keyboard hit in the list of possible keys current_action = kb.get_char([LEFT_KEY, RIGHT_KEY, SHOOT_KEY, QUIT_KEY])
# Display the current state of the game and sleep for a while display_game(game, cannon, aliens)
sleep(SLEEP_TIME / game["level"])
# Reset the terminal kb.set_normal_term()
# When this script is run directly, execute the following code if __name__ =="__main__":
# Start the game start()
// Not available yet
12.3 — Déplacer les aliens et le canon
À chaque tour de boucle, votre canon peut se déplacer selon l’action tapée.
Identifiez des fonctions intéressantes à écrire, puis modifiez la boucle principale pour prendre en compte les déplacements du canon.
Ensuite, comme illustré dans la figure suivante, les aliens se déplacent tous ensemble de gauche à droite.
Lorsqu’un d’entre eux touche la bordure droite, ils descendent tous d’une ligne et se dirigent ensuite vers la gauche.
La clé direction dans le dictionnaire alien indique la direction actuelle.
Correction
"""
A homemade simplified version of the Space Invaders game.
"""# Needed imports import os
from typing import List, Dict, Union, Any, Optional
import keyboardcapture
from time import sleep
# Constants WIDTH =30HEIGHT =15SLEEP_TIME =0.08LEFT_KEY ="k"RIGHT_KEY ="m"SHOOT_KEY ="o"QUIT_KEY ="q"defdisplay_game ( game: Dict[str, int],
cannon: Dict[str, Any],
aliens: List[Dict[str, Any]]
) ->None:
"""
Function to display the game board.
In:
* game: The game dictionary, containing the parameters of the game board (life, score, level).
* cannon: The cannon dictionary, containing the parameters of the player's cannon (pos_x, shoot).
* aliens: The aliens list containing the parameters of the aliens (pos_x, pos_y, direction).
Out:
* None.
"""# Clear the screen os.system("clear")
# Display the top info print("+"+"-"* WIDTH +"+", " Left: <"+ LEFT_KEY +">")
print("|"+"SCORE LIFE LEVEL".center(WIDTH, " ") +"|", " Right: <"+ RIGHT_KEY +">")
print("|"+ (str(game["score"]).center(5, " ") +" "+ str(game["life"]).center(4, " ") +" "+ str(game["level"]).center(5, " ")).center(WIDTH, " ") +"|", " Shoot: <"+ SHOOT_KEY +">")
print("+"+"-"* WIDTH +"+", " Quit: <"+ QUIT_KEY +">")
# Scan all the cells of the game board to check what has to be displayeed for i in range(HEIGHT):
print("|", end="")
for j in range(WIDTH):
# Determine if an alien is present at this position alien_present =Falsefor alien in aliens:
if alien["pos_x"] == j and alien["pos_y"] == i:
alien_present =Truebreak# Display the cannon where needed if i == HEIGHT -1and cannon["pos_x"] == j:
print("#", end="")
# Display the aliens where needed elif alien_present:
print("@", end="")
# If there is nothing, we draw a blank cell else:
print(" ", end="")
# Next line print("|")
# Display the top separation line print("+"+"-"* WIDTH +"+")
definit_aliens ( nb_aliens: int =20,
ratio_line_filled: float =0.4 ) -> List[Dict[str, Any]]:
"""
Function to initialize the list of the aliens.
In this version, they start on top at the center.
In:
* nb_aliens: The number of aliens.
* ratio_line_filled: The ratio of the line to be filled with aliens.
Out:
* aliens: The list of aliens, each alien being a dictionary with the parameters (pos_x, pos_y, direction).
"""# Initialize the list of aliens aliens = []
# Determine the number of alien lines full_line_size = int(WIDTH * ratio_line_filled)
nb_full_lines = nb_aliens // full_line_size
final_line = nb_aliens % full_line_size
full_line_margin = (WIDTH - full_line_size) //2 final_line_margin = (WIDTH - final_line) //2# Create the aliens for l in range(nb_full_lines):
for c in range(full_line_size):
aliens.append({"pos_x": full_line_margin + c, "pos_y": l, "direction": "right"})
for c in range(final_line):
aliens.append({"pos_x": final_line_margin + c, "pos_y": nb_full_lines, "direction": "right"})
# Return the list of aliens return aliens
################################### NEW defmove_cannon ( cannon: Dict[str, Any],
action: str
) ->None:
"""
Function to move the cannon.
This function will update the cannon dictionary directly.
In:
* cannon: The cannon dictionary, containing the parameters of the player's cannon (pos_x, shoot).
* action: The action asked by the player.
Out:
* None.
"""# Move the cannon left if action == LEFT_KEY and cannon["pos_x"] >0:
cannon["pos_x"] -=1# Move the cannon right elif action == RIGHT_KEY and cannon["pos_x"] < WIDTH -1:
cannon["pos_x"] +=1################################### /NEW ################################### NEW defmove_aliens ( aliens: List[Dict[str, Any]]
) ->None:
"""
Function to move the aliens.
This function will update the aliens dictionary directly.
In:
* aliens: The aliens list containing the parameters of the aliens (pos_x, pos_y, direction).
Out:
* None.
"""# If an alien reaches the border, all aliens goes down and changes direction if any([(alien["pos_x"] ==0and alien["direction"] =="left") or (alien["pos_x"] == WIDTH -1and alien["direction"] =="right") for alien in aliens]):
for alien in aliens:
alien["pos_y"] +=1 alien["direction"] ="left"if alien["direction"] =="right"else"right"# Otherwise, all aliens move in their direction else:
for alien in aliens:
alien["pos_x"] +=1if alien["direction"] =="right"else-1################################### /NEW defstart () ->None:
"""
The main function of the game.
In:
* None.
Out:
* None.
"""# Initialize the game game = {"life": 1, "score": 0, "level": 1}
cannon = {"pos_x": WIDTH //2, "shoot": False}
aliens = init_aliens()
# To get the keyboard hit kb = keyboardcapture.KeyboardCapture()
# Main loop of the game current_action =""while current_action != QUIT_KEY:
# Catch the keyboard hit in the list of possible keys current_action = kb.get_char([LEFT_KEY, RIGHT_KEY, SHOOT_KEY, QUIT_KEY])
################################### NEW # Move the cannon and the aliens if current_action in [LEFT_KEY, RIGHT_KEY]:
move_cannon(cannon, current_action)
move_aliens(aliens)
################################### /NEW # Display the current state of the game and sleep for a while display_game(game, cannon, aliens)
sleep(SLEEP_TIME / game["level"])
# Reset the terminal kb.set_normal_term()
# When this script is run directly, execute the following code if __name__ =="__main__":
# Start the game start()
// Not available yet
12.4 — Tirer sur les aliens
Lorsque la touche o est pressée, le canon lance un tir vertical.
Pour prendre en compte cette action, ajoutez une fonction qui vérifie si un alien est touché par ce tir.
Dans ce cas, retirez l’alien de la liste.
La fonction affichant le plateau de jeu doit être mise à jour pour afficher le tir.
Modifiez la condition de continuation de votre boucle principale de jeu pour vérifier que le jeu n’est pas fini (plus d’aliens ou votre canon est détruit par un alien).
Correction
"""
A homemade simplified version of the Space Invaders game.
"""# Needed imports import os
from typing import List, Dict, Union, Any, Optional
import keyboardcapture
from time import sleep
# Constants WIDTH =30HEIGHT =15SLEEP_TIME =0.08LEFT_KEY ="k"RIGHT_KEY ="m"SHOOT_KEY ="o"QUIT_KEY ="q"defdisplay_game ( game: Dict[str, int],
cannon: Dict[str, Any],
aliens: List[Dict[str, Any]]
) ->None:
"""
Function to display the game board.
In:
* game: The game dictionary, containing the parameters of the game board (life, score, level).
* cannon: The cannon dictionary, containing the parameters of the player's cannon (pos_x, tir).
* aliens: The aliens list containing the parameters of the aliens (pos_x, pos_y, direction).
Out:
* None.
"""# Clear the screen os.system("clear")
# Display the top info print("+"+"-"* WIDTH +"+", " Left: <"+ LEFT_KEY +">")
print("|"+"SCORE LIFE LEVEL".center(WIDTH, " ") +"|", " Right: <"+ RIGHT_KEY +">")
print("|"+ (str(game["score"]).center(5, " ") +" "+ str(game["life"]).center(4, " ") +" "+ str(game["level"]).center(5, " ")).center(WIDTH, " ") +"|", " Shoot: <"+ SHOOT_KEY +">")
print("+"+"-"* WIDTH +"+", " Quit: <"+ QUIT_KEY +">")
################################### NEW # Determine if an alien is being shot alien_shot_y =Noneif cannon["fire"]:
aliens_in_column = [al["pos_y"] for al in aliens if al["pos_x"] == cannon["pos_x"]]
if len(aliens_in_column) >0:
alien_shot_y = max(aliens_in_column)
################################### /NEW # Scan all the cells of the game board to check what has to be displayeed for i in range(HEIGHT):
print("|", end="")
for j in range(WIDTH):
# Determine if an alien is present at this position alien_present =Falsefor alien in aliens:
if alien["pos_x"] == j and alien["pos_y"] == i:
alien_present =Truebreak# Display the cannon where needed if i == HEIGHT -1and cannon["pos_x"] == j:
print("#", end="")
################################### NEW # Display the aliens where needed elif alien_present:
if i == alien_shot_y and j == cannon["pos_x"]:
print("*", end="")
else:
print("@", end="")
# Display the cannon fire where needed elif cannon["fire"] and cannon["pos_x"] == j and (alien_shot_y if alien_shot_y isnotNoneelse-1) < i < HEIGHT -1:
print(":", end="")
################################### /NEW # If there is nothing, we draw a blank cell else:
print(" ", end="")
# Next line print("|")
# Display the top separation line print("+"+"-"* WIDTH +"+")
definit_aliens ( nb_aliens: int =20,
ratio_line_filled: float =0.4 ) -> List[Dict[str, int]]:
"""
Function to initialize the list of the aliens.
In this version, they start on top at the center.
In:
* nb_aliens: The number of aliens.
* ratio_line_filled: The ratio of the line to be filled with aliens.
Out:
* aliens: The list of aliens, each alien being a dictionary with the parameters (pos_x, pos_y, direction).
"""# Initialize the list of aliens aliens = []
# Determine the number of alien lines full_line_size = int(WIDTH * ratio_line_filled)
nb_full_lines = nb_aliens // full_line_size
final_line = nb_aliens % full_line_size
full_line_margin = (WIDTH - full_line_size) //2 final_line_margin = (WIDTH - final_line) //2# Create the aliens for l in range(nb_full_lines):
for c in range(full_line_size):
aliens.append({"pos_x": full_line_margin + c, "pos_y": l, "direction": "right"})
for c in range(final_line):
aliens.append({"pos_x": final_line_margin + c, "pos_y": nb_full_lines, "direction": "right"})
# Return the list of aliens return aliens
defmove_cannon ( cannon: Dict[str, int],
action: str
) ->None:
"""
Function to move the cannon.
This function will update the cannon dictionary directly.
In:
* cannon: The cannon dictionary, containing the parameters of the player's cannon (pos_x, fire).
* action: The action asked by the player.
Out:
* None.
"""# Move the cannon left if action == LEFT_KEY and cannon["pos_x"] >0:
cannon["pos_x"] -=1# Move the cannon right elif action == RIGHT_KEY and cannon["pos_x"] < WIDTH -1:
cannon["pos_x"] +=1defmove_aliens ( aliens: List[Dict[str, Any]]
) ->None:
"""
Function to move the aliens.
This function will update the aliens dictionary directly.
In:
* aliens: The aliens list containing the parameters of the aliens (pos_x, pos_y, direction).
Out:
* None.
"""# If an alien reaches the border, all aliens goes down and changes direction if any([(alien["pos_x"] ==0and alien["direction"] =="left") or (alien["pos_x"] == WIDTH -1and alien["direction"] =="right") for alien in aliens]):
for alien in aliens:
alien["pos_y"] +=1 alien["direction"] ="left"if alien["direction"] =="right"else"right"# Otherwise, all aliens move in their direction else:
for alien in aliens:
alien["pos_x"] +=1if alien["direction"] =="right"else-1################################### NEW defcheck_alien_shot ( cannon: Dict[str, Any],
aliens: List[Dict[str, Any]],
game: Dict[str, int]
) ->None:
"""
Function to check if an alien was shot by the cannon.
This function will update the game dictionary directly.
Any alien shot will be removed from the aliens list.
The aliens list will be updated directly.
In:
* cannon: The cannon dictionary, containing the parameters of the player's cannon (pos_x, fire).
* aliens: The aliens list containing the parameters of the aliens (pos_x, pos_y, direction).
* game: The game dictionary, containing the parameters of the game board (life, score, level).
Out:
* None.
"""# If the alien was shot, we remove it and increase the score if cannon["fire"]:
for alien in aliens:
if alien["pos_x"] == cannon["pos_x"] and alien["pos_y"] == max([al["pos_y"] for al in aliens if al["pos_x"] == cannon["pos_x"]]):
game["score"] +=1 aliens.remove(alien)
################################### /NEW ################################### NEW defgame_is_over ( cannon: Dict[str, Any],
aliens: List[Dict[str, Any]]
) -> Union[bool, Optional[str]]:
"""
Function to check if the game is finished.
The game is finished if all the aliens are dead or if they reach the cannon.
In:
* cannon: The cannon dictionary, containing the parameters of the player's cannon (pos_x, fire).
* aliens: The aliens list containing the parameters of the aliens (pos_x, pos_y, direction).
Out:
* over: A boolean indicating if the game is finished.
* winner: A string indicating if the player or the aliens won.
"""# The game is finished if all the aliens are dead or if they reach the cannon all_aliens_dead = len(aliens) ==0 player_dead = any([alien["pos_x"] == cannon["pos_x"] and alien["pos_y"] == HEIGHT -1for alien in aliens])
# Return the result if all_aliens_dead:
returnTrue, "player"elif player_dead:
returnTrue, "aliens"else:
returnFalse, None################################### /NEW defstart () ->None:
"""
The main function of the game.
In:
* None.
Out:
* None.
"""# Initialize the game game = {"life": 1, "score": 0, "level": 1}
cannon = {"pos_x": WIDTH //2, "shoot": False}
aliens = init_aliens()
# To get the keyboard hit kb = keyboardcapture.KeyboardCapture()
# Main loop of the game current_action =""################################### NEW over, winner =False, Nonewhile current_action != QUIT_KEY andnot over:
################################### /NEW # Catch the keyboard hit in the list of possible keys current_action = kb.get_char([LEFT_KEY, RIGHT_KEY, SHOOT_KEY, QUIT_KEY])
################################### NEW # Check if the player shot an alien if current_action == SHOOT_KEY:
cannon["fire"] =Trueelse:
cannon["fire"] =False################################### /NEW # Move the cannon and the aliens if current_action in [LEFT_KEY, RIGHT_KEY]:
move_cannon(cannon, current_action)
move_aliens(aliens)
# Display the current state of the game and sleep for a while display_game(game, cannon, aliens)
sleep(SLEEP_TIME / game["level"])
################################### NEW # Check if an alien was shot and if the game is over check_alien_shot(cannon, aliens, game)
over, winner = game_is_over(cannon, aliens)
################################### /NEW # Reset the terminal kb.set_normal_term()
################################### NEW # Display the final state and the winner display_game(game, cannon, aliens)
if winner =="player":
print("You won!")
elif winner =="aliens":
print("You lost!")
################################### /NEW # When this script is run directly, execute the following code if __name__ =="__main__":
# Start the game start()
// Not available yet
12.5 — Améliorez votre jeu
Amusez-vous à étendre votre jeu avec les fonctionnalités suivantes, par exemple :
Jouer jusqu’à ce que votre compteur de vie soit à 0.
Considérer que des tirs spéciaux peuvent tomber du ciel et faire détruire une colonne entière d’aliens.
Ajouter des aliens spéciaux qui ne meurent qu’après avoir reçu plusieurs tirs.
…
Pour aller plus loin
Revenons à votre régressseur linéaire pour ces deux exercices supplémentaires.
13 — Changer la génération des données pour le jeu de test
Il serait intéressant d’évaluer la qualité de votre régressseur linéaire lorsque le jeu de test a une distribution statistique différente de celle du jeu d’entraînement.
Jusqu’à quelle différence est-il robuste ?
C’est un problème régulier en apprentissage automatique, car les données d’entraînement disponibles peuvent parfois être différentes de celles pour lesquelles on souhaite utiliser le modèle.
14 — Adapter le modèle
Pour résoudre le problème ci-dessus, on peut essayer d’utiliser un petit jeu de données disponible avec la même distribution que le jeu de test (qui est en général inconnu lors de l’entraînement du modèle).
Supposons que vous avez :
Un jeu d’entraînement de 800 points avec une pente donnée.
Un jeu de test de 200 points avec une pente (légèrement) différente de celle du jeu d’entraînement.
Un jeu d’adaptation de 50 points avec la même pente que le jeu de test.
Entraînez un régressseur linéaire sur le jeu d’entraînement, puis effectuez quelques epochs sur le jeu d’adaptation pour adapter le régressseur.
Quels résultats obtenez-vous sur le jeu de test ?
Est-ce mieux que le modèle non adapté ?