Practical activity
Duration3h45Presentation & objectives
This practical activity is quite long, and will mainly consist in three parts. Each part should last approximately a third of the total duration of this activity. However, some parts may be longer than others, so do not hesitate to start the next part if you are done with the current one!
This practical activity can be seen as a tutorial, that will ask you to run commands from time to time, either to visualize behaviors, or to install elements. Please reproduce the provided examples, and install all presented elements.
First, you will learn how to write a simple program in a text editor, and to run it through the terminal using the Python interpreter. It will help you understand what is going on in the background when you press the “run” button in the editor you have probably been using so far. Also, you will learn how to install libraries for Python, that will provide useful functions for particular purposes.
Then, you will shift toward more modern solutions, and will install an integrated development environment (IDE). This tool is a central tool for programmers, as it allows you to write, execute and debug programs, with a lot of facilities.
Finally, you will install a few extensions to that IDE. In particular, you will install some that help you work in groups, and some that integrate artificial intelligence (AI) tools to help you write code.
Activity contents (part 1)
1 — Setting up Python
1.1 — What is the Python interpreter?
Let’s first install on your machine the required software to code and execute programs written using Python language.
Python is a computer language that allows you to write programs, i.e., a crafted list of instructions to be executed by the computer to perform the task you want.
However, the computer processor basically understand series of 0 and 1. A Python interpreter makes the translation between your instructions that respect Python syntax and the processor which requires series of 0 and 1. This is obviously a very crude shortcut as several steps may be required to feed the processor (through bytecode for instance). However, the main feature of an interpreter is that it translates one statement at a time for the computer processor.
With an interpreter, there is no need to translate the full source code and produce the complete binary code for the program prior to launch the execution. That would be the role of a compiler. Languages such as C or C++ require a compiler. Other languages, such as Java stand in the middle of these two solutions, by compiling Java code to an intermediate representation (bytecode), that is then interpreted.
To work with Python language, you need to install such an interpreter able to translate and execute the lines of text you will write using Python syntax.
1.2 — Do you already have a Python interpreter on your machine?
To check whether you already have a Python interpreter on your machine, open a terminal and type:
python --versionpython --versionpython3 --versionpython3 --versionThe output should look like this:
Python 3.10.2Python 3.10.2Python 3.10.2Python 3.10.2If you have that, then you have a version of Python 3 installed. It would be a good idea to check if it is a recent one (at least 3.12), or if you have an old version. If you have an old version, you will have to upgrade it (see below).
If, on the contrary, you get a message indicating the command is unknown, you’ll have to install Python (see below).
Quoting About Python version, Python versions are numbered “A.B.C” or “A.B” where:
- A is the major version number – It is only incremented for really major changes in the language.
- B is the minor version number – It is incremented for less earth-shattering changes.
- C is the micro version number – It is incremented for each bugfix release.
Unlike SemVer, every so-called “minor version” of Python may then include breaking changes. These backward-incompatible changes are usually documented in the “What’s New” page for each version (e.g., the one for 3.12.4 and more precisely in the changelog page which lists new or upgraded functions or syntax, but also deprecated ones compared to previous versions).
Usually, if not indicated otherwise, A.B1 (newer) is backward-compatible with A.B2 (older) when B1 > B2.
1.3 — Install or upgrade the Python interpreter
To install or upgrade Python, your reference point is the Python official website.
Always install software from the official websites!
There are several websites that will let you download a software you’re looking for. Some will make you pay for some software you may find for free elsewhere (some licenses allow it). But most of all, there is a high security risk to install software from non-trusted sources.
You may wonder if it is always best to have the latest version of a software. Here are some questions to think about before upgrading your interpreter:
-
Sometimes, the choice is not yours: for instance, your client may have some constraints that you may comply with (your program will probably not run alone but within an existing system having a specific environment).
-
It is also a matter of balance between breaking existing software to take into account new functionalitites or bug corrections, security issues, etc. Indeed, you have to be sure to be able to repare the broken software.
-
Some checks must be performed: does my program use packages or have dependencies (libraries) that are not compatible (bugs) with the latest version? Have I checked the user feedbacks about a specific version? Do the release pages mention potential problems?
For now, consider that any version above 3.12 should satisfy your needs. If some courses ask you for an upgrade later in your scholarship, you may have to upgrade your interpreter then.
When writing some code, keep track of the software version you rely on. Knowing the version of the interpreter you are using is important to ensure any user will be able to make it work. It should appear when documenting your software, along with the versions of the librairies or packages that your software requires.
The procedure to install or upgrade Python is different depending on your system:
Visit the Python Releases for Windows section on Python’s official website to find the desired version of Python.
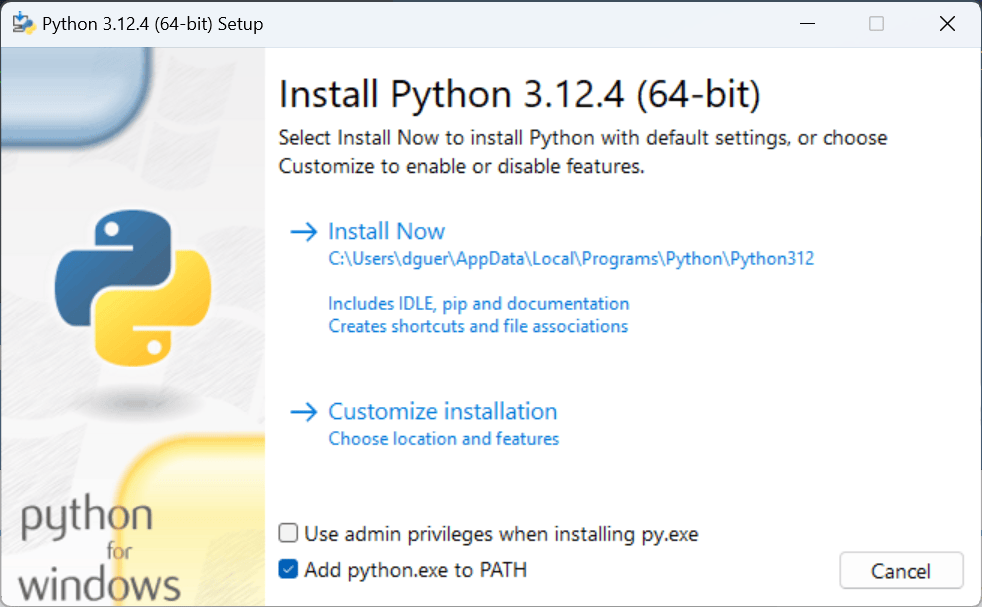
Click the Download Python link to download the installation file for the version you want (choose the latest). Match the targetted architecture of the installer with your architecture (normally, the 64-bit installer should be ok). Then, run the downloaded installer. If you’re upgrading from an existing Python 3.x installation, the installer will allow you to install the newer version alongside the older one.
During the installation process, ensure that the “Add Python to PATH” option is checked, so the new version is available in your system’s PATH.
Check installation
To verify your installation/upgrade, open a new terminal or command prompt and type the following command to verify that Python has been updated successfully:
python --versionpython --versionThe apt package manager is an essential tool for managing software on Ubuntu and other Debian-based distributions.
If you work with a different distribution, you should have a package manager too, but with a different name.
But, well, let’s be honest, if that is the case you probably already know how to install Python :)
First, open a terminal, and update the package list by running the following command:
sudo apt updateInstall the Python package by executing the following command:
sudo apt install python3This command will install Python to the default version in your distribution’s package manager, which might be slightly behind the official release but is considered stable.
Check installation
To verify your installation/upgrade, open a new terminal and type the following command to verify that Python has been updated successfully:
python3 --versionTwo methods are possible to install or update Python: using the official Python.org installer or using Homebrew. Homebrew is a popular package manager for MacOS that can simplify your Python upgrading process. Follow the procedure of your choice:
Using the Python installer
Visit the Python.org website. Put your mouse cursor on the “Downloads” menu, the page may directly propose you install the latest version.
Alternately, navigate to the Downloads section where you can click:
- On the “Latest Python 3 Release” link to see the release notes for the latest version.
- On the “Download macOS 64-bit universal2 installer” link to download the installer for the most recent version.
Once the download is complete, open the installer and follow the prompts to start the installation process. Throughout the installation, ensure that you select the “Add Python to PATH” option to update your system’s PATH environment variable.
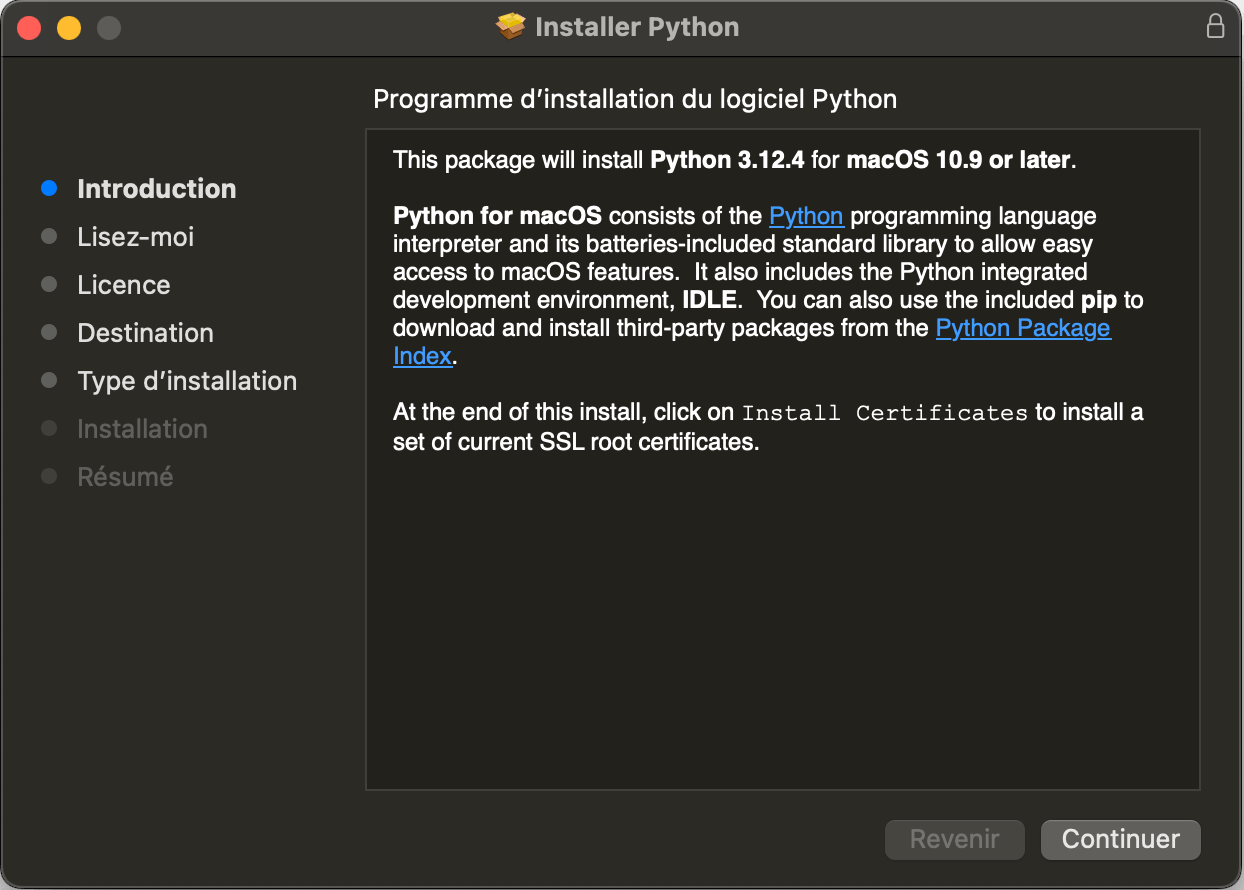
remplacer cette capture par le moment où on voit le “add to path”
Using Homebrew
First, ensure that Homebrew is installed on your computer. If not, you can install it by following the instructions on the Homebrew website.
Open a terminal window and update Homebrew by running the following command:
brew updateNow, to install the latest version of Python. You can type the following command to download and install the most recent Python version:
brew install python3If you have already installed Python using Homebrew, you can use the alternative command
brew upgrade python3Check installation
Whatever choice you made, to verify your installation/upgrade, open a new terminal and type the following command to verify that Python has been updated successfully:
python3 --versionDo not install Python 2.x! During the course, you will use the version 3 of the Python language which is not backward compatible with Python 2.
Version 2 is proposed only for backward compatibility of some old Python program, and should not be used anymore for any new program.
“Update” or “upgrade”? We used these two words interchangeably, but there is a big difference between updating a software or upgrading a software.
A software update is typically a release containing enhancements to the current version (e.g., security patches for dealing with newly discovered vulnerabilities, performances improvments, bugs correction).
An upgrade is a whole new version of software that represents a significant change or major improvement (e.g., new major functionnalities).
2 — Using the Python interpreter to execute some Python code
2.1 — A first Python program
The goal is to check if your Python interpreter is working correctly. Your first program will be the traditional one that prints “Hello World!” on screen.
In Python, one line of code is enough to do that. We also provide the Java equivalent for later in your scholarship.
# Print a string to the shell
print("Hello World!")
/**
* To run this code, you need to have Java installed on your computer, then:
* - Create a file named `Main.java` in a directory of your choice.
* - Copy this code in the file.
* - Open a terminal in the directory where the file is located.
* - Run the command `javac Main.java` to compile the code.
* - Run the command `java -ea Main` to execute the compiled code.
* Note: '-ea' is an option to enable assertions in Java.
*/
public class Main {
/**
* This is the entry point of your program.
* It contains the first codes that are going to be executed.
*
* @param args Command line arguments received.
*/
public static void main(String[] args) {
// Print a string to the shell
System.out.println("Hello World!");
}
}As you installed an interpreter, there are two ways to execute this code:
- Through an interactive session.
- Writing and running a script.
2.2 — Working in an interactive session
The first way to work with Python is through an interactive session. To get an interactive session started, just open a terminal and simply type the following command, then hit the “Enter” key.
pythonpythonpython3python3The prompt in the terminal may change to >>> indicating the Python interpreter is waiting for your instructions.
Indeed, when you’re in an interactive session, every Python statement is executed immediately and any output is displayed directly beneath.
Thus type the following code:
print("Hello World!")Then, hit the “Enter” key, and you should see the following result:
Hello World!You can go on typing any Python code you want. For instance, consider the following Python code that simply reverses a string.
# The string to manipulate
s = "IMT Atlantique"
print(s)

# Loop to append to a new string
result = ""
for i in range(len(s)):
    result = s[i] + result

# Print the result
print("Reversed string:", result)
/**
* To run this code, you need to have Java installed on your computer, then:
* - Create a file named `Main.java` in a directory of your choice.
* - Copy this code in the file.
* - Open a terminal in the directory where the file is located.
* - Run the command `javac Main.java` to compile the code.
* - Run the command `java -ea Main` to execute the compiled code.
* Note: '-ea' is an option to enable assertions in Java.
*/
public class Main {
/**
* This is the entry point of your program.
* It contains the first codes that are going to be executed.
*
* @param args Command line arguments received.
*/
public static void main(String[] args) {
// The string to manipulate
String s = "IMT Atlantique";
System.out.println(s);
// Loop to append to a new string
String result = "";
for (int i = 0; i < s.length(); i++) {
result = s.charAt(i) + result;
}
// Print the result
System.out.println("Reversed string: " + result);
}
}In the interactive Python interpreter, run statement by statement the code above. What does the output look like?
To exit the interactive session, type quit() or exit(), and hit the “Enter” key.
2.3 — Using a Python script
A more efficient way to use the interpreter is to put all your statements in a text file (a script file) and ask the Python interpreter to read and execute every line of the file.
Usually, Python scripts have the .py extension.
Sometimes, you will encounter files that contain Python instructions with a .ipynb extension.
You will encounter such files in the project.
These are “notebooks”, and they are meant to be read with a software called Jupyter.
Notebooks allow to interlace Python codes and Markdown cells, to provide a nice visualization of a script.
Also, outputs of Python commands such as print (or produced figures with tools such as matplotlib) appear inline.
This makes it a practical format for tutorials for instance.
To write a Python script with a file, open a basic text editor from your desktop GUI.
Use the “Notepad” application for instance.
Use the “Gedit” application for instance.
Use the “TextEdit” application for instance.
In that case, once opened, go to the Format menu and choose the “Convert to Text format” prior to type anything. The Rich Text Format (RTF) is not wanted.
Rich tools such as Microsoft Word, LibreOffice or Pages will not work for that. They will not produce simple text files, but will enrich the text with a lot of meta-information that cannot be interpreted by the Python interpreter.
Then, write print("Hello World!") in the file, and save this text file as hello_world.py to the location of your choice.
To keep things organized, you may want to create a specific folder to store this script and the next ones.
For instance, in something like <docs>/IMT/computer_science/s5/env/session_2/, where <docs> represents the directory where you store your documents.
To execute the script:
-
Open a terminal (or use one already opened).
-
Navigate to the directory where you saved your Python file. For instance (change
<docs>to the needed directory):cd <docs>\IMT\computer_science\s5\env\session_2\cd <docs>\IMT\computer_science\s5\env\session_2\cd <docs>/IMT/computer_science/s5/env/session_2/cd <docs>/IMT/computer_science/s5/env/session_2/You can check that you are in the correct directory by running:
echo %cd%Get-Locationpwdpwd -
Launch the Python interpreter on the
hello_world.pyfile by typing the following command:python hello_world.pypython hello_world.pypython3 hello_world.pypython3 hello_world.py -
You should see the same result as before:
OutputHello World!Hello World!Hello World!Hello World!
As an exercise, create a new file and paste the code we gave you earlier to reverse a string in it. Then, run the entire file using the Python executable. What does the output look like?
2.4 — Running a Python script with arguments
Writing a script in a file also has the advantage to allow you to pass arguments to the script. This is very practical if you want to create a script that can easily be used with various inputs.
When learning to manipulate a terminal, you have already encountered these arguments. For instance, when running the following command:
dir docsGet-ChildItem docsls docsls docsYou are giving the argument docs to the command ls/dir/Get-ChildItem .
Therefore, you are asking to list the contents of the directory docs in the current working directory of the terminal.
In Python, you can access the arguments provided to the Python script using the sys.argv variable.
Let’s update the “Hello World!” program to illustrate that.
Open your hello_world.py file, and update its contents as follows:
# Needed imports
import sys

# Check if argument is provided
# The list sys.argv contains:
# - The name of the script ("hello_world.py" in our case), in sys.argv[0].
# - The arguments (if provided), in sys.argv[1:].
if len(sys.argv) <= 1:
    print("Please provide a name!")
    sys.exit(1)

# Print a string to the shell
print("Hello %s!" % sys.argv[1])
/**
* To run this code, you need to have Java installed on your computer, then:
* - Create a file named `Main.java` in a directory of your choice.
* - Copy this code in the file.
* - Open a terminal in the directory where the file is located.
* - Run the command `javac Main.java` to compile the code.
* - Run the command `java -ea Main` to execute the compiled code.
* Note: '-ea' is an option to enable assertions in Java.
*/
public class Main {
/**
* This is the entry point of your program.
* It contains the first codes that are going to be executed.
*
* @param args Command line arguments received.
*/
public static void main(String[] args) {
// Check if argument is provided
if (args.length <= 0) {
System.out.println("Please provide a name!");
System.exit(1);
}
// Print a string to the shell
System.out.println("Hello " + args[0] + "!");
}
}Then, execute your script from the terminal three times as follows:
python hello_world.py
python hello_world.py World
python hello_world.py "my friend"
python hello_world.py
python hello_world.py World
python hello_world.py "my friend"python3 hello_world.py
python3 hello_world.py World
python3 hello_world.py "my friend"python3 hello_world.py
python3 hello_world.py World
python3 hello_world.py "my friend"The output should look like this:
Please provide a name!
Hello World!
Hello my friend!
Please provide a name!
Hello World!
Hello my friend!Please provide a name!
Hello World!
Hello my friend!Please provide a name!
Hello World!
Hello my friend!Additionally, you may have already encountered some named arguments starting with a - or a -- when running commands.
For instance, check the following command:
dir /O-D /T:W docsGet-ChildItem docs | Sort-Object LastWriteTime -Descendingls -l --sort time docsls -t -l docsThis syntax allows to add named arguments to the script you are running. Let’s have a look at the Linux tab, which is the closest to what you can do in Python:
- Option
-lindicates thatlscommand should give the long name of listed files. - Option
--sort timeindicates that listed files should be sorted by creation time. - The command ends with the argument
docsas before.
With a Python script, you can create similar named arguments.
To do so, you need the argparse library:
# Needed imports
import argparse
import datetime

# Initialize parser
parser = argparse.ArgumentParser(formatter_class=argparse.ArgumentDefaultsHelpFormatter)

# Add options
parser.add_argument("-d", "--date", default=False, action="store_true", help="Prints the date")
parser.add_argument("-n", "--name", type=str, default="World", help="Customize the name to print")

# Parse the arguments
args = parser.parse_args()
config = vars(args)

# Print a string to the shell
# Here we use a syntactic sugar of Python
# The first line below is equivalent to the following lines:
# date_str = ""
# if config["date"]:
#     date_str = " Today is %s" % datetime.datetime.now().strftime("%Y-%m-%d")
date_str = (" Today is %s" % datetime.datetime.now().strftime("%Y-%m-%d")) if config["date"] else ""
print("Hello %s!%s" % (config["name"], date_str))
// Needed imports
import java.time.LocalDate;
import java.time.format.DateTimeFormatter;
import java.util.HashMap;
import java.util.Map;
/**
* To run this code, you need to have Java installed on your computer, then:
* - Create a file named `Main.java` in a directory of your choice.
* - Copy this code in the file.
* - Open a terminal in the directory where the file is located.
* - Run the command `javac Main.java` to compile the code.
* - Run the command `java -ea Main` to execute the compiled code.
* Note: '-ea' is an option to enable assertions in Java.
*/
public class Main {
/**
* This is the entry point of your program.
* It contains the first codes that are going to be executed.
*
* @param args Command line arguments received.
*/
public static void main(String[] args) {
// Initialize parser
Map<String, String> config = new HashMap<>();
boolean showDate = false;
String name = "World";
// Add options
for (int i = 0; i < args.length; i++) {
switch (args[i]) {
case "-d":
case "--date":
showDate = true;
break;
case "-n":
case "--name":
if (i + 1 < args.length) {
name = args[i + 1];
i++;
} else {
System.out.println("Error: No name provided with the --name option");
System.exit(1);
}
break;
default:
System.out.println("Unknown option: " + args[i]);
System.exit(1);
}
}
config.put("name", name);
config.put("date", String.valueOf(showDate));
// Print a string to the shell
String dateStr = showDate ? " Today is " + LocalDate.now().format(DateTimeFormatter.ofPattern("yyyy-MM-dd")) : "";
System.out.println("Hello " + config.get("name") + "!" + dateStr);
}
}Then, execute your script from the terminal few times as follows:
python hello_world.py
python hello_world.py -n "my friend"
python hello_world.py --name "my friend"
python hello_world.py -d
python hello_world.py --date
python hello_world.py -d -n "my friend"
python hello_world.py
python hello_world.py -n "my friend"
python hello_world.py --name "my friend"
python hello_world.py -d
python hello_world.py --date
python hello_world.py -d -n "my friend"python3 hello_world.py
python3 hello_world.py -n "my friend"
python3 hello_world.py --name "my friend"
python3 hello_world.py -d
python3 hello_world.py --date
python3 hello_world.py -d -n "my friend"python3 hello_world.py
python3 hello_world.py -n "my friend"
python3 hello_world.py --name "my friend"
python3 hello_world.py -d
python3 hello_world.py --date
python3 hello_world.py -d -n "my friend"The output should look like this:
Hello World!
Hello my friend!
Hello my friend!
Hello World! Today is 2024-08-12
Hello World! Today is 2024-08-12
Hello my friend! Today is 2024-08-12
Hello World!
Hello my friend!
Hello my friend!
Hello World! Today is 2024-08-12
Hello World! Today is 2024-08-12
Hello my friend! Today is 2024-08-12Hello World!
Hello my friend!
Hello my friend!
Hello World! Today is 2024-08-12
Hello World! Today is 2024-08-12
Hello my friend! Today is 2024-08-12Hello World!
Hello my friend!
Hello my friend!
Hello World! Today is 2024-08-12
Hello World! Today is 2024-08-12
Hello my friend! Today is 2024-08-12In the previous examples, the first line of the script import X (X being sys or argparse) indicates that the module X will be used.
A module is a collection of variables, functions, etc. that serve a particular purpose.
Some are made for system interation, arguments parsing, but also mathematical computations, signal processing, artificial intelligence, etc.
We will talk about it more later in programming session 2.
Note that you can combine arguments passed through argparse and arguments passed through sys.argv.
Activity contents (part 2)
3 — The integrated development environment (IDE)
An integrated development environment or IDE is a software application that helps programmers develop software code efficiently. It increases developer productivity by combining capabilities such as software editing, building, testing, and packaging in an easy-to-use application. Just as writers use text editors and accountants use spreadsheets, software developers use IDEs to make their job easier.
An IDE (Integrated Development Environment) will gather the functionnalities of all the tools we already saw (editor, interpreter) and new ones (debugger) into a common place. The IDE will help you with low-level repetitive tasks, assuming you configured it correctly. Help ranges from syntax highlighting to automatic production of one executable or launching some execution from your sources.
While providing help and new tools to developers, an IDE relies on already installed tools such as compilers, interpreters, debuggers, etc. An IDE is then a powerful aggregator of installed tools, often providing a graphical user interface to interact with these tools. If you do not install a Python interpreter, an IDE for developing Python programs will be useless, unless it installs one during its own installation procedure.
3.1 — What is an IDE used for?
You can use any text editor to write code. However, most integrated development environments (IDEs) include functionality that goes beyond text editing. They provide a central interface for common developer tools, making the software development process much more efficient. Developers can start programming new applications quickly instead of manually integrating and configuring different software. They also don’t have to learn about all the tools and can instead focus on just one application. The following are some reasons why developers use IDEs:
-
Code editing automation – An IDE can help the developer to write code, complying the targetted computer language syntax and rules.
-
Syntax highlighting – An IDE can format the code using different colors or fonts to help you read it. This helps to quickly find syntax errors and better grasp the meaning of the code.
-
Intelligent code completion – an IDE can make suggestions to complete a code statement when the developer begins typing.
-
AI support – An IDE can help using AI code generation to create code based on a user’s conversational prompt.
-
Refactoring support – An IDE can help to some extent, the developer refactoring the code, i.e., restructuring the source code to make it more efficient and readable without changing its core functionality.
-
Local build automation – An IDE can perform repeatable development tasks that are typically part of every code change (e.g., compilation, testing).
-
Debugging – An IDE can help the developer to step through the code, line by line, as it runs and inspect code behavior.
-
Collaborative support – An IDE can help the developer working with other persons (developer, designer…) on a same software (live co-edition, sharing piece of code, sharing a common repository using built-in version control systems…)
3.2 — How to choose an IDE?
Many IDEs exist on the market with a range of features and different prices. Many IDEs are open source, or free to use and configure.
Here some criteria to consider when choosing an IDE:
-
Programing language – Some IDEs may focus on specific computer languages and provide help accordingly.
-
Operating system – Some IDEs may target specific systems (Windows, MacOS, Linux) or be avalaible on several systems.
-
Performance – Depending on the technology on which an IDE is based on, performances like memory or disk consumption, UI reactivity, etc. may vary.
-
Automation features – While some features are proposed by all IDEs (e.g., source code editor, build automation, debugger), additionnal features may be useful too. What do you need to help you develop?
-
Customization – Some IDEs include the ability to customize workflows to match a developer’s needs and preferences, through plugins, extensions or add-ons. Does an IDE ecosystem active or rich enough to provide you with what you need?
-
The IDE “life” – Are software updates frequent? For what reason (e.g., bugs, security patches, new functionnalities)? Is there an active community (e.g., official blogs, up-to-date documentation)?
This table lists some free IDEs (it is not a comprehensive list):
Name |
Distributor |
Free access |
Systems |
Languages |
|---|---|---|---|---|
| Visual Studio Code | Microsoft | Open source | Windows Linux MacOS |
Most |
| PyCharm | JetBrains | Community edition Pro edition (for students) |
Windows Linux MacOS |
Python JavaScript CoffeeScript |
| Eclipse | Eclipse Fundation | Open source | Windows Linux MacOS |
Most |
| NetBeans | Apache Software Fundation | Open source | Windows Linux MacOS |
Most |
| IntelliJ IDEA | JetBrains | Community edition | Windows Linux MacOS |
Java Groovy Kotlin Scala Python Rust |
| Code::Blocks | Code::Blocks | Open source | Windows Linux MacOS |
Most |
| XCode IDE | Apple | Yes | MacOS | C C++ Objective-C Objective-C++ Java AppleScript Python Ruby ResEdit (Rez) Swift |
There are many more IDEs on the market.
However, recently, Visual Studio Code (VSCode for short) has clearly been adopted as the tool of choice by many developers, whatever programming language considered. We therefore suggest that you use it, as we will provide instructions with this tool. You are obviously free to do otherwise, if you can translate our instructions vor VSCode to your IDE of choice.
4 — Visual Studio Code
4.1 — Install the IDE
Until now, in this practical session, you have used a standard text editor to write your Python scripts. Visual Studio Code is an IDE providing a lightweight, flexible and open source code editor. However, it can be a lot more useful than just being a code editor, as it can be extended thrgouh extension mechansims.
Here is how to install it, depending on your system:
The easiest ways install Visual Studio Code are either directly from the Microsoft Store or from the Visual Studio Code official website. Try the second option for instance: download the installer file that match your machine, then launch it to install Visual Studio Code IDE on your machine.
However, if you prefer using the terminal, try WinGet (the Windows package manager). To do so, assuming WinGet is available on your machine, type the command line:
winget install Microsoft.VisualStudioCodewinget install Microsoft.VisualStudioCodeThe easiest way is to install Visual Studio Code from the package that matches your system (e.g., Debian, RPM…) on the download page. However, if you prefer using the terminal, type the following two command lines:
wget -O vscode.deb https://code.visualstudio.com/sha/download?build=stable&os=linux-deb-x64
sudo apt install ./vscode.deb
You will then have to type the administrator password. Characters will not appear on the screen as you type it though. This is a security measure, it will work anyway.
The easiest way to install Visual Studio Code is from the official website where you download the application that matches your architecture. Do not forget to drag and drop the downloaded application from the “Downloads” folder into the “Applications” folder. It will be easier for you to launch Visual Studio Code later.
However, if you prefer using HomeBrew (HomeBrew needs to be already installed) this command line will do the job:
brew install --cask visual-studio-codeOn some occasions, it may be interesting to use Visual Studio Code without installing it on the machine you work on. If you want to do this, just go on the website to run a version of Visual Studio Code directly in your navigator with several limits (e.g., no integrated terminal, no compilation). However, some extensions like “LiveShare” work.
Keep Visual Studio Code updated!
In the absence of special contraindications, you must install all the updates when proposed, either immediately or when the editor closes. To do so, do not deactivate the automatic checking for updates.
A minor version is usually available once a month with new functionnalities you may want to discover and use. Sometimes, extra updates are proposed as they correct a security breach or a regression: that’s why keeping your Visual Studio Code up-to-date is a very good practice.
4.2 — A first tour of the IDE
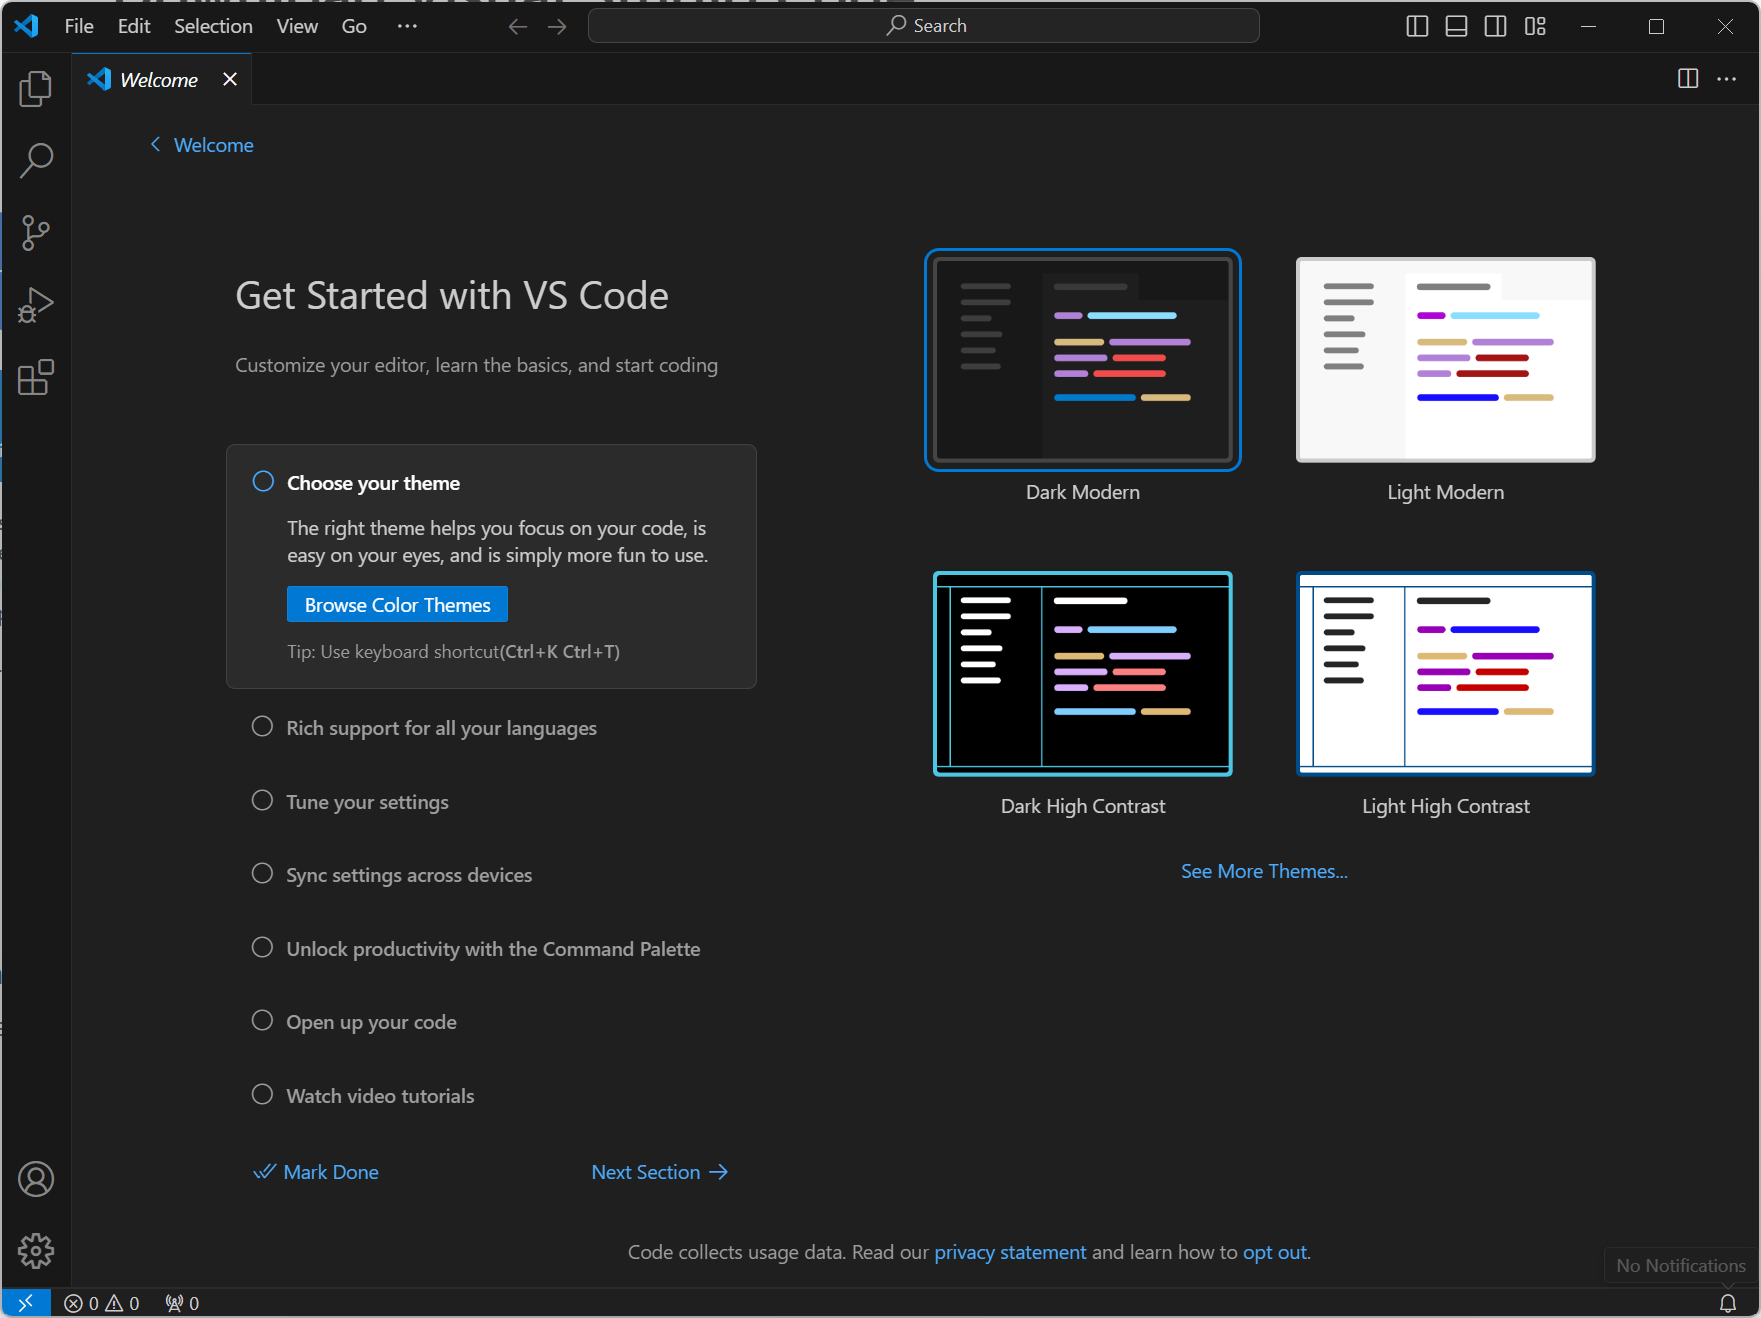
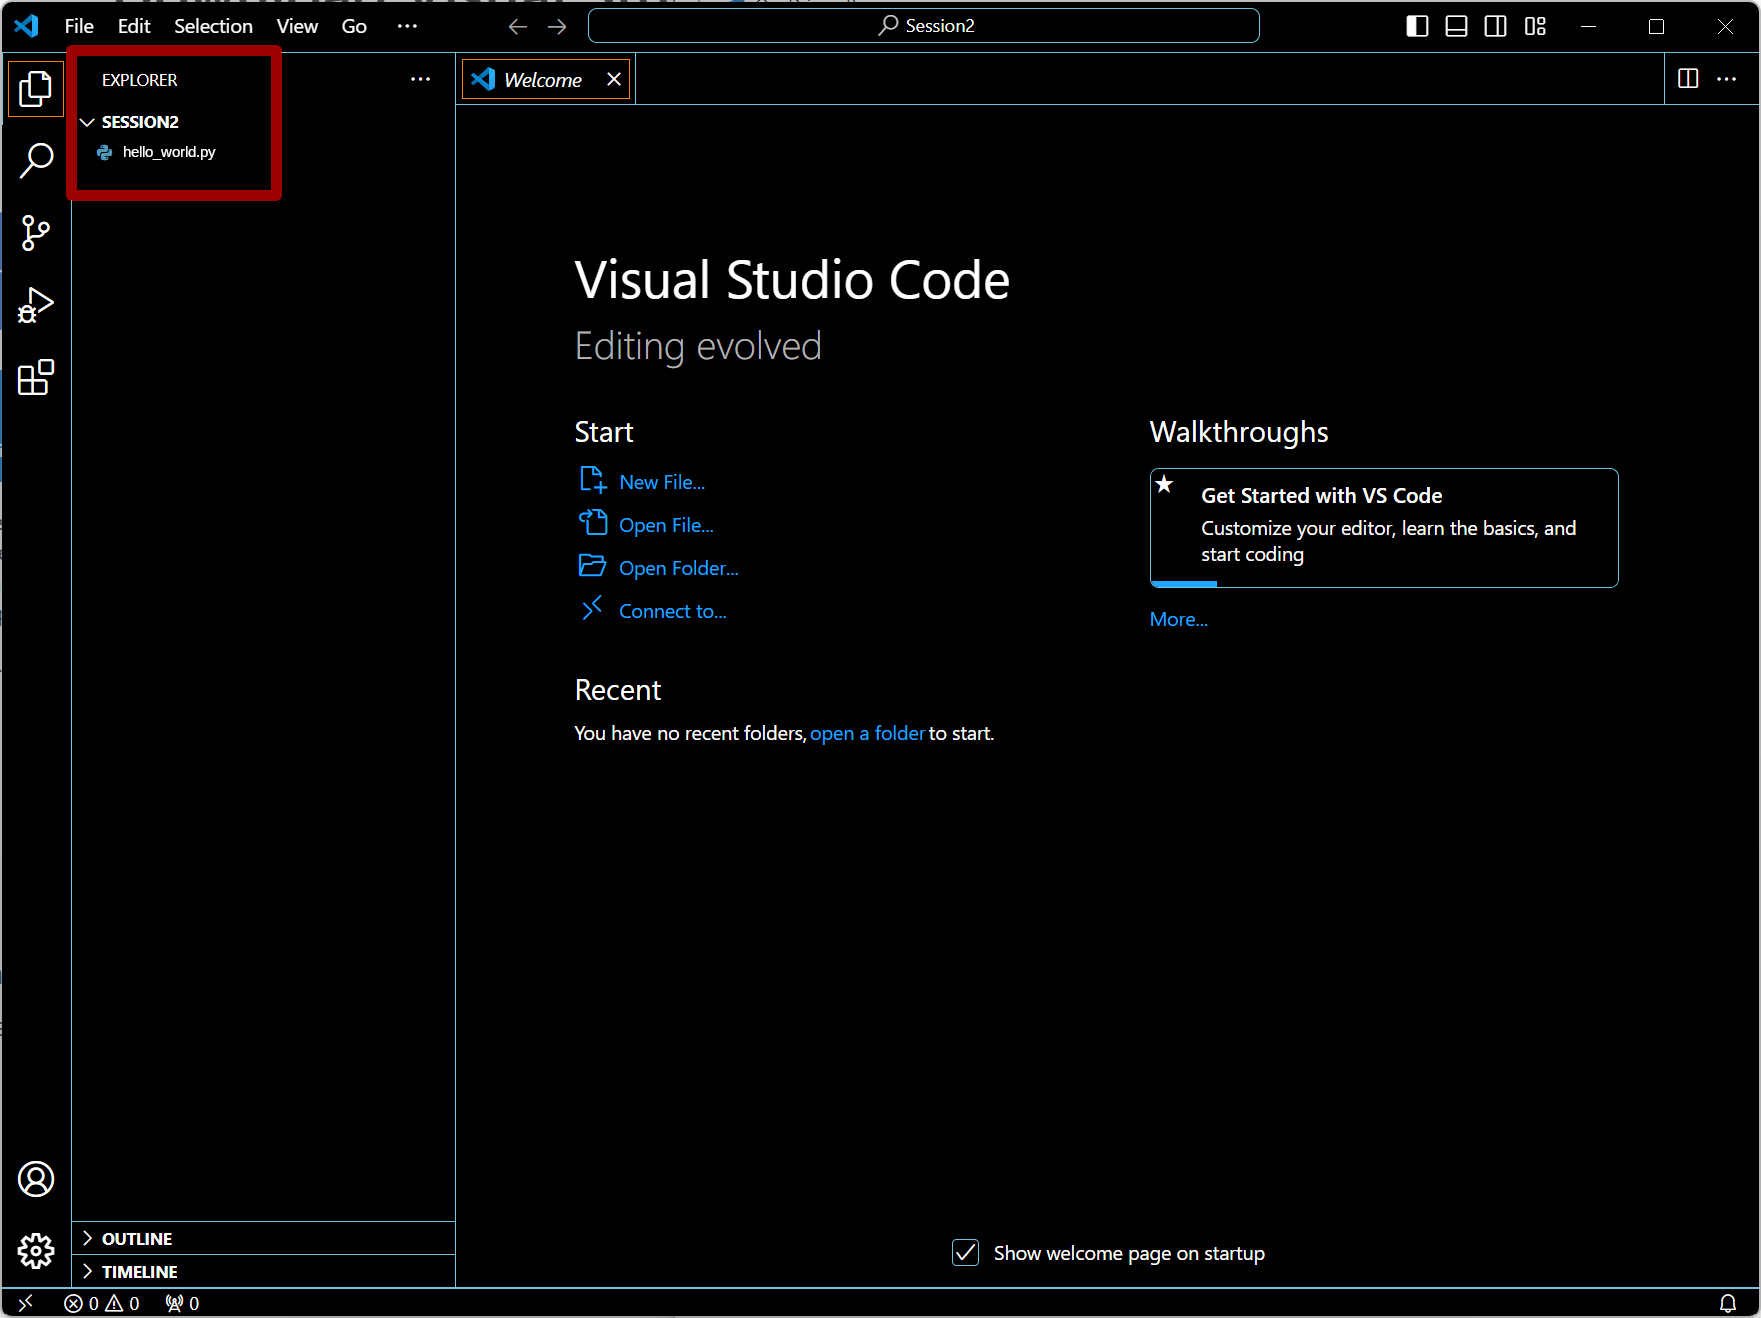
Once the installation successful, just launch the Visual Studio Code application from your GUI like a regular application. The first window that appears after installation, may look like this one, with a "Welcome" tab.
Through this tab, you may directly start tuning some elements of the IDE interface, installing some extensions that will add some specific functionnalities to the IDE, etc. You may do that now or later, step by step.
For this activity, we ask you to close the “Welcome” tab, and follow the following guidelines, step by step, to better understand some basic but crucial mechanisms of the Visual Studio Code interface. Do not worry, you can open it again at any moment through the “Command palette interface” (keyword “Welcome”).
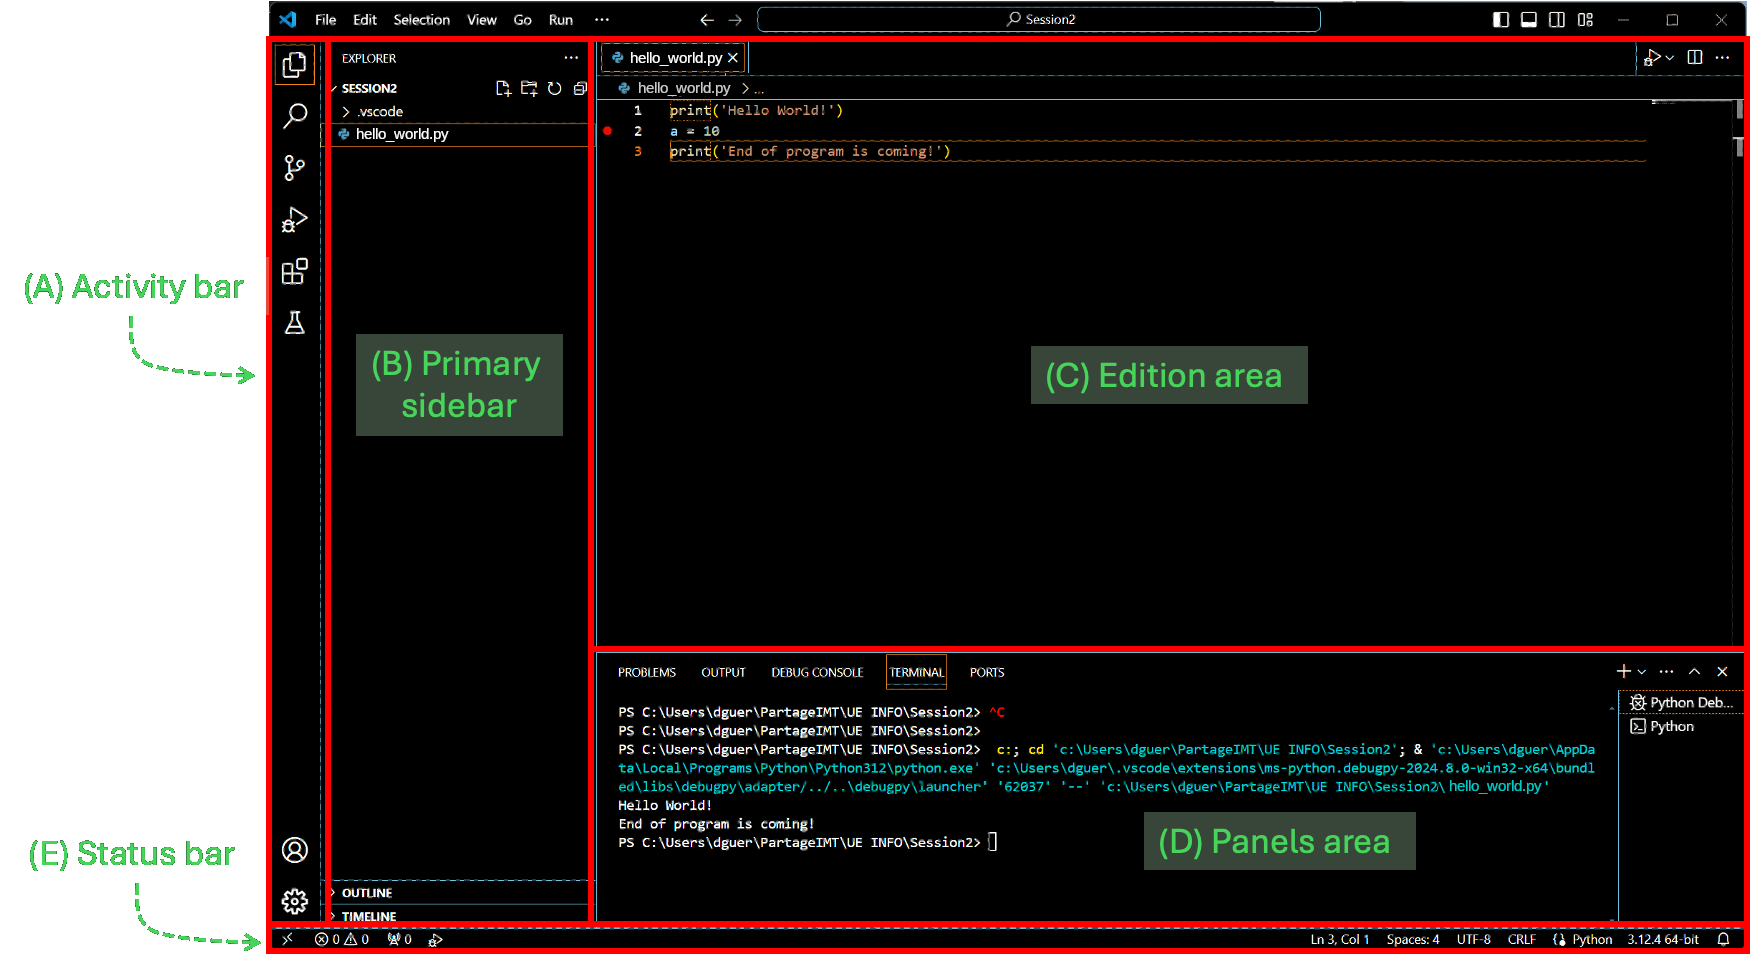
Five areas compose the Visual Studio Code interface.
We have identified them on the figure on the left (click to enlarge).
-
Activity bar (A) – Located on the left side, a vertical series of icons allow you to open various views such as the file navigator, the search view, the extensions manager or the debugging view. When you click on one icon, the corresponding view shows up in the primary sidebar, just on the right to the activity bar. Note that the contents of this bar, i.e., the icons, depends on the extensions you install in your VSCode. For now, let’s focus on these two icons:
-
Explorer icon
 – Opens the view showing the current opened folder.
 -
Extensions icon
 – Opens the view that shows the current installed extensions, but also that gives all the extensions you may download and install.
-
-
Primary sidebar (B) – The view launched by clicking on one activity bar icon, opens on the right to the activity bar. The contents of the Primary sidebar is obviously view-dependent. If you click again on the active icon of the activity bar, the primary sidebar disappear for leaving more space to the area on its left: the edition area.
-
Edition area (C) – This is where all the opened files may be edited. The Python script you wrote earlier in this activity will be opened and edited there, in a few steps.
-
Panels area (D) – Under the edition area, the panels are basically tabs that allows to interact with the installed tools you need (e.g., integrated terminals, compiler outputs, debugging console, execution output, LaTeX engine messages). Some panels will open when you execute your Python script.
-
Status bar (E) – On the lower part of the window, the status bar gives information about the opened file or the current status of the editor such as the current language, cursors location, current GIT branch, Live Share session, etc.
More information about the GUI of Visual Studio Code IDE can be found in the documentation. Save this link for later (for instance, after you finish this activity).
4.3 — A first Python script with the IDE
4.3.1 — Open your script
Let’s open and edit the Python script hello_world.py you wrote earlier, stored in the directory <docs>/IMT/computer_science/s5/env/session_2/.
You may have other names either for the file or the folder, adapt as needed.
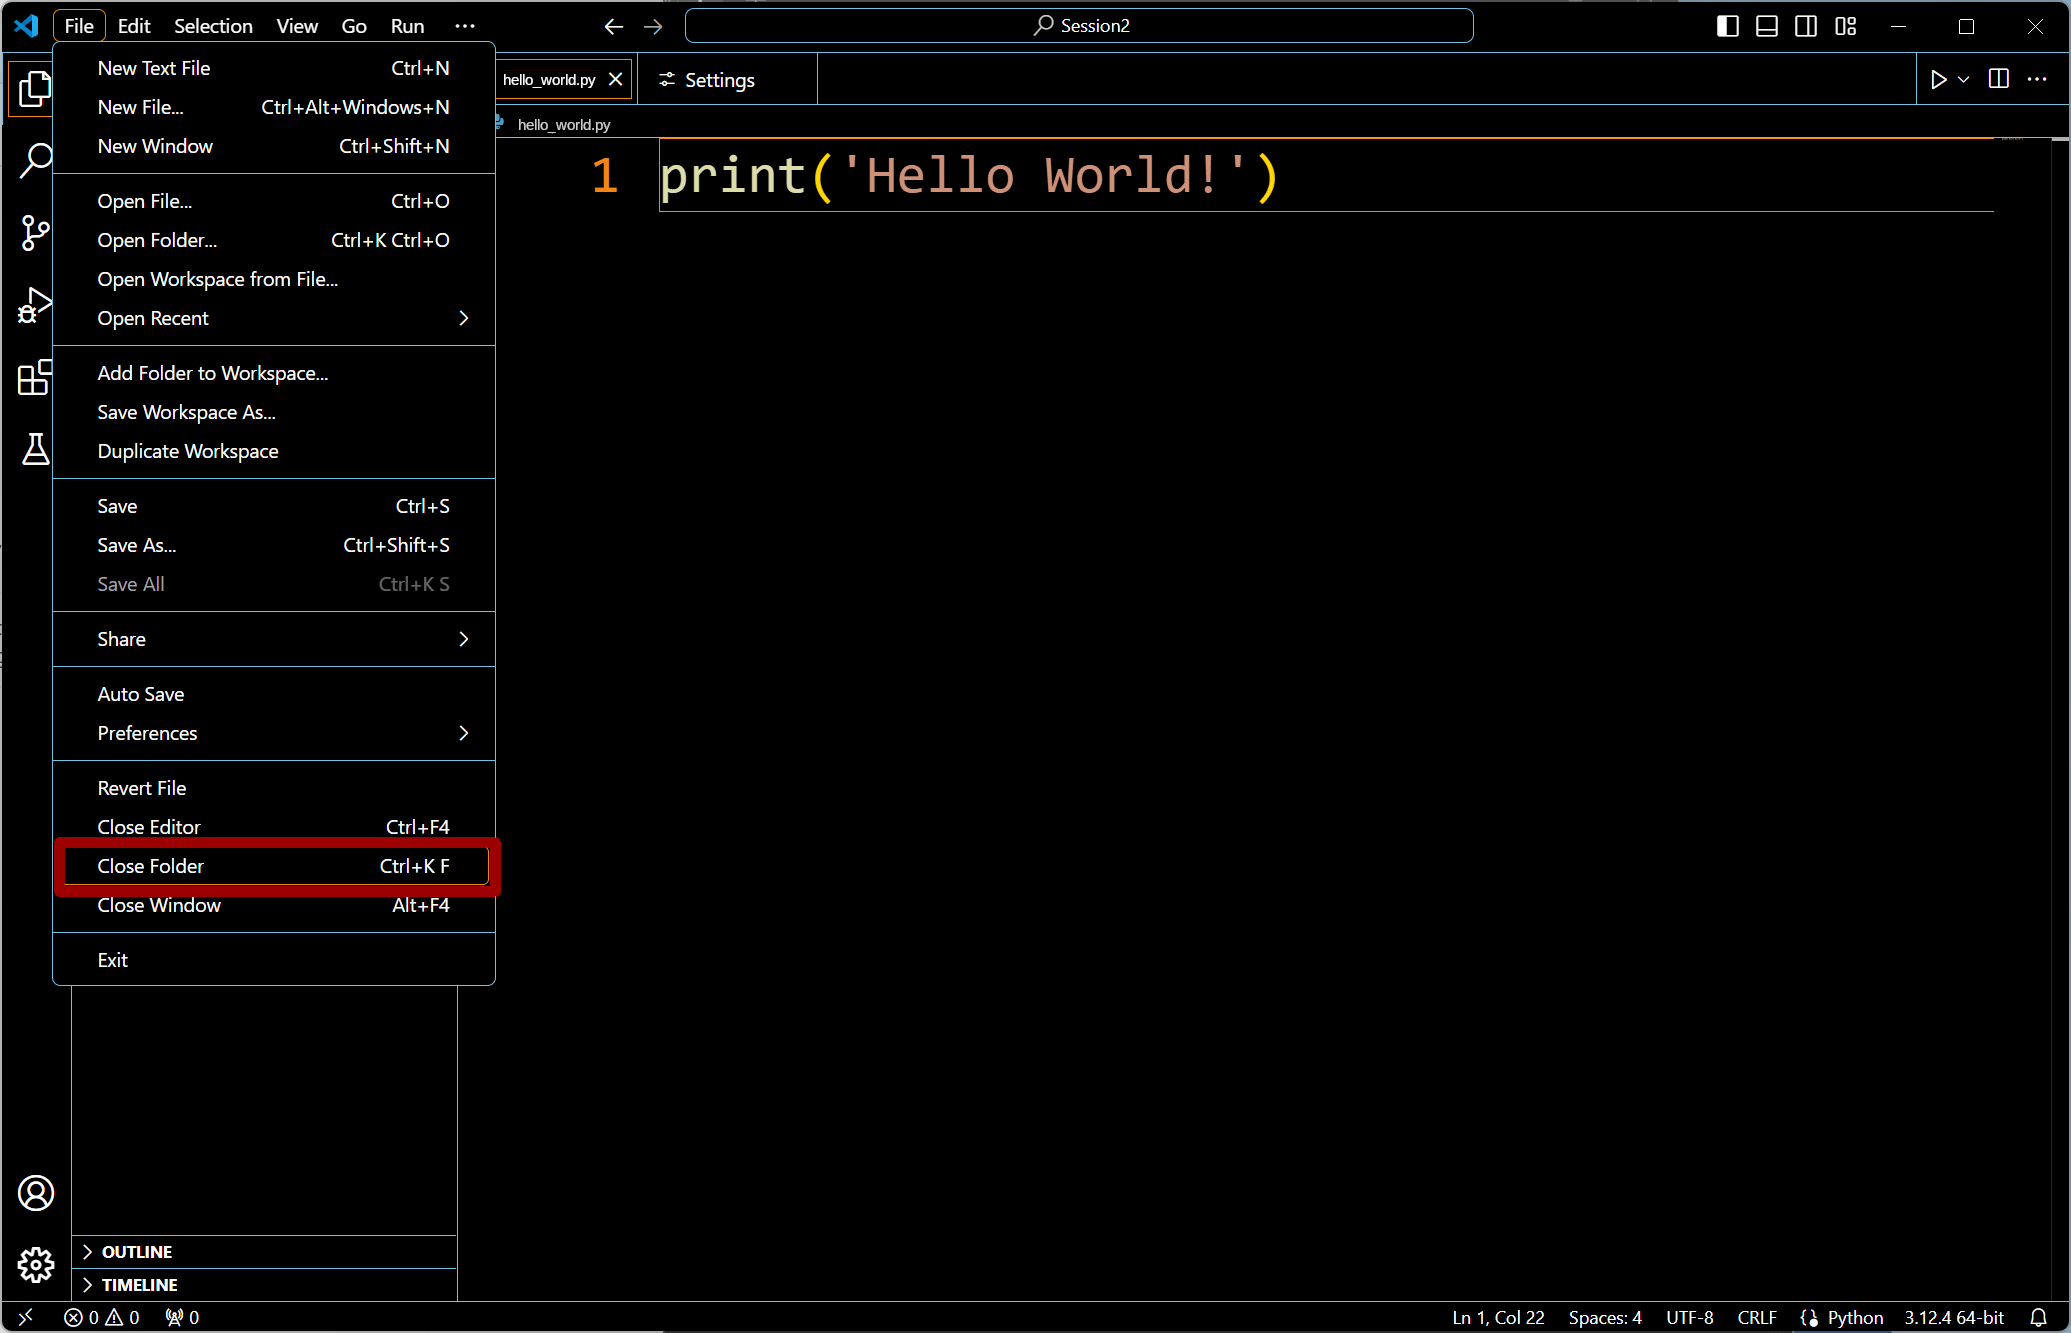
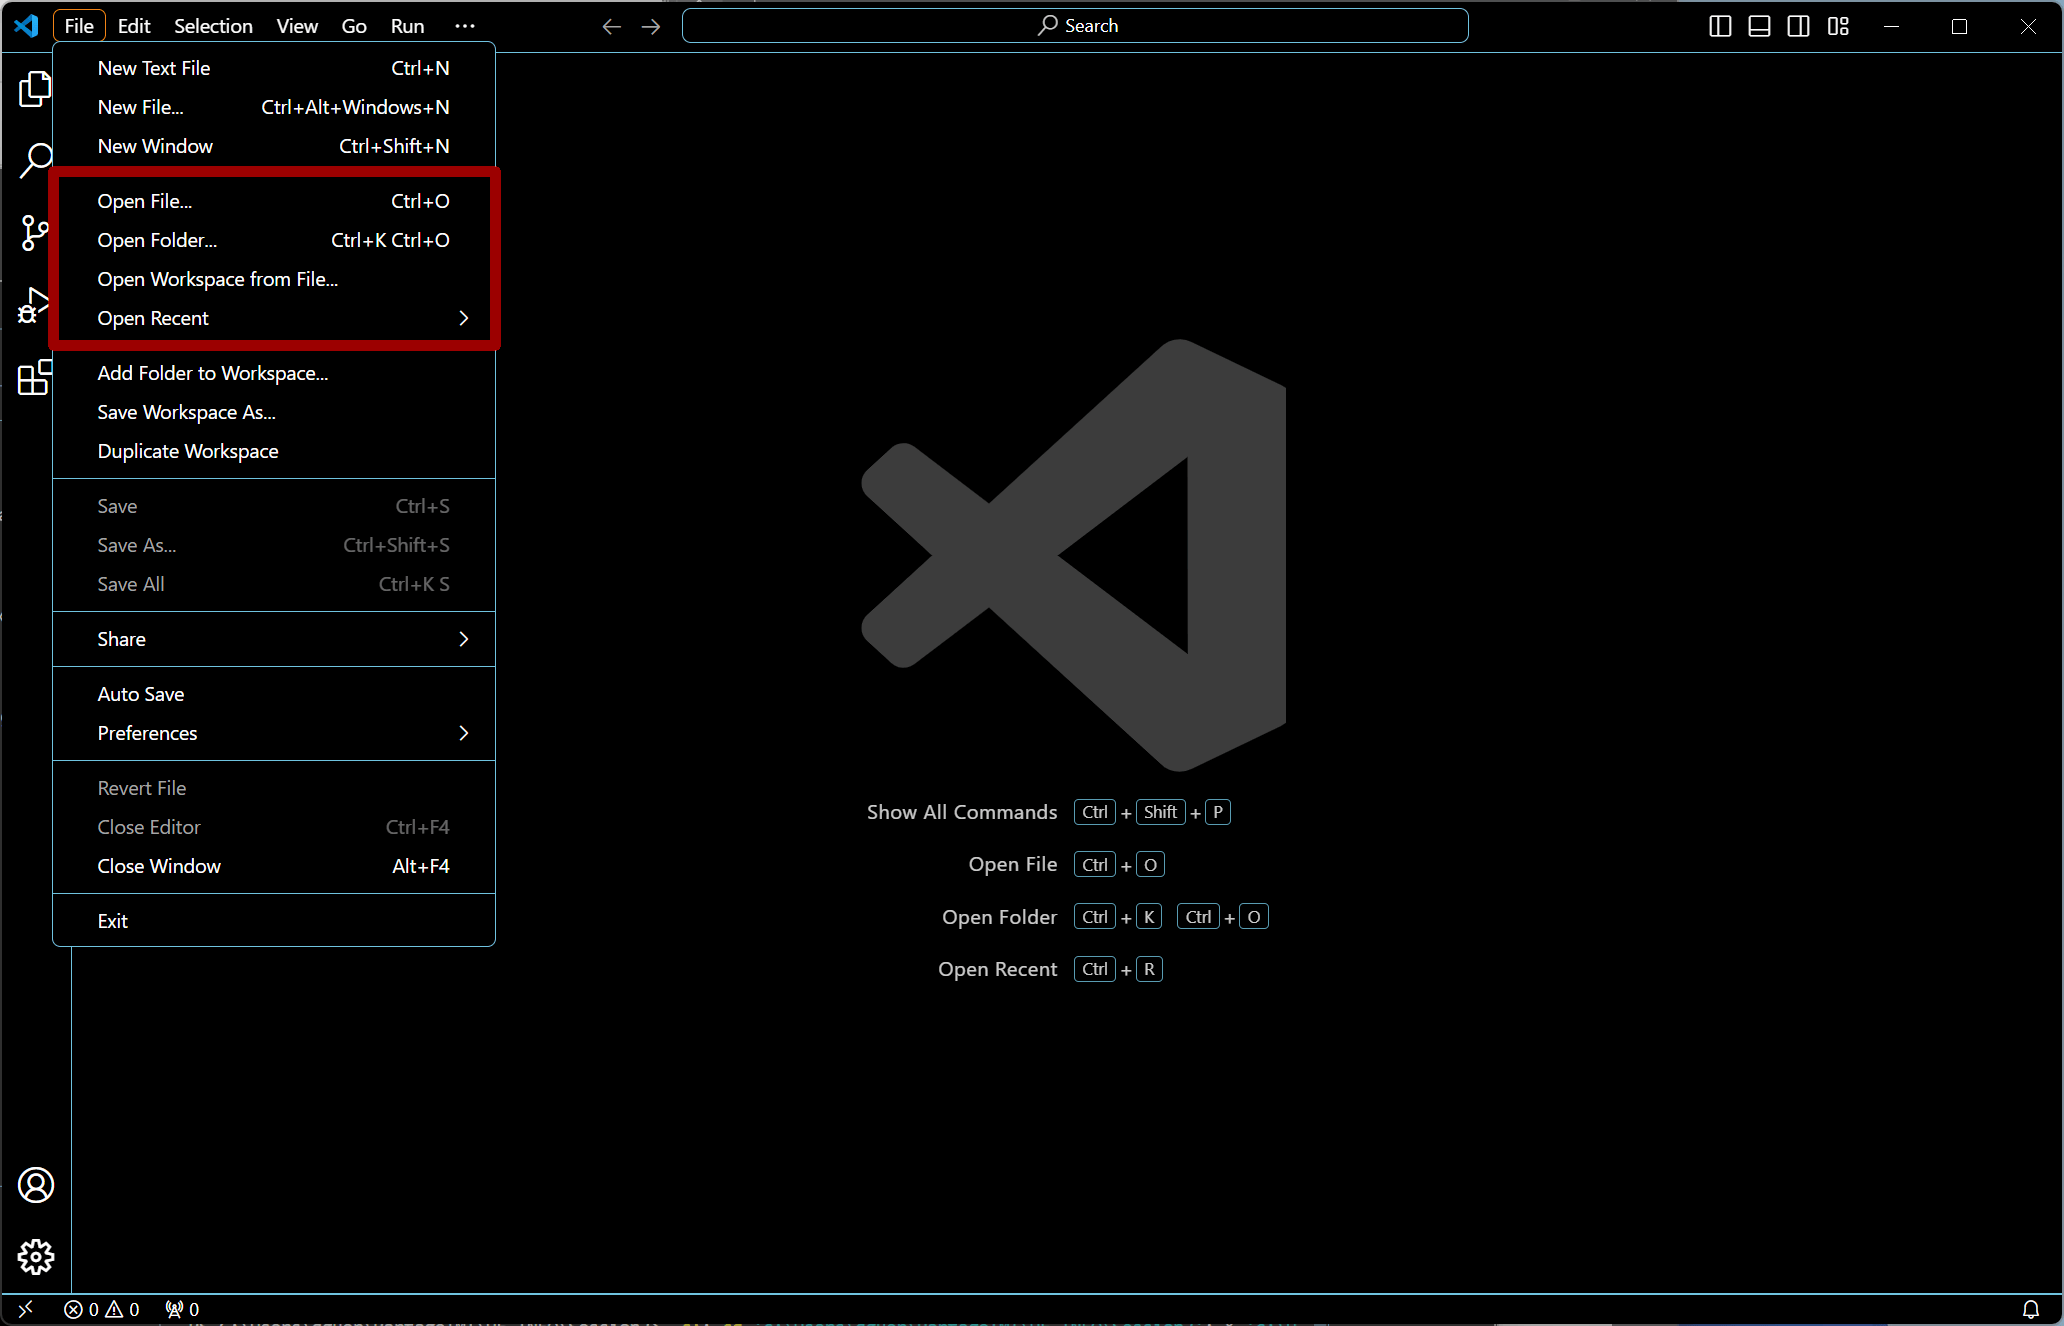 You can open your Python script through the “File” menu.
However, from the “Open” block, several choices are possible.
You can open your Python script through the “File” menu.
However, from the “Open” block, several choices are possible.
-
Open File – The IDE only opens the file as a standalone entity, for editing as any other text file editor. For the IDE, it means this file does not belong to any project or set of files working together. Indeed, when you implement solutions for a lab, or for a real project, you will probably need several Python files working together, to answer the full problem. In that perspective, using “Open File.” is not the way to use.
-
Open Folder – Visual Studio Code will open a folder and consider it as a “workspace” (like a dedicated space for a project or an activity for instance). This is the choice we will select.
 Open the
 <docs>/IMT/computer_science/s5/env/session_2/folder. Once opened, its contents appears in the “Primary sidebar” as the Explorer icon from the Activity sidebar is automatically selected.
-
Open Workspace from file – This choice is for opening multi-root workspaces (not used in this activity).
A Visual Studio Code workspace is the collection of one or more folders that are opened in a Visual Studio Code window (instance).
-
Single-folder workspace In most cases, you will have a single folder opened as the workspace (here that is the case). In fact, when opening a folder in Visual Studio Code, it is automatically seen as a workspace. It means Visual Studio Code automatically keeps track of its configuration, such as your open files or editor layout. When you reopen that folder, the editor will be as you left it previously.
-
Multi-root workspace – If you need several distinct folders to be part of a workspace, you’ll create and open multi-root workspace which is basically a JSON file that lists all folders of the workspace.
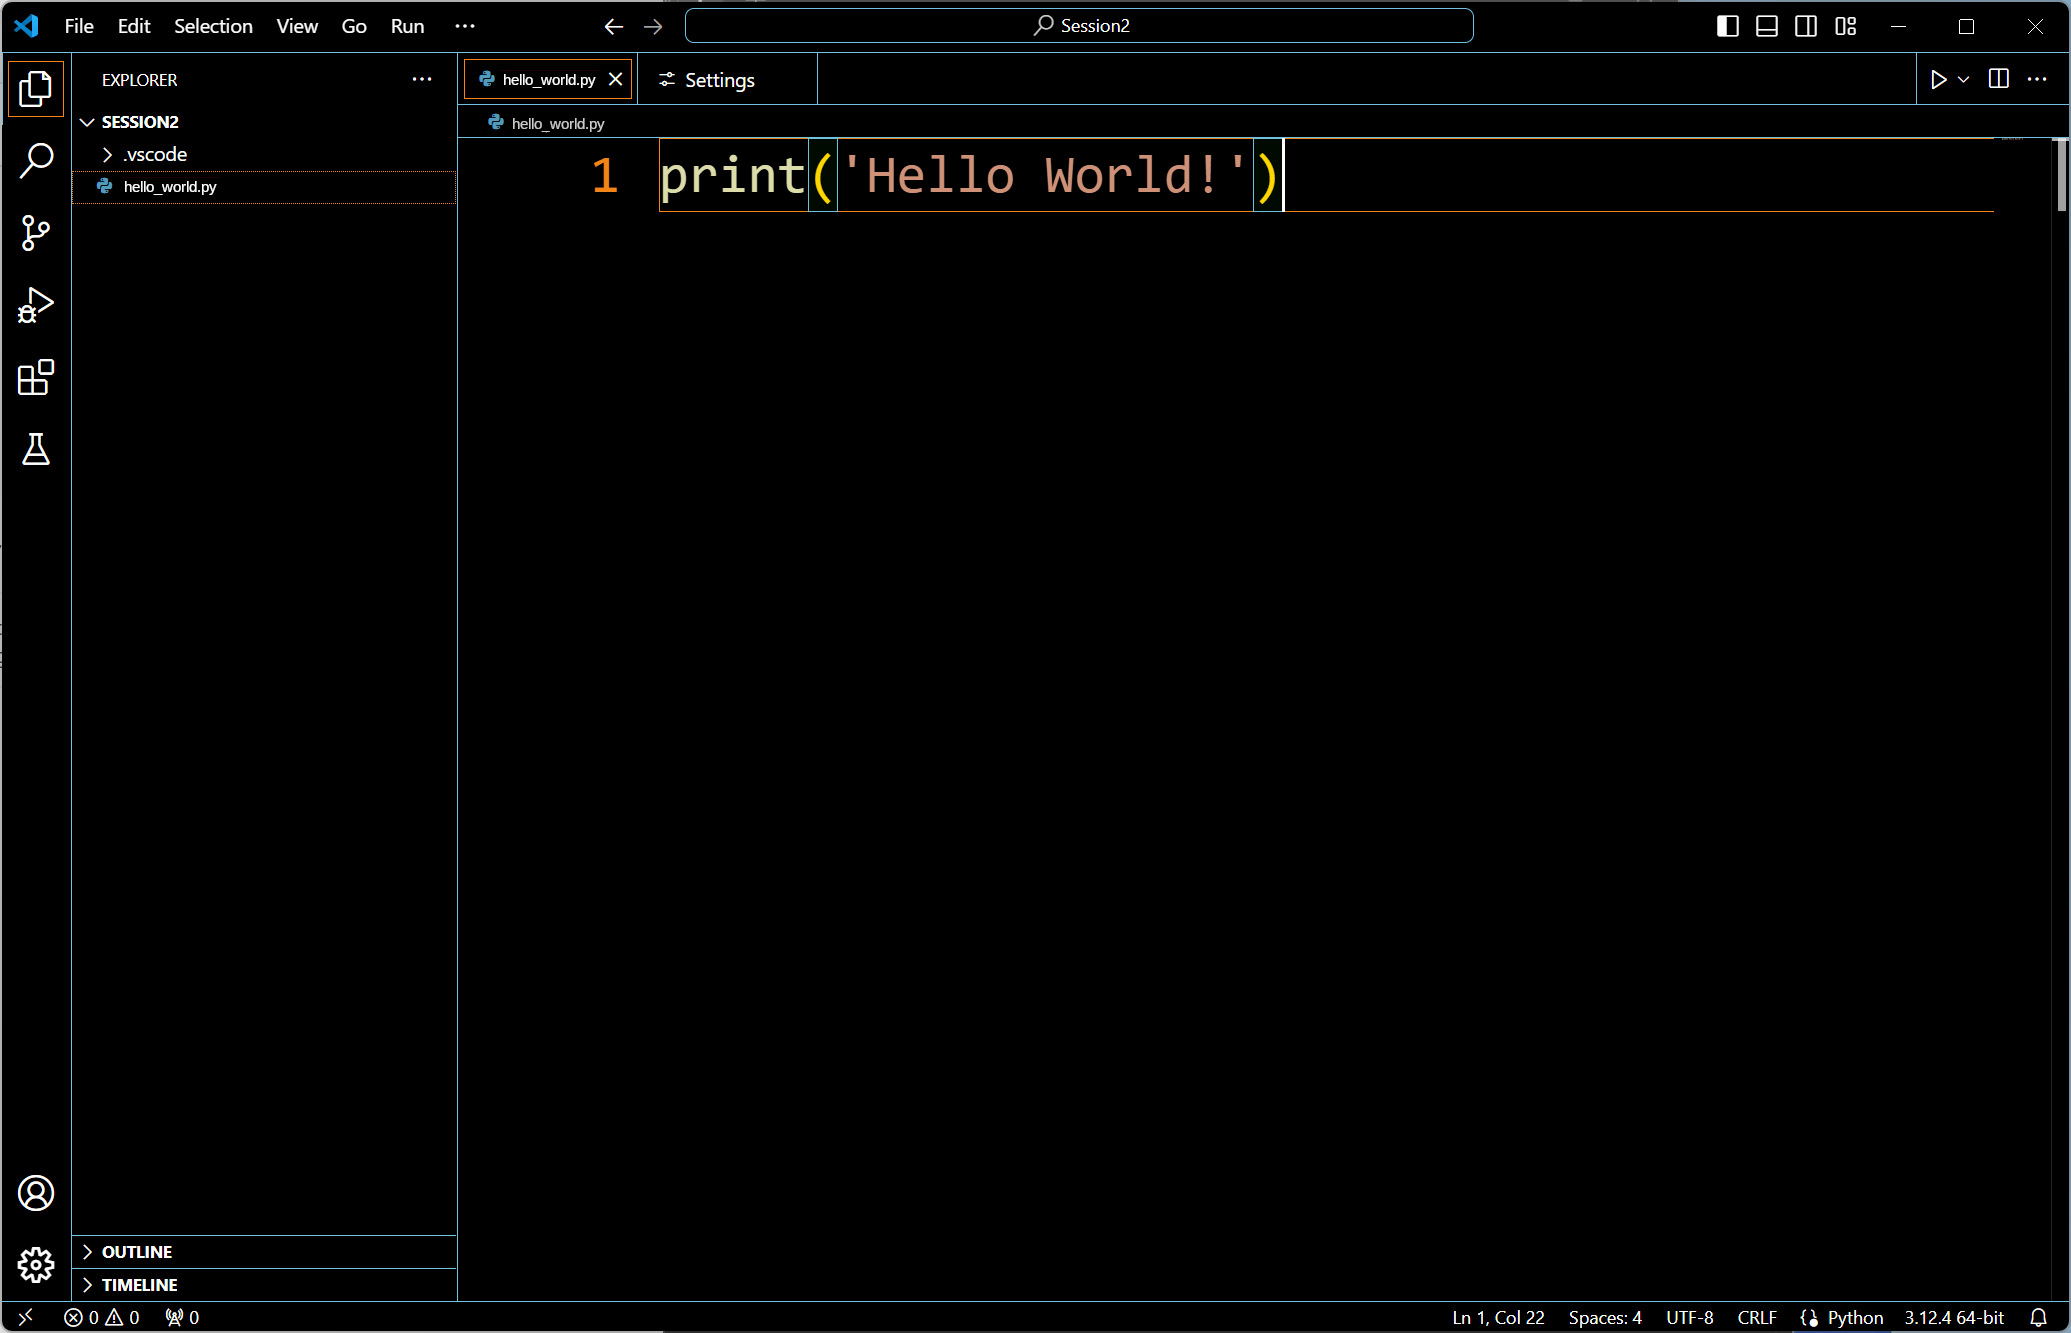
5.3.2 — Edit the script
 Click on the
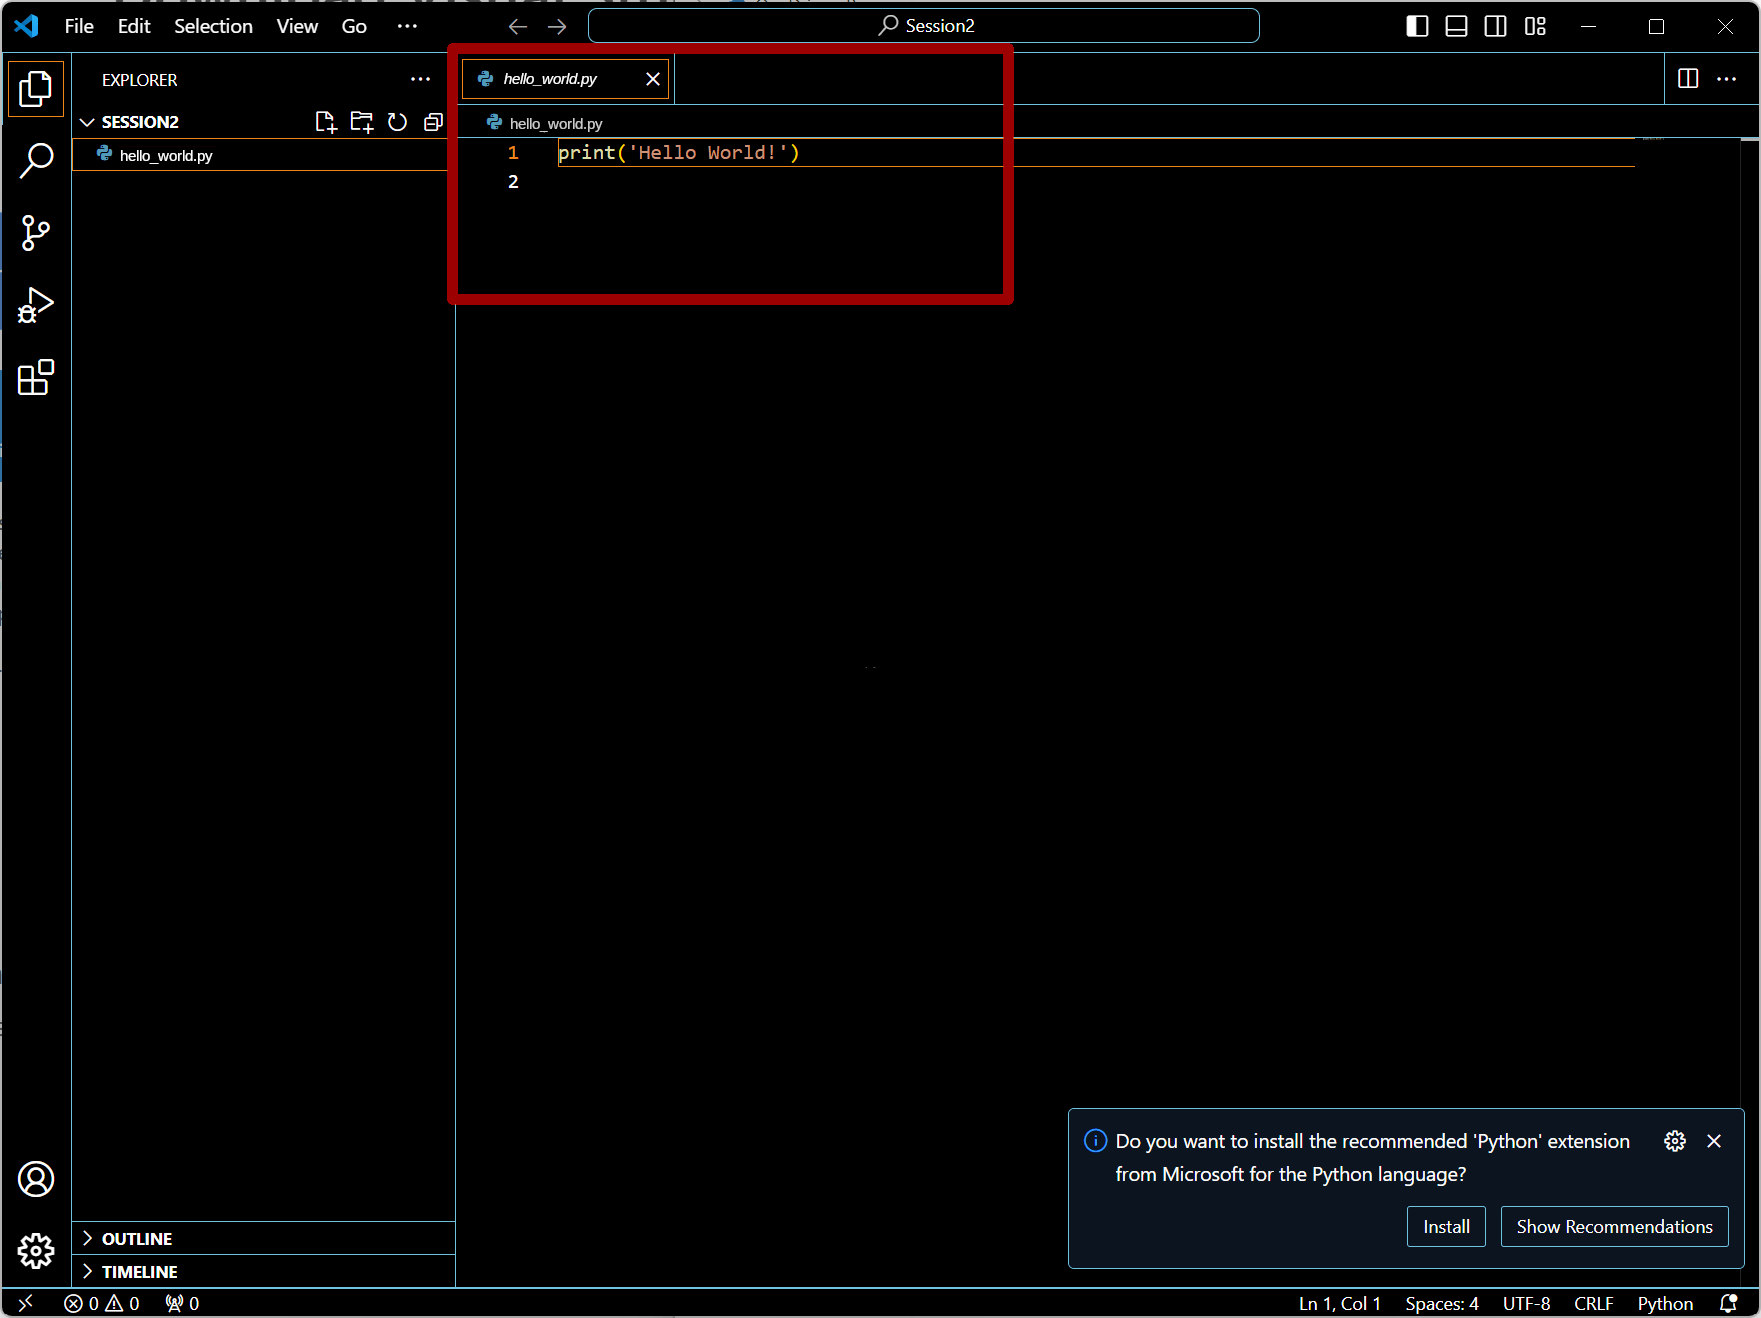
 hello_world.py file in the primary sidebar, to open it in a new tab, logically named hello_world.py, in the edition area.
As you can see, a new editor containing your script appears within the Edition area of the GUI.
Some basic syntax highlighting is even already operational.
Visual Studio Code may ask you whether you want to install the recommanded Python extension. This extension, once installed, will help you from the interface, to launch a script execution. However, you will decline this opportunity as you’ll do it later on your own in this activity. The procedure may be useful for installing other extensions. Thus, close the notification dialog box on the lower right part
Now, you can edit your Python script file and save it (Menu “File” then “Save”). As long as the changes in the editor are not saved, a white dot is shown next to the file name in the Edition tab.
Now, one question remains: how to execute this script?
4.3.3 — Run your Python script
You have your script hello_world.py opened in a window and now, you want to execute it.
There at least two ways to launch the execution of your script.
Let’s start with the integrated terminal.
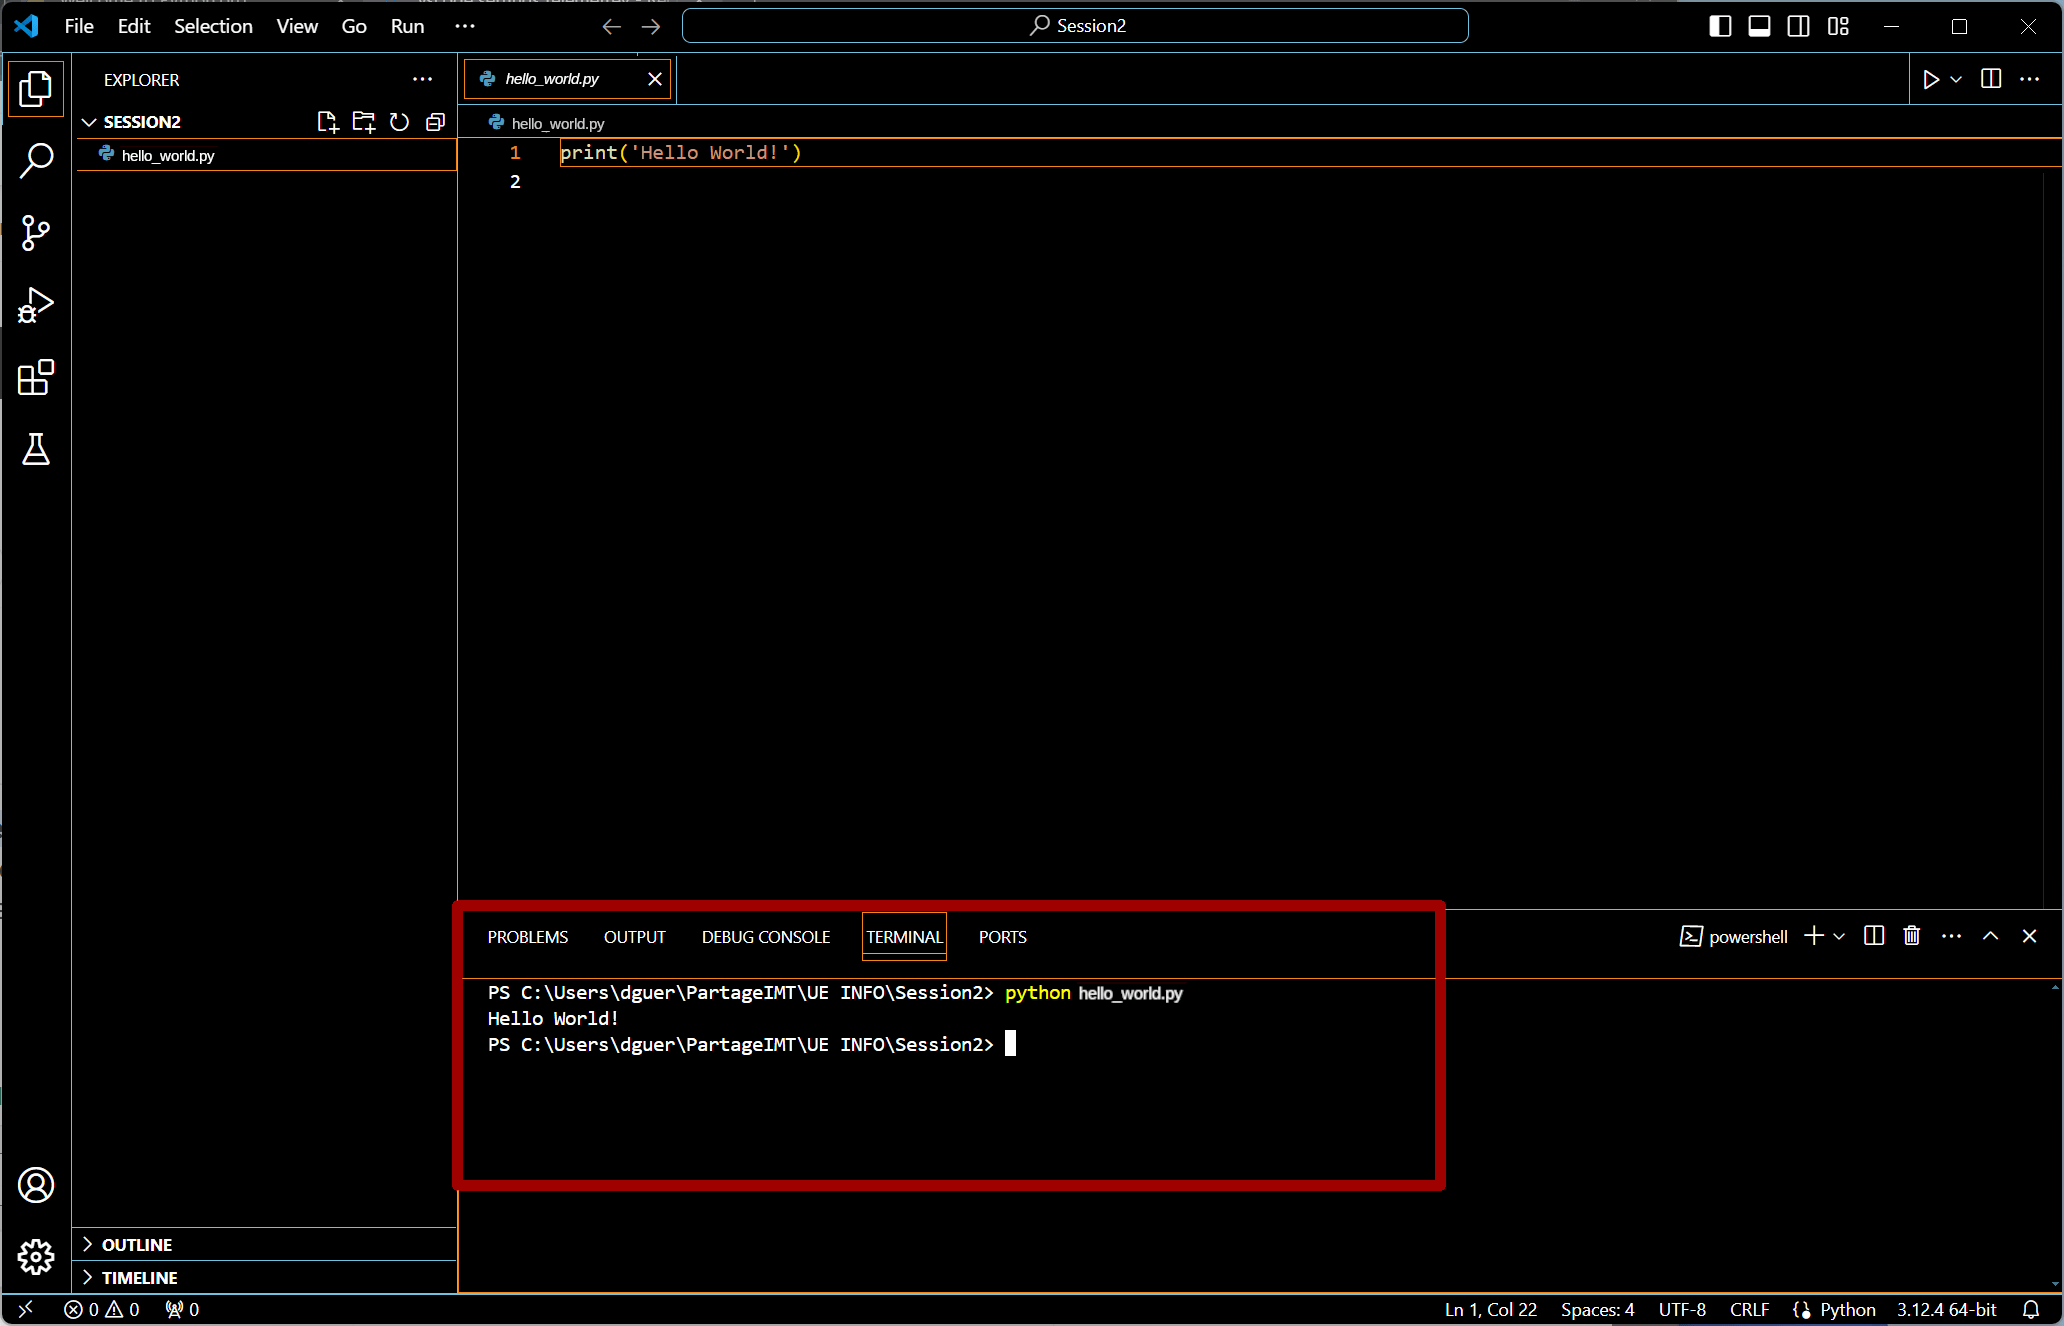 Visual Studio Code proposes you an integrated terminal which basically acts as a regular terminal, but the advantage is that it appears directly in the Visual Studio Code window, in the Panels area.
Click on the “View” menu then select “Terminal”.
Visual Studio Code proposes you an integrated terminal which basically acts as a regular terminal, but the advantage is that it appears directly in the Visual Studio Code window, in the Panels area.
Click on the “View” menu then select “Terminal”.
The “Terminal” panel appears in the dedicated area. From this terminal, you can call the Python interpreter on your script and see the result of its execution.
It is really convenient to have both your source code and an execution panel in the same window. Whatever the shortcuts you may use later, you will always the possibility to execute your Python scripts from a terminal within Visual Studio Code.
However, the Python extension proposed previously may grant you easier ways to launch your scripts but also many other tools (automatic completion, debugging, testing) useful to help you. Let’s install the Python extension that we declined earlier! Note the steps for installing an extension, as they will be the same for all extensions you want to install.
First, open the “Extensions” view (just click on the “Extensions” icon from the Activity bar).
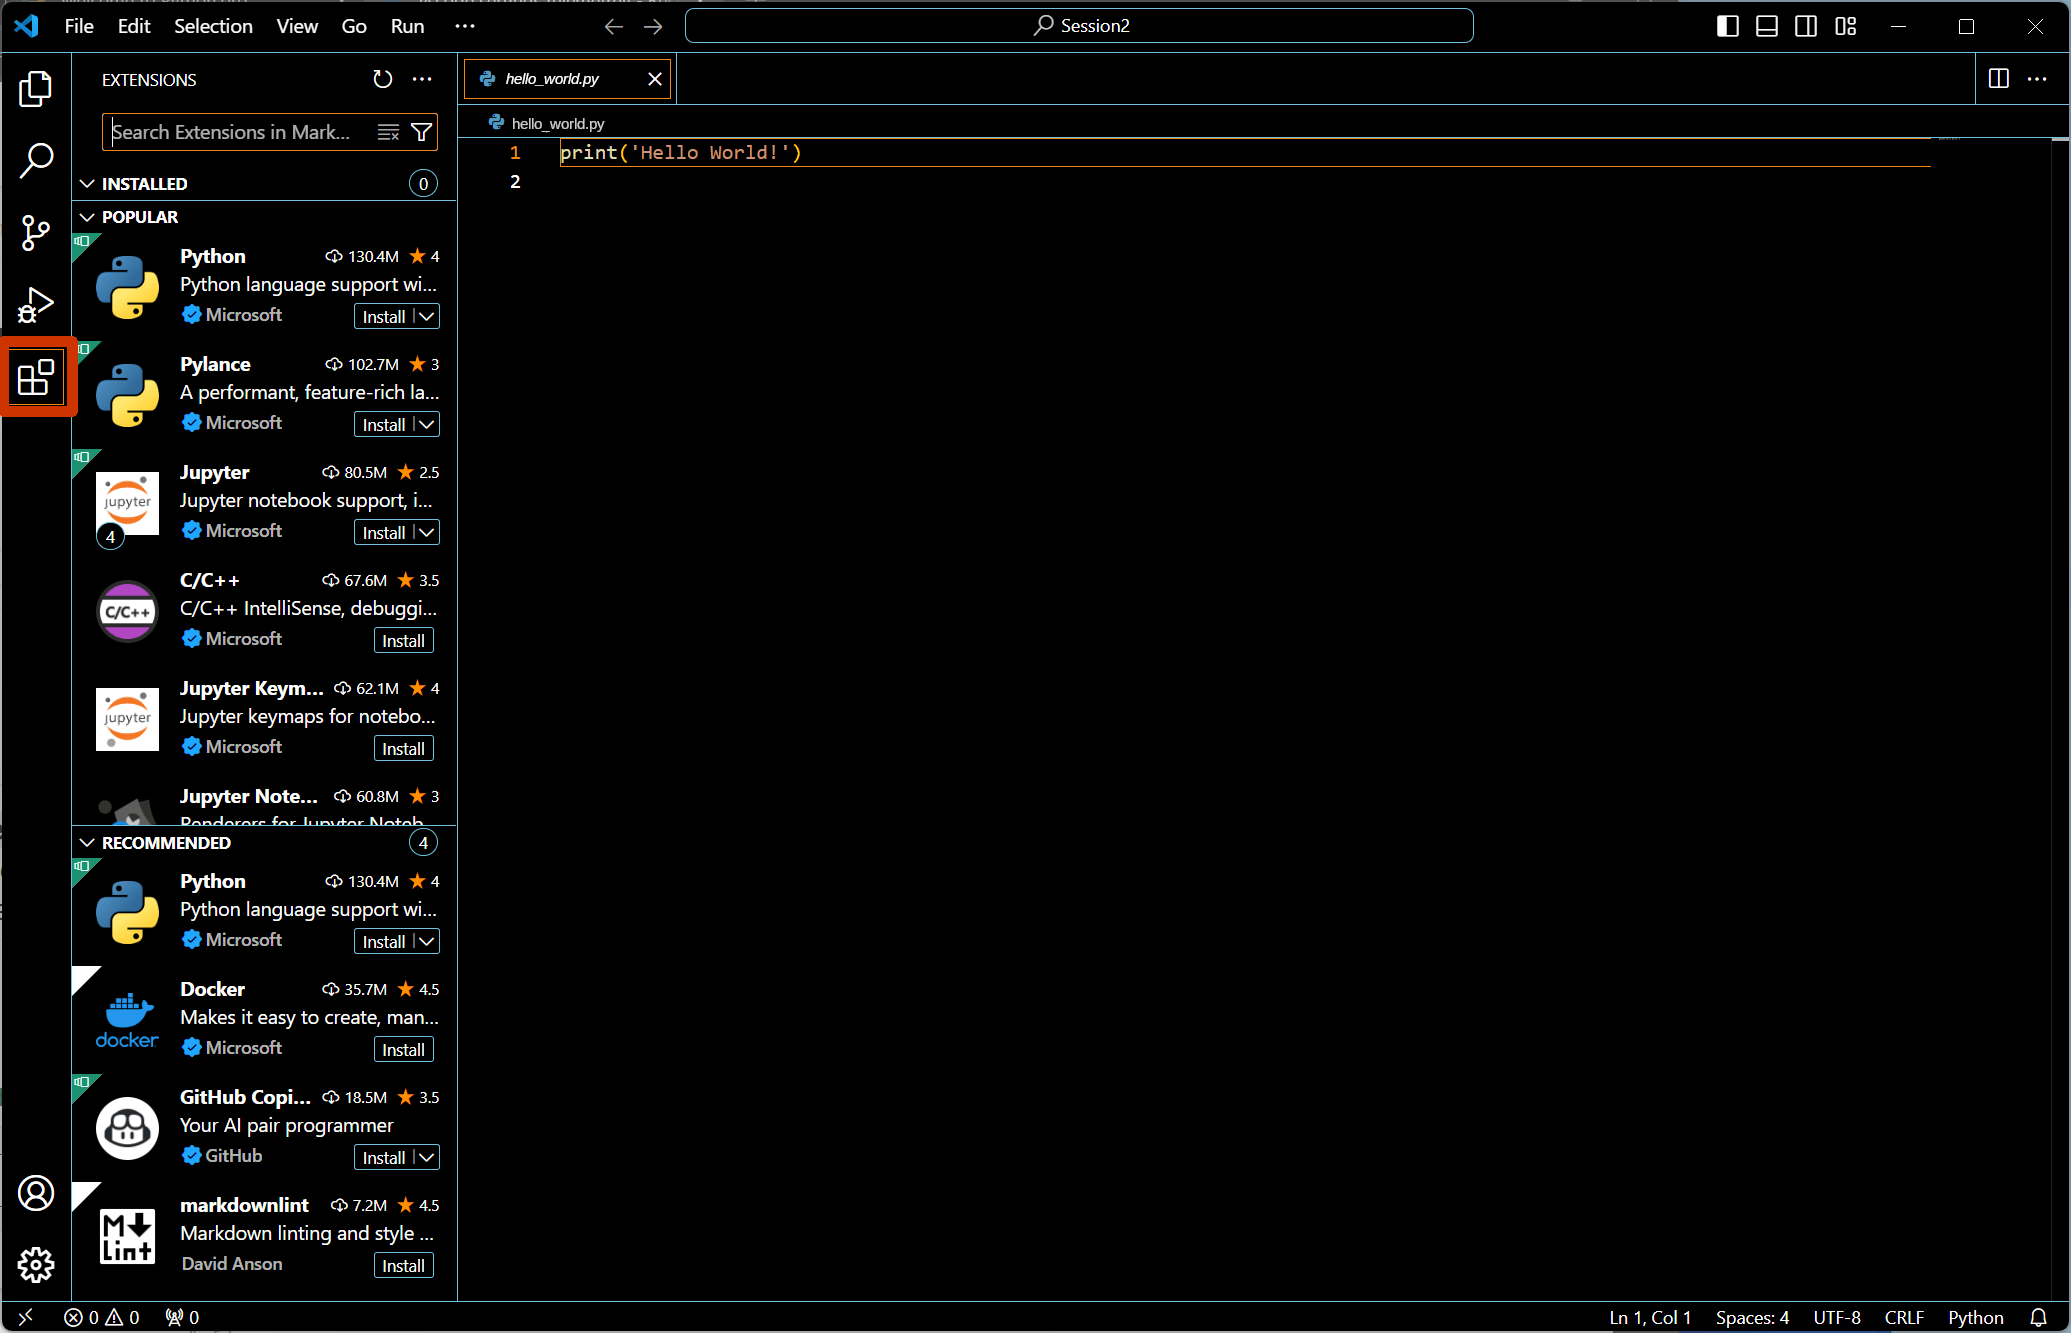 This view gives you the installed extensions and proposes you either popular extensions or extensions that Visual Studio Code finds relevant to you.
As a Python file is already opened, Visual Studio Code will probably propose the Python extension to you, in the “Recommanded” section.
Alternately, you can use the field “Search Extensions” for words that describe what you are looking for (in our case, “Python”).
This view gives you the installed extensions and proposes you either popular extensions or extensions that Visual Studio Code finds relevant to you.
As a Python file is already opened, Visual Studio Code will probably propose the Python extension to you, in the “Recommanded” section.
Alternately, you can use the field “Search Extensions” for words that describe what you are looking for (in our case, “Python”).
 The extension we need (the one recommanded previously) is the one provided by Microsoft.
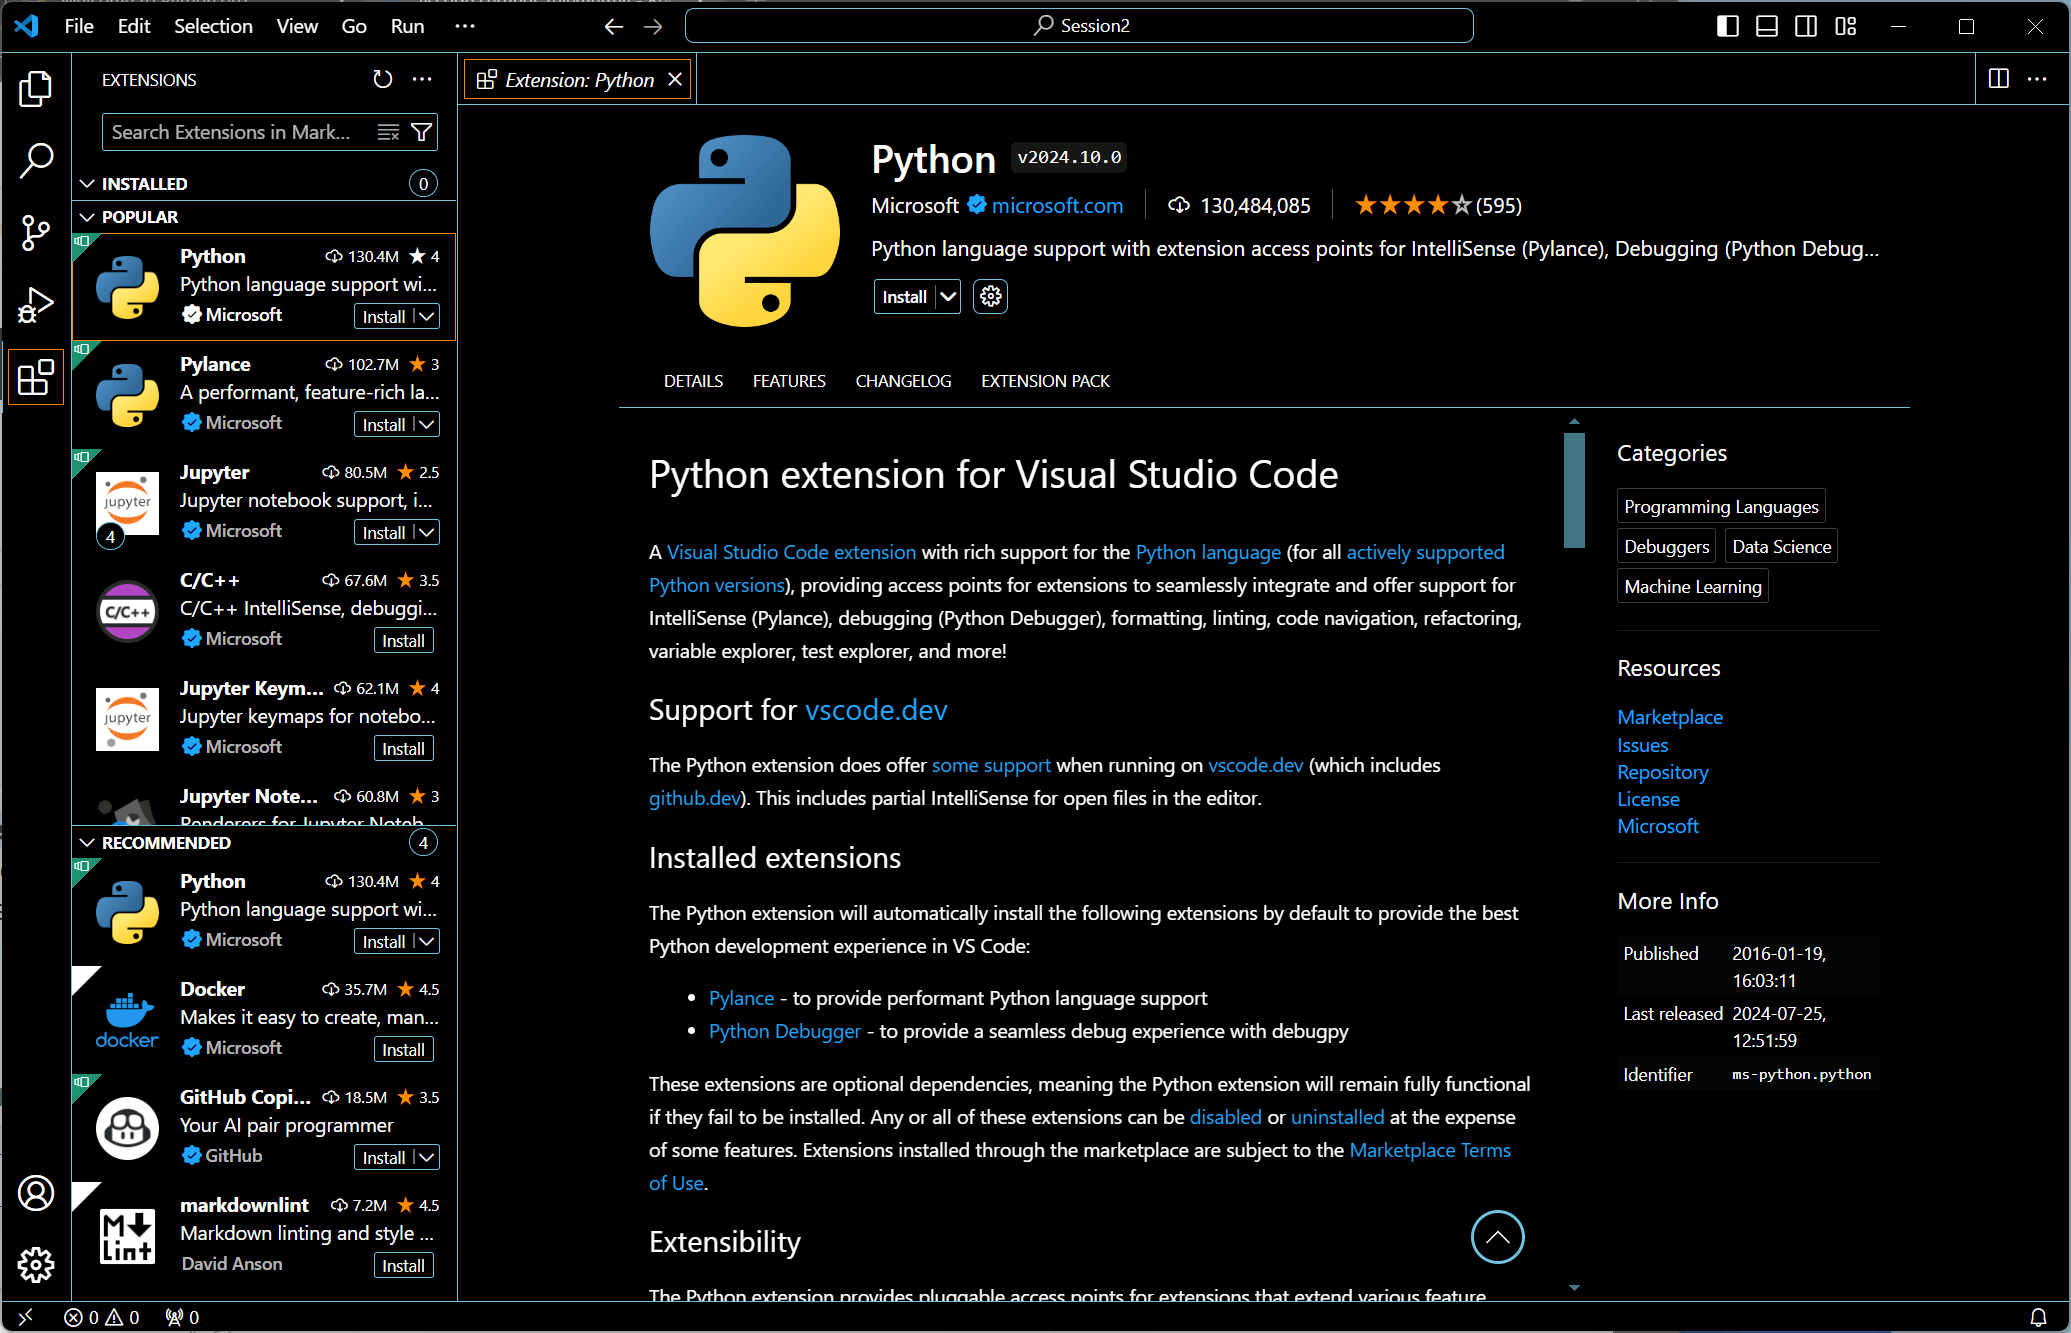 Click on this extension to have more details.
Take your time to read all the information given.
Look at the author of the extension (here Microsoft certified), the amount of users, etc.
Check the “Details”, “Features”, etc. embedded tabs for more details on the functionnalities, behaviors, constraints, etc.
You may learn that it will install “Pylance” and “Python Debugger”.
Find these two extensions, and read their information pages.
Click on this extension to have more details.
Take your time to read all the information given.
Look at the author of the extension (here Microsoft certified), the amount of users, etc.
Check the “Details”, “Features”, etc. embedded tabs for more details on the functionnalities, behaviors, constraints, etc.
You may learn that it will install “Pylance” and “Python Debugger”.
Find these two extensions, and read their information pages.
 When you are ready, click on the “Install” button.
A few moments later, the view will be updated to show you that the mentioned extensions have been installed.
When you are ready, click on the “Install” button.
A few moments later, the view will be updated to show you that the mentioned extensions have been installed.
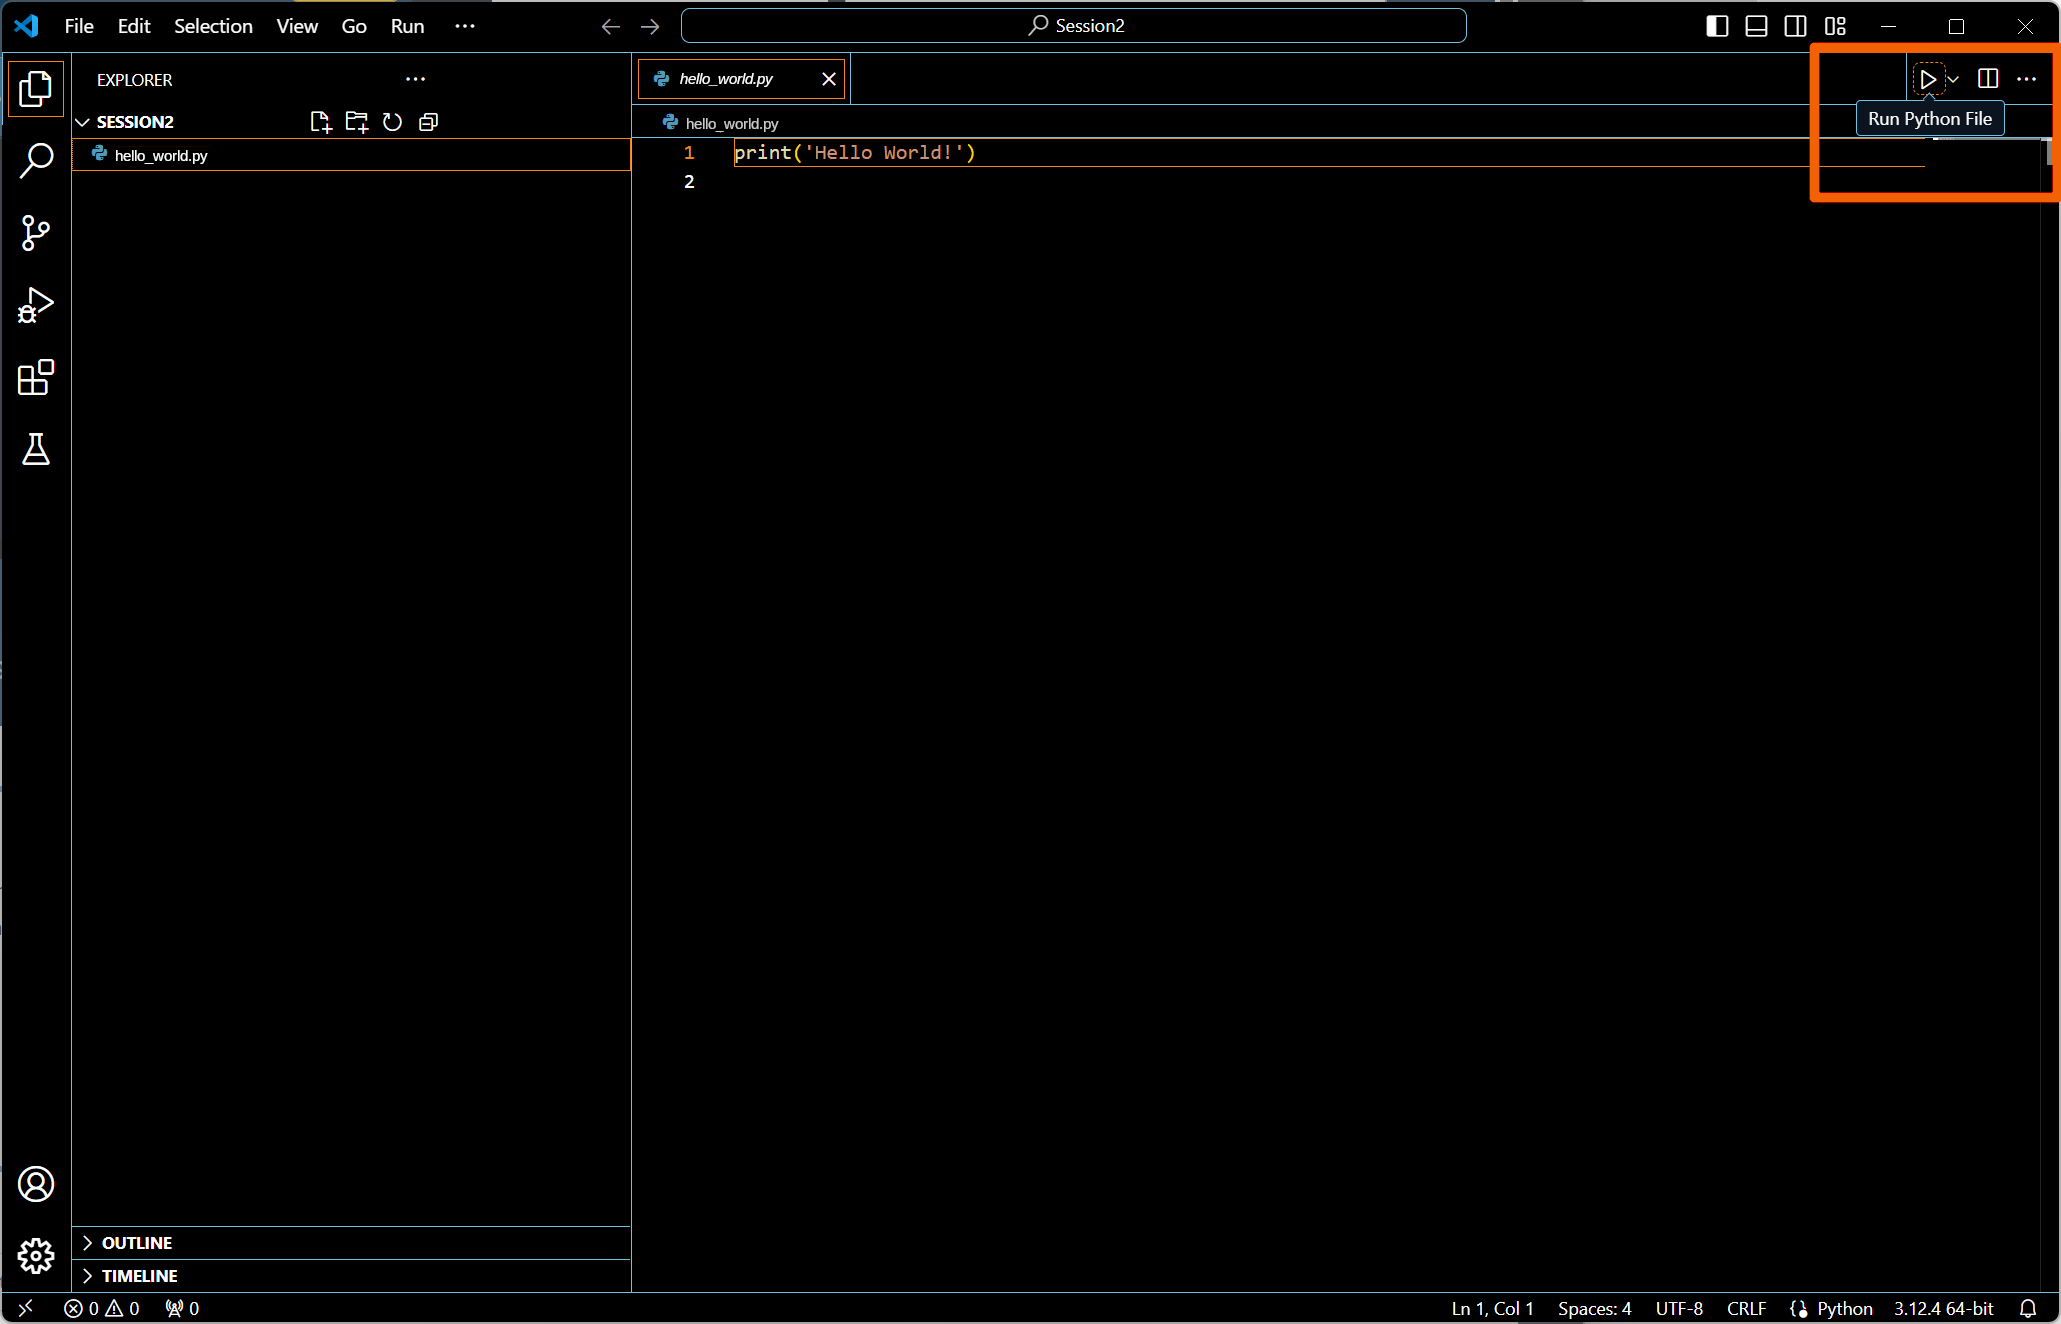
A new toolbar should have appeared on the upper right part of the hello_world.py editor, allowing you to execute the script.
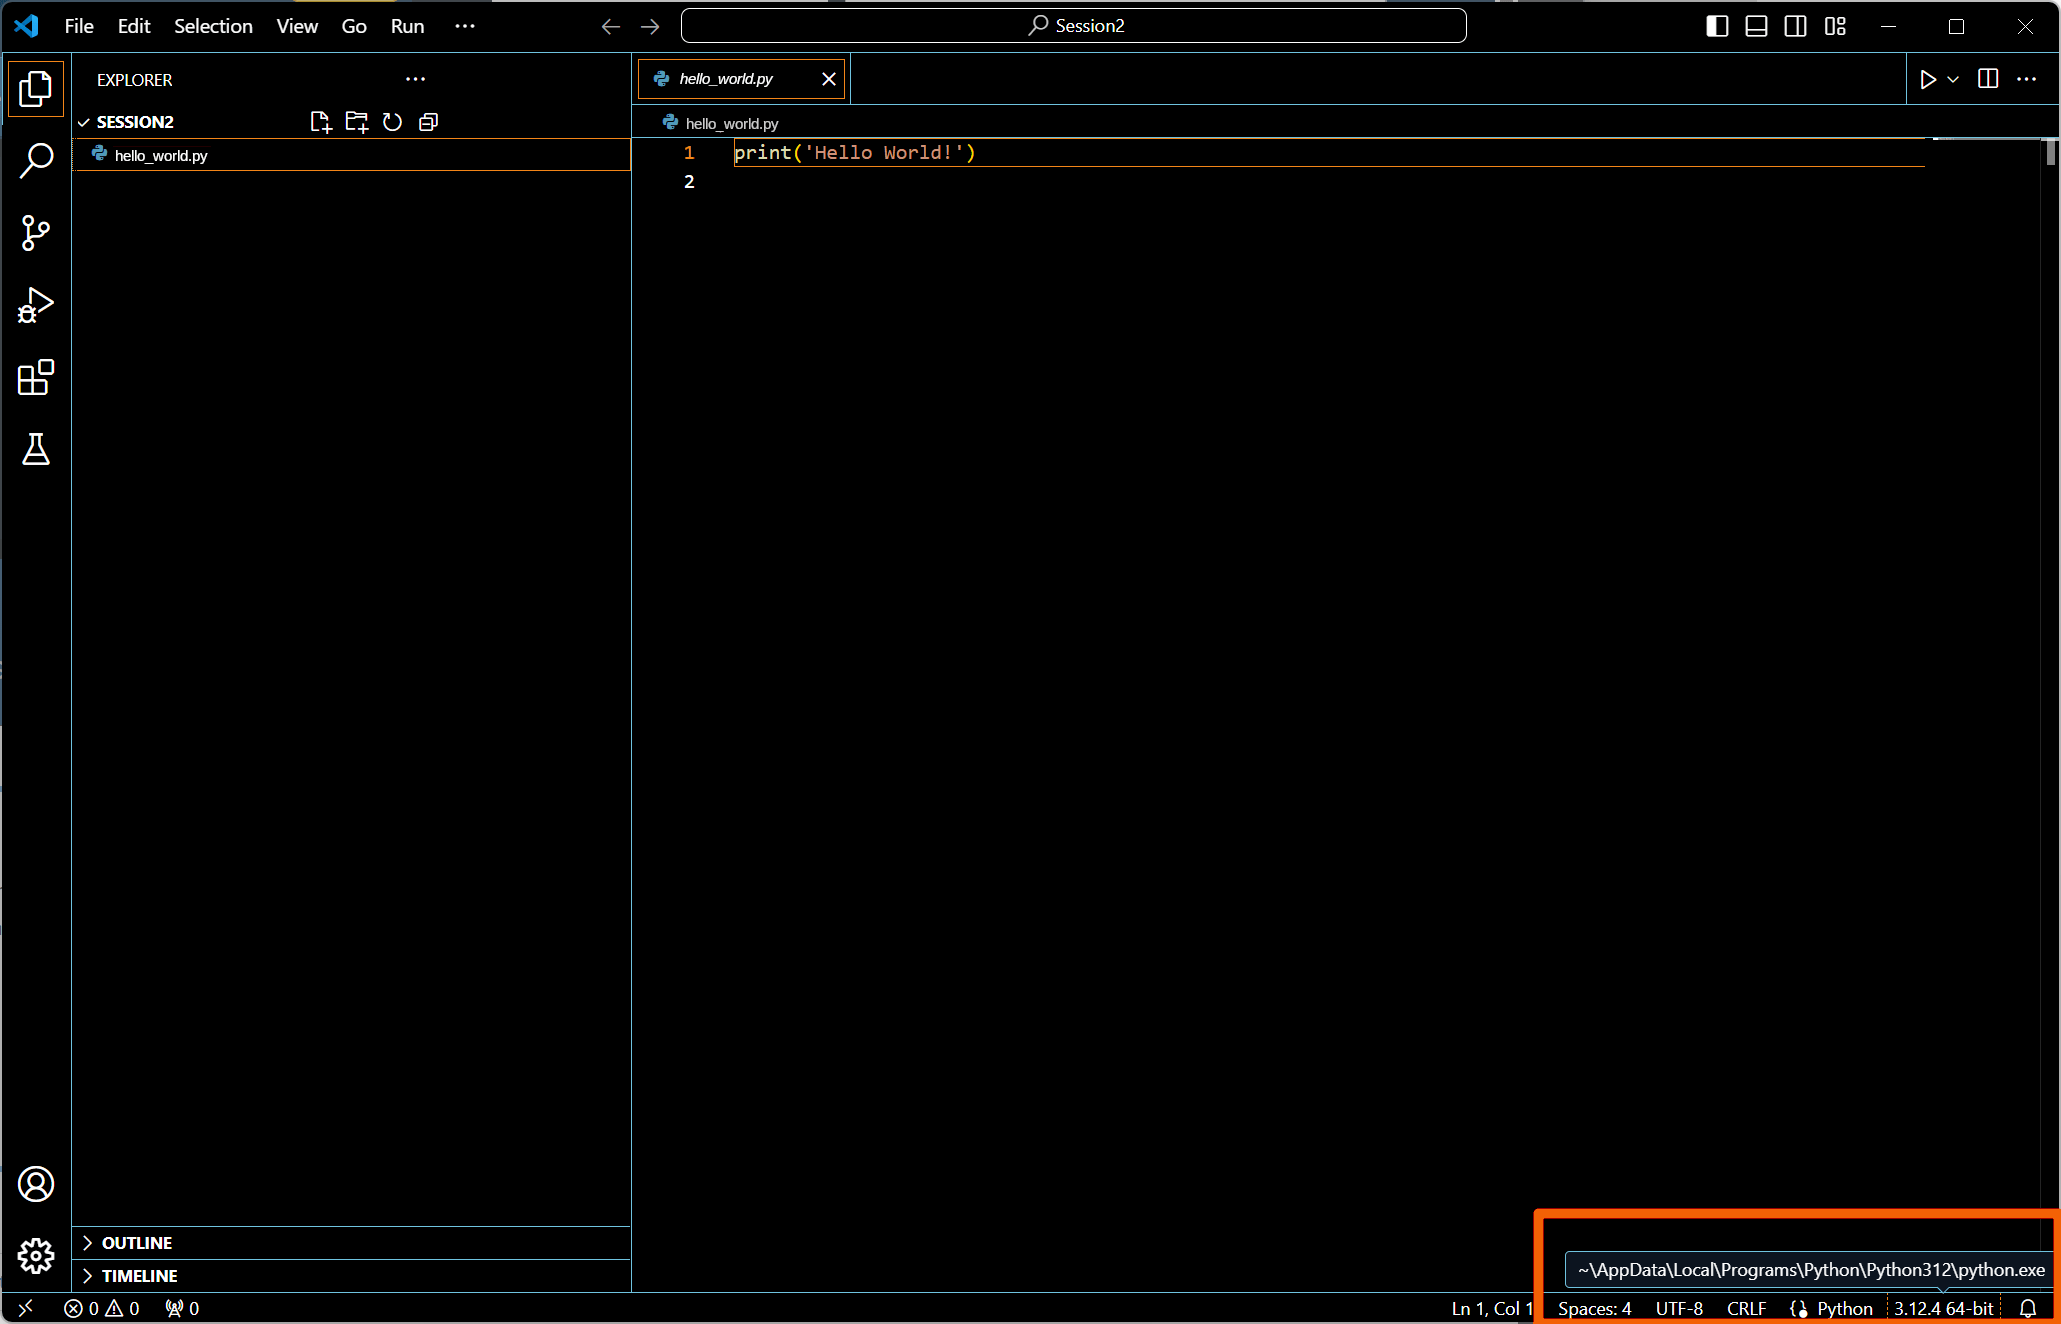 The status bar indicates the Python interpreter that will be used for further execution.
As you have already one (installed during the first part of the activity), it becomes the default one.
To know where the Python interpreter that will be used is installed, just position the mouse cursor over the right part of the status bar.
The status bar indicates the Python interpreter that will be used for further execution.
As you have already one (installed during the first part of the activity), it becomes the default one.
To know where the Python interpreter that will be used is installed, just position the mouse cursor over the right part of the status bar.
If you have several interpreters installed on your system, either Visual Studio Code will ask you which one to use at the first execution, or you may define your own specific configuration through the JSON file launch.json, created in your workspace.
This is in particular useful if you want to always run Python with a specific argument for instance.
Now, you are ready to run your script:
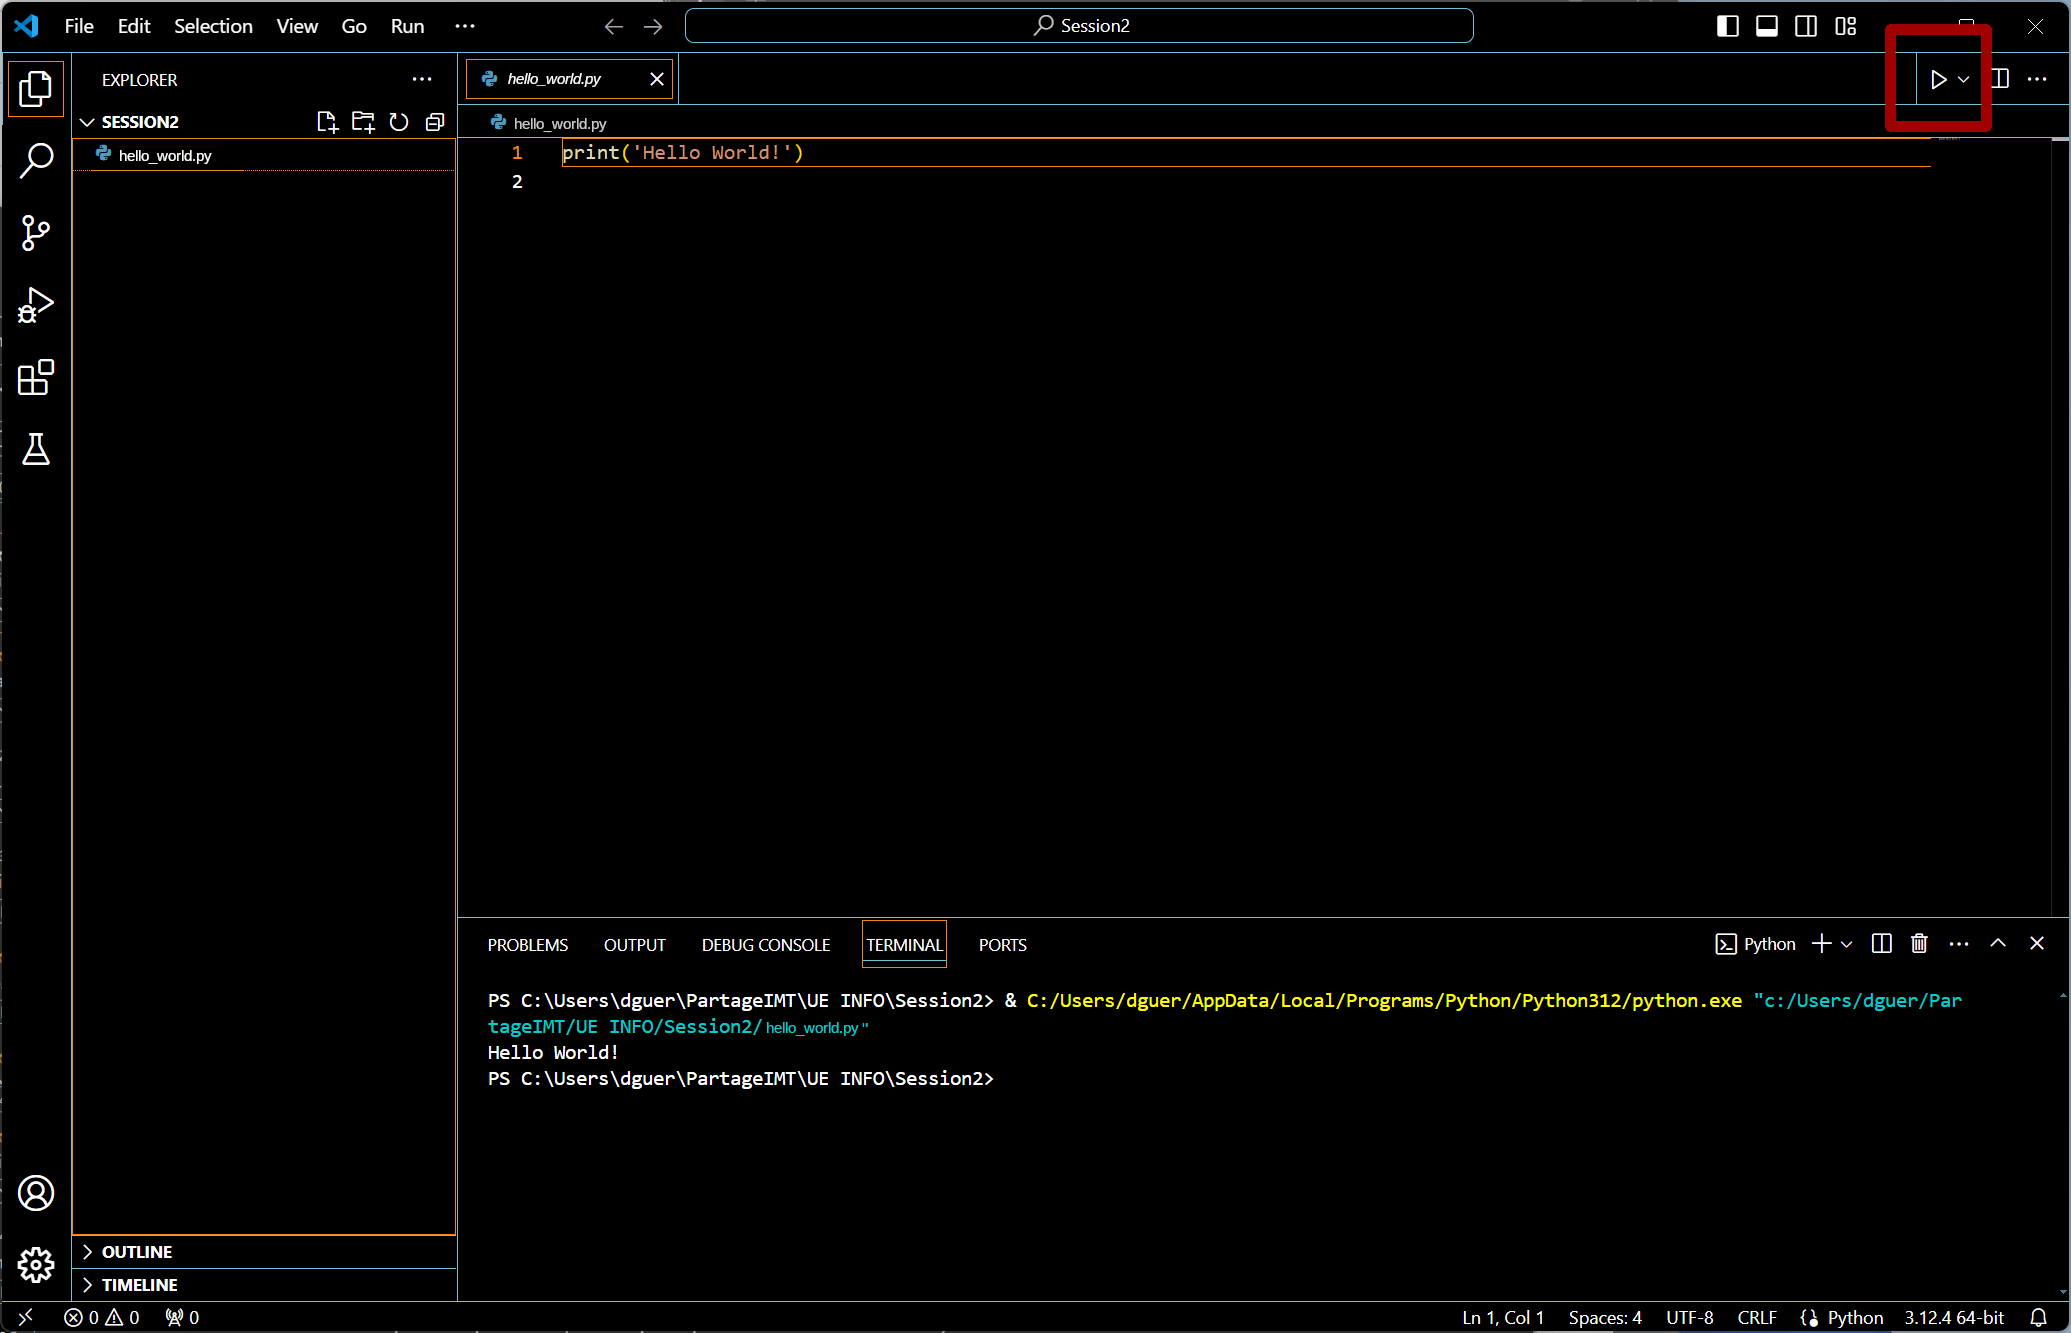 On the upper right part of the
 hello_world.py editing tab, just click on the triangle “Run the Python file”.
The terminal panel opens (if needed), to let you see the execution of Python script (as previously).
The Python extension is not the Python intrepreter. It is clear that the button is only a (powerful) shortcut to launch the Python interpreter you installed in the previous lab. The extension does not install a Python interpreter. In the case, you don’t have any Python interpreter installed on your system, Visual Studio Code alone does not know what to do, and asks you to install (or select) a Python interpreter.
The same separation between the interface provided by the IDE and the required tools, applies when you use other languages. For instance, in the case of C++ coding, you have to install a compiler (e.g., gcc, clang) prior to use any C++ extension in Visual Studio Code that help you copile your source code.
4.4 — Configure/tune your IDE?
You can configure Visual Studio Code to your liking through its various settings. Nearly every part of VSCode’s editor, user interface, and functional behavior has options you can modify.
However, it is important to note that Visual Studio Code provides different scopes for settings:
-
User settings – These settings apply globally to any instance of Visual Studio Code you open.
-
Workspace settings – These settings are stored inside your workspace and only apply when the workspace is opened. These settings override the user settings.
The purpose of this section is:
- To learn how to tune basic settings (we choose the editor font size).
- To observe the impact of such a tuning.
- To understand where and how Visual Studio Code stores settings.
From a more practical point of view, it also introduces the “Command Palette”, one of the most used mechansim in Visual Studio Code.
4.4.1 Open the IDE settings window
Open the GUI for settings using the menu “File/Preferences/Settings”.
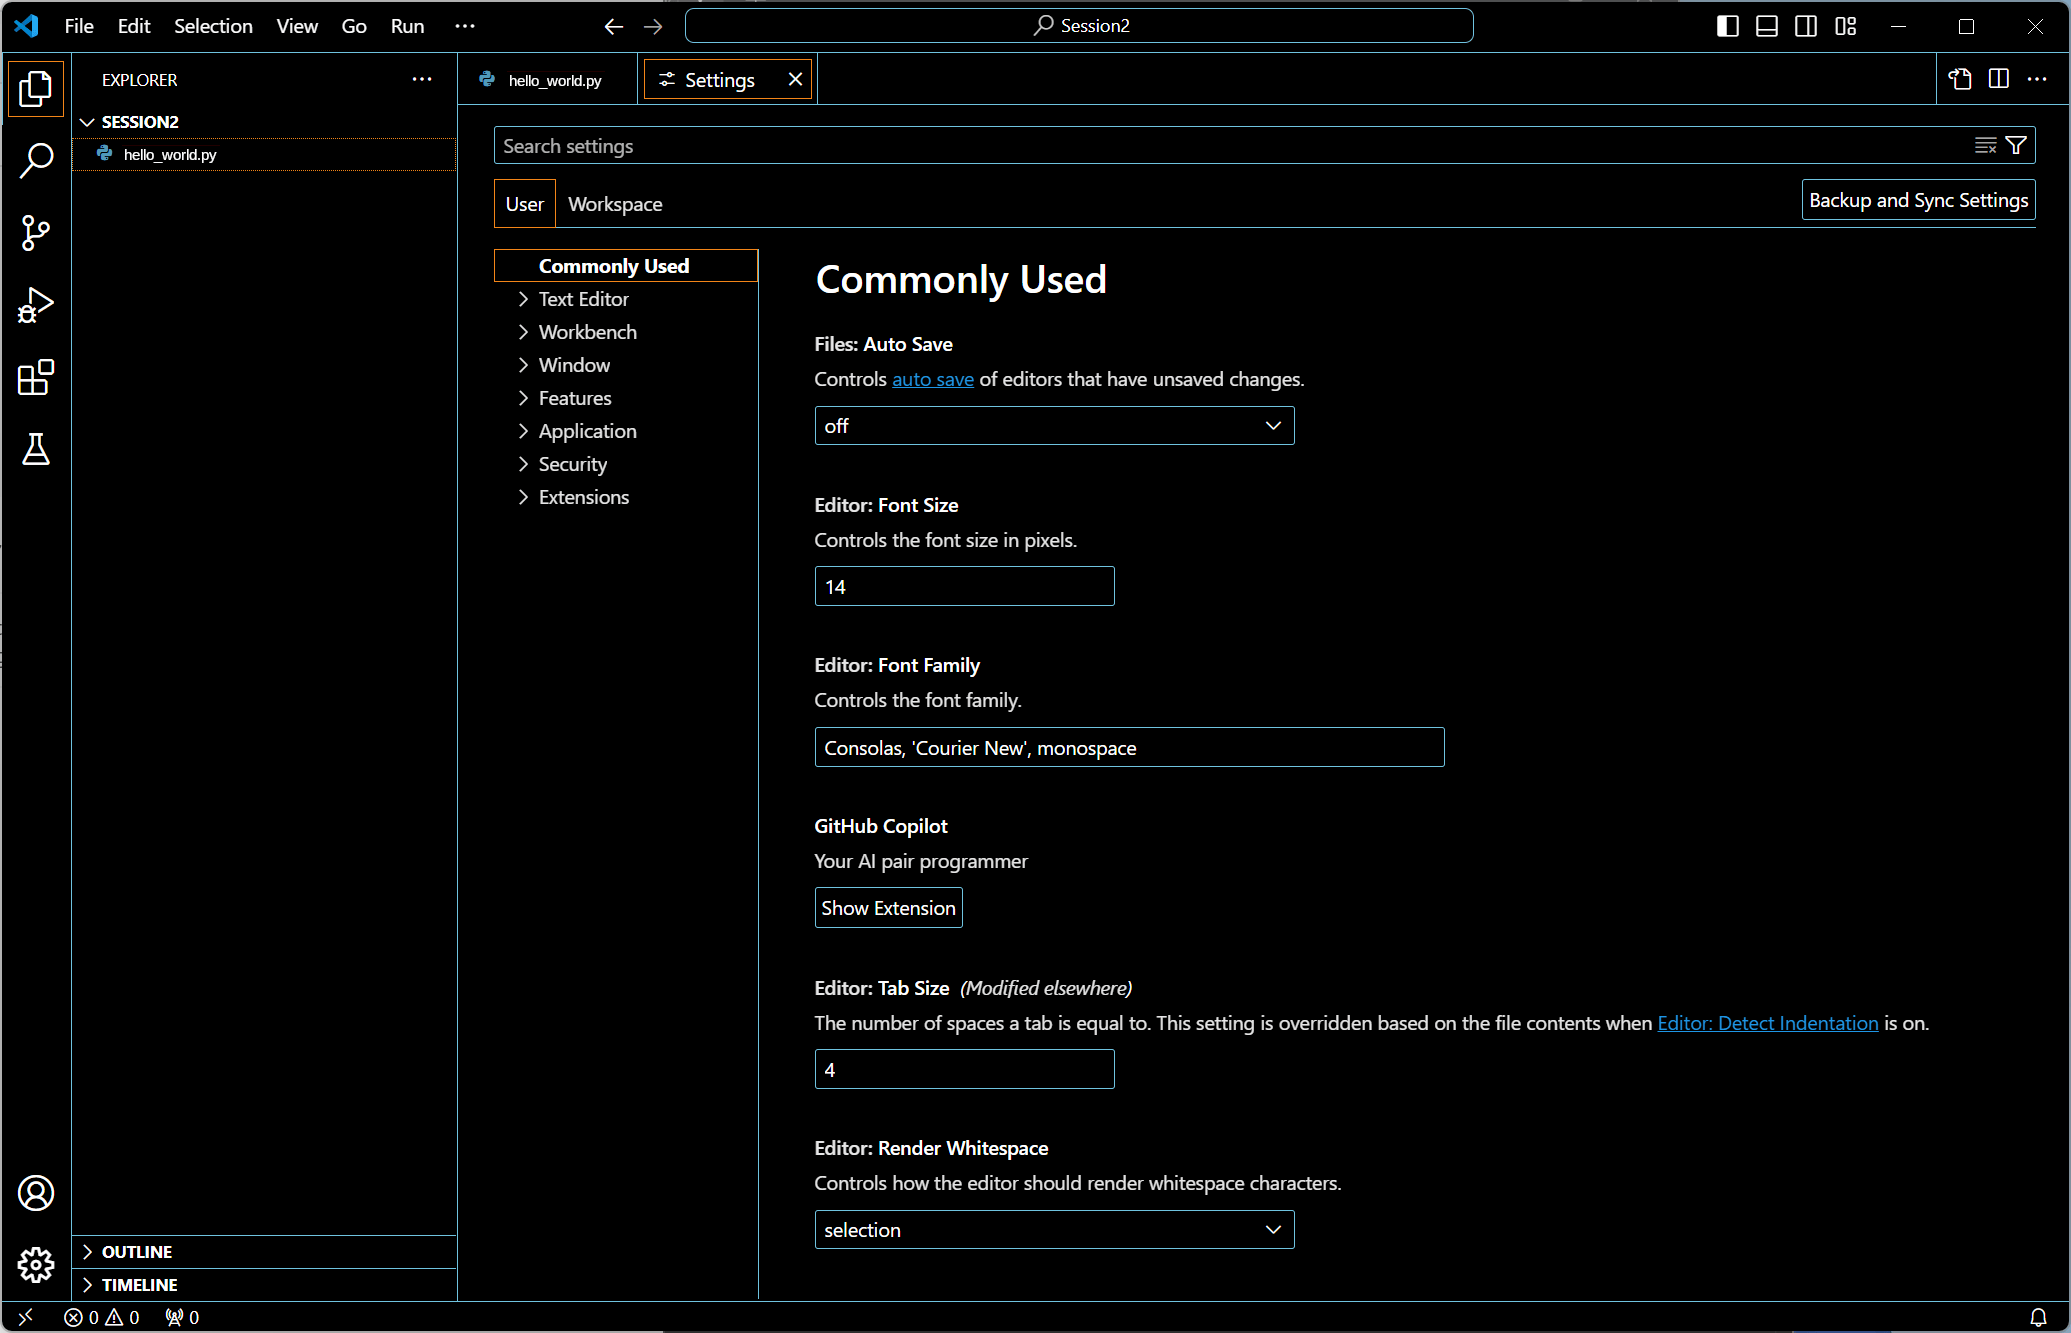 The new window “Settings” lists all the possible elements that you may tune either at the User level or at the Workspace level.
That’s the reason why you have two lists, in two separate tabs.
You can check that the two lists globally propose the same settings, with some extra for the Workspace list.
The new window “Settings” lists all the possible elements that you may tune either at the User level or at the Workspace level.
That’s the reason why you have two lists, in two separate tabs.
You can check that the two lists globally propose the same settings, with some extra for the Workspace list.
4.4.2 — Modify one setting
The folder <docs>/IMT/computer_science/s5/env/session_2/ is currently opened (as a one-folder workspace), so we will modify the editor font size only for this workspace, changing it to 36.
The editor font size in the User settings remains at 14.
Be sure you are modifying the setting in the Workspace tab and not in the User tab.
You have two ways to find the field corresponding to the setting you want to modify:
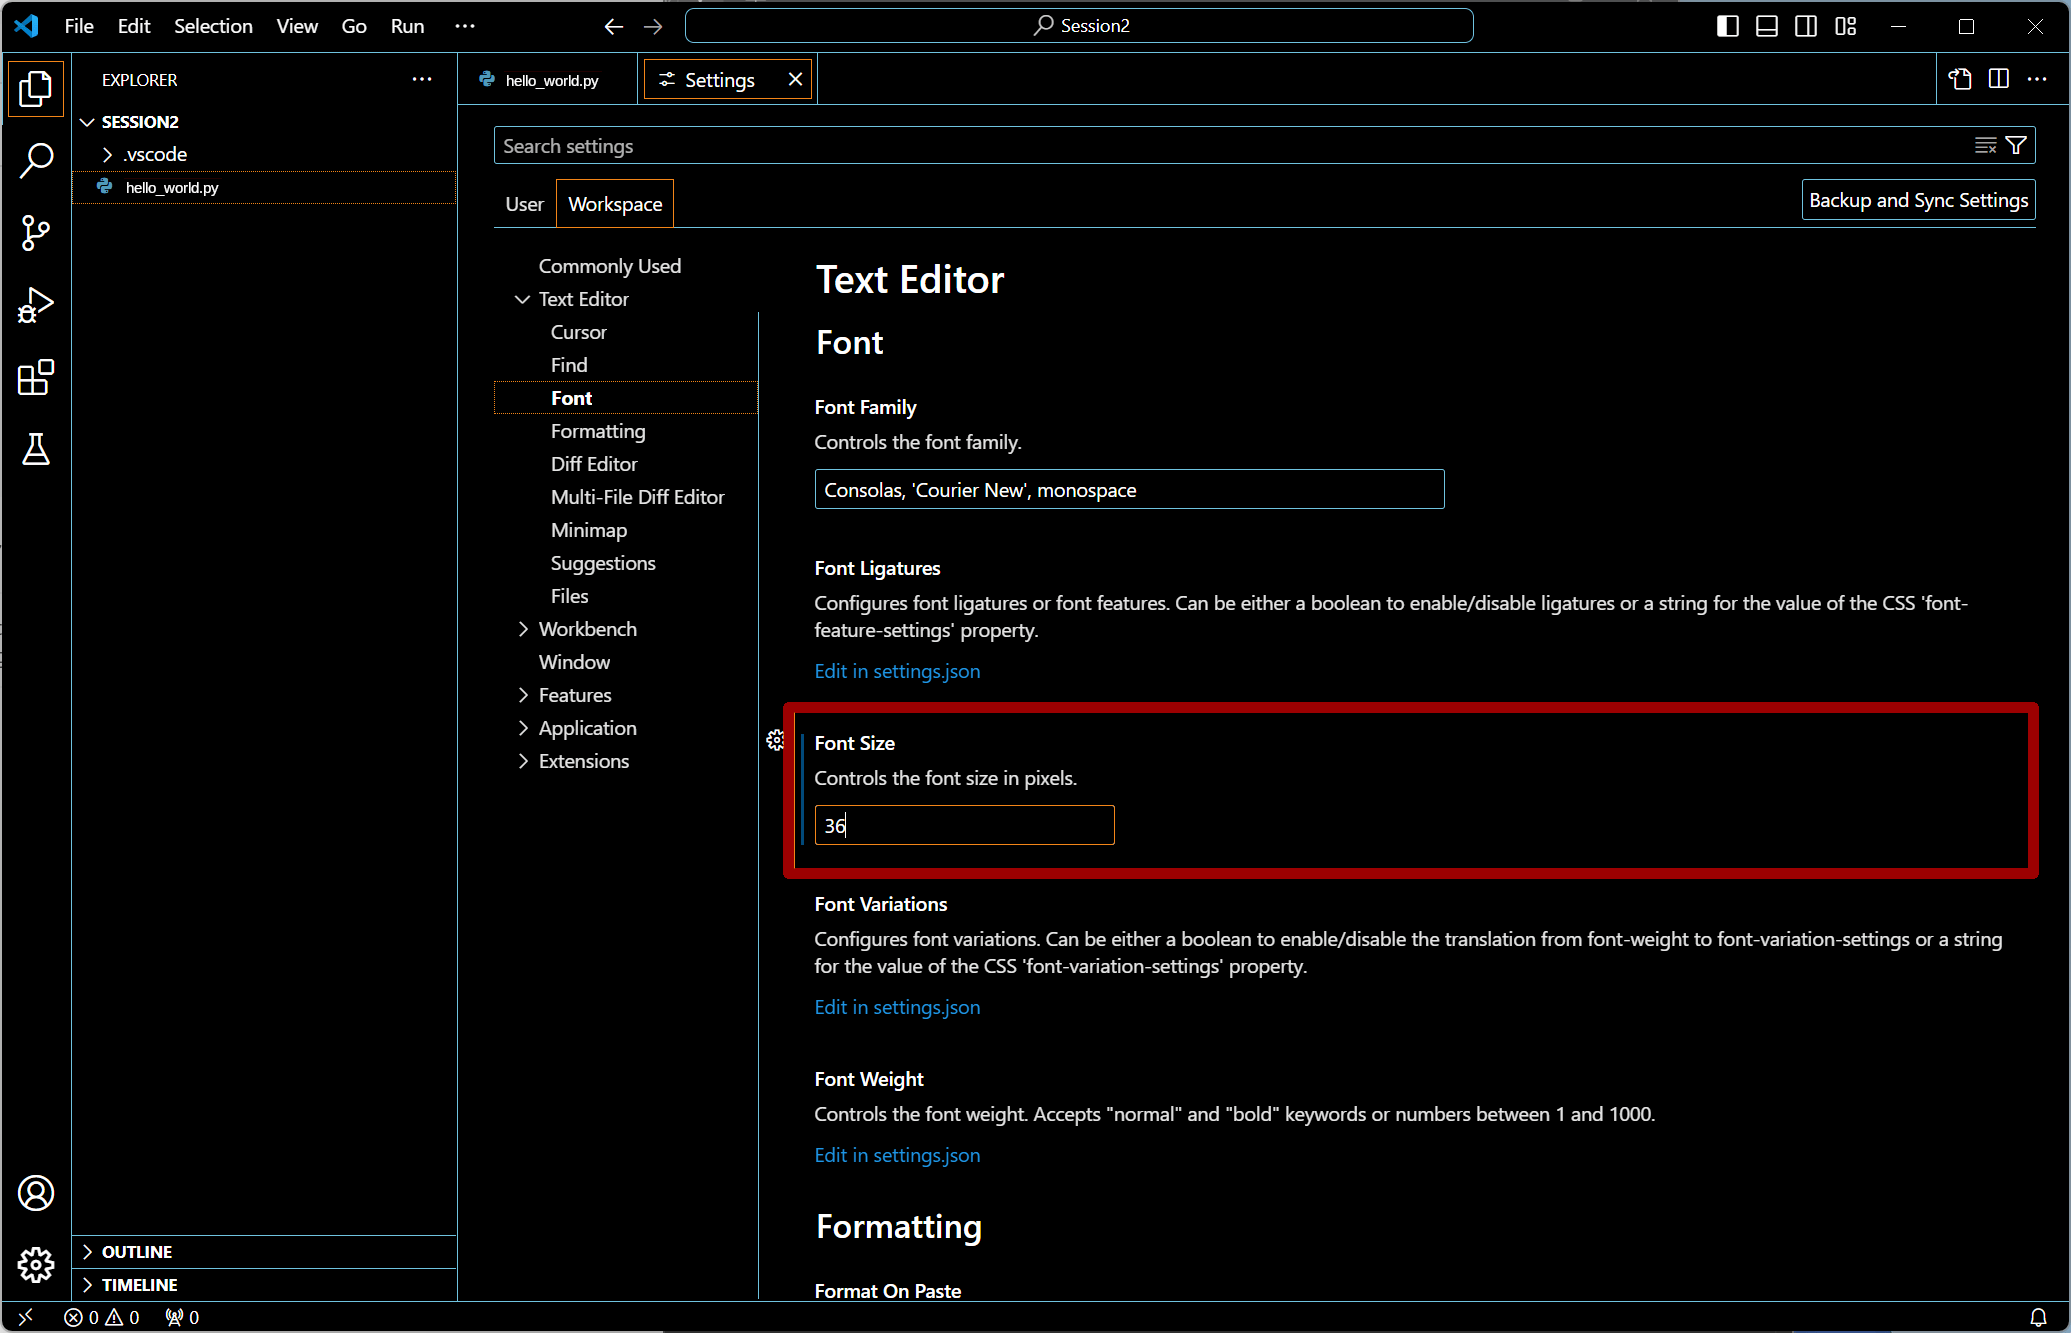 Either, go into the tree of settings proposed on the left part of the page.
In our case, you have to open the “Text Editor” tree, then to open the “Font” category, and the right part of the page will allow to modify all the setings of this category.
Among these settings, you’ll find the “Font Size” settings.
Either, go into the tree of settings proposed on the left part of the page.
In our case, you have to open the “Text Editor” tree, then to open the “Font” category, and the right part of the page will allow to modify all the setings of this category.
Among these settings, you’ll find the “Font Size” settings.
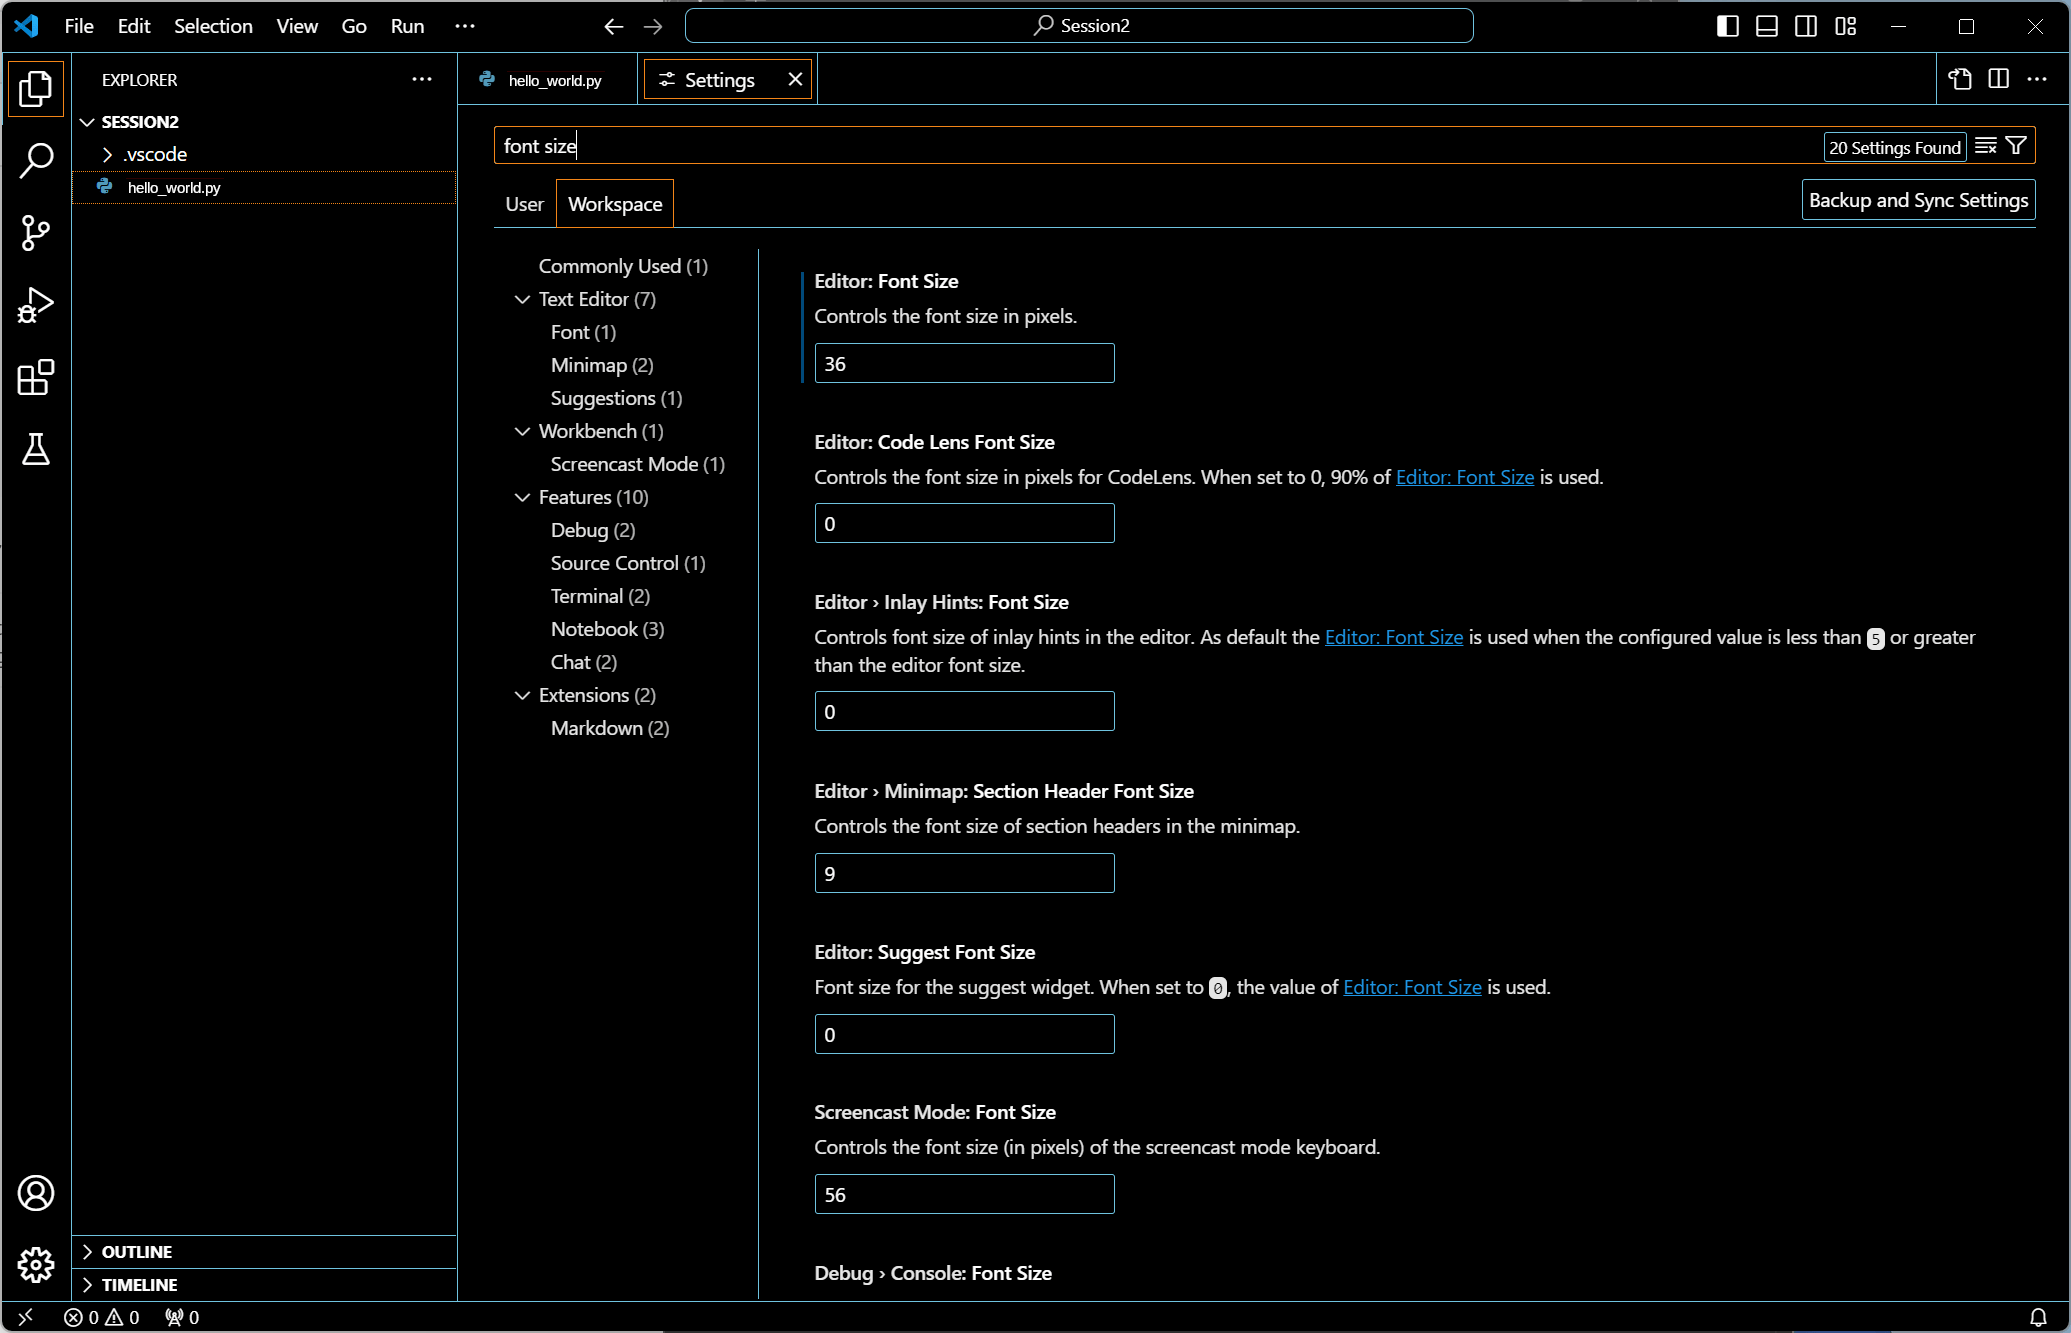 Or, use the field “Search settings” in the upper part of the page.
Type some keywords relative to the settings you want to modify (here type “font size”).
The lower part will show you all the corresponding settings.
Among these settings, you’ll find the “Font Size” settings.
Or, use the field “Search settings” in the upper part of the page.
Type some keywords relative to the settings you want to modify (here type “font size”).
The lower part will show you all the corresponding settings.
Among these settings, you’ll find the “Font Size” settings.
 Change the font size value from 14 to 36.
Once the modification done, all the editors are impacted.
Go to the window editing the
Change the font size value from 14 to 36.
Once the modification done, all the editors are impacted.
Go to the window editing the hello_world.py file, and observe the difference in size.
4.4.3 — Check the impact scope
The question here is: how to know if the font size modification only impacts the editor when the workspace is opened?
 Close the folder (i.e., the current folder is the current workspace).
 Open the
 hello_world.py file as a standalone file using the “Open File” menu, and not the “Open Folder” menu.
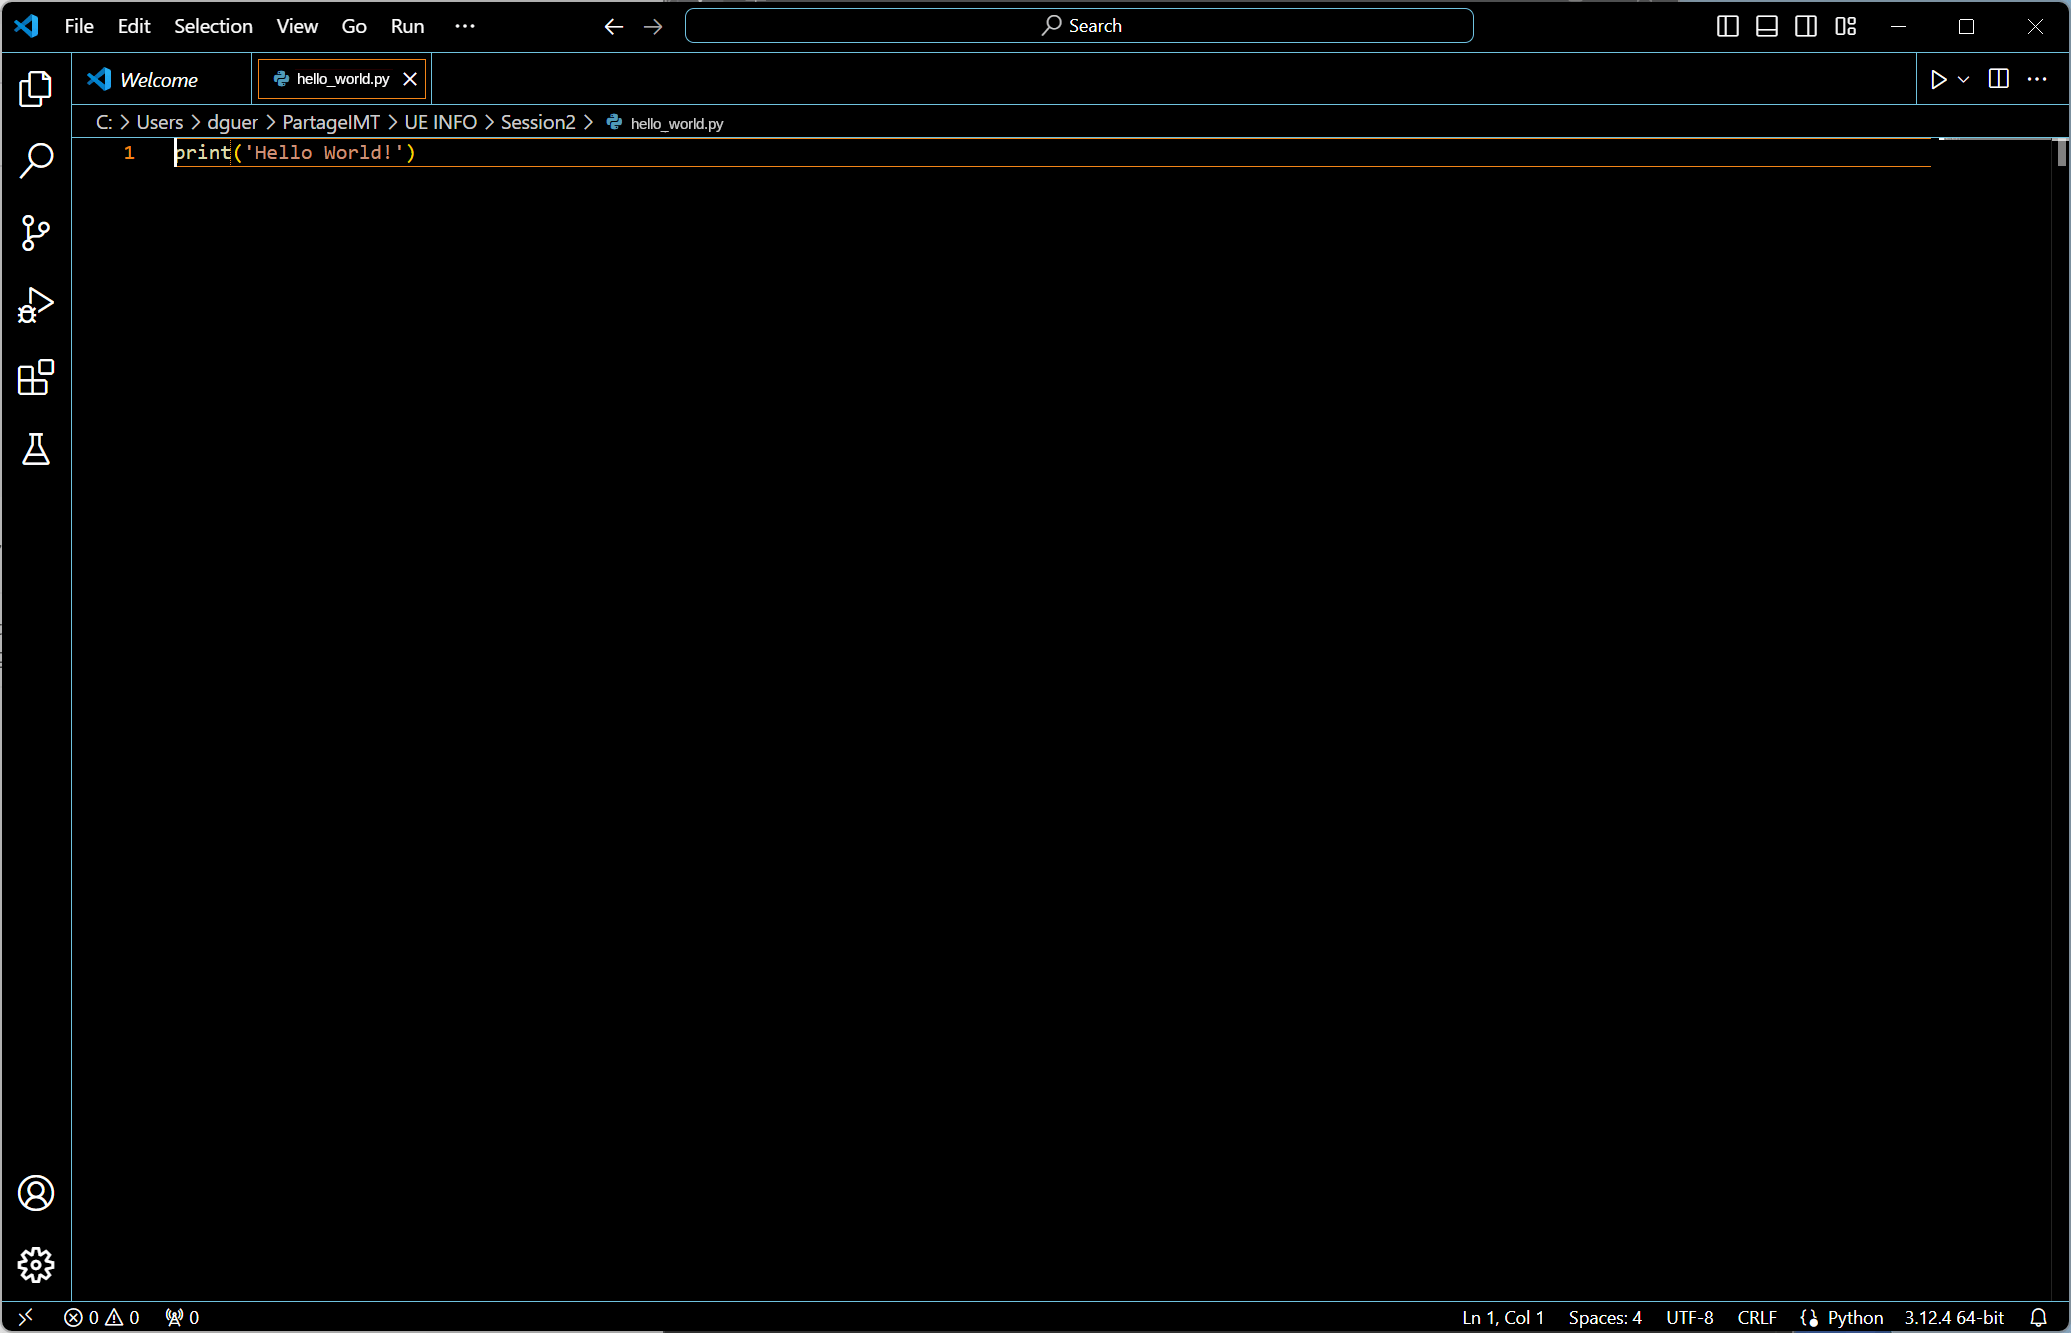 The font size in this new editor, is still 14 as there is no workspace settings in action here, only User (global) settings.
This clearly demonstrates the differences between User settings and Workspace settings.
The font size in this new editor, is still 14 as there is no workspace settings in action here, only User (global) settings.
This clearly demonstrates the differences between User settings and Workspace settings.
 Close the file and open the folder
 <docs>/IMT/computer_science/s5/env/session_2/ again.
Now, explore the various settings. You can go through the list of all possible settings and change some to adapt the GUI to your preferences (e.g., background color, text color, tab settings).
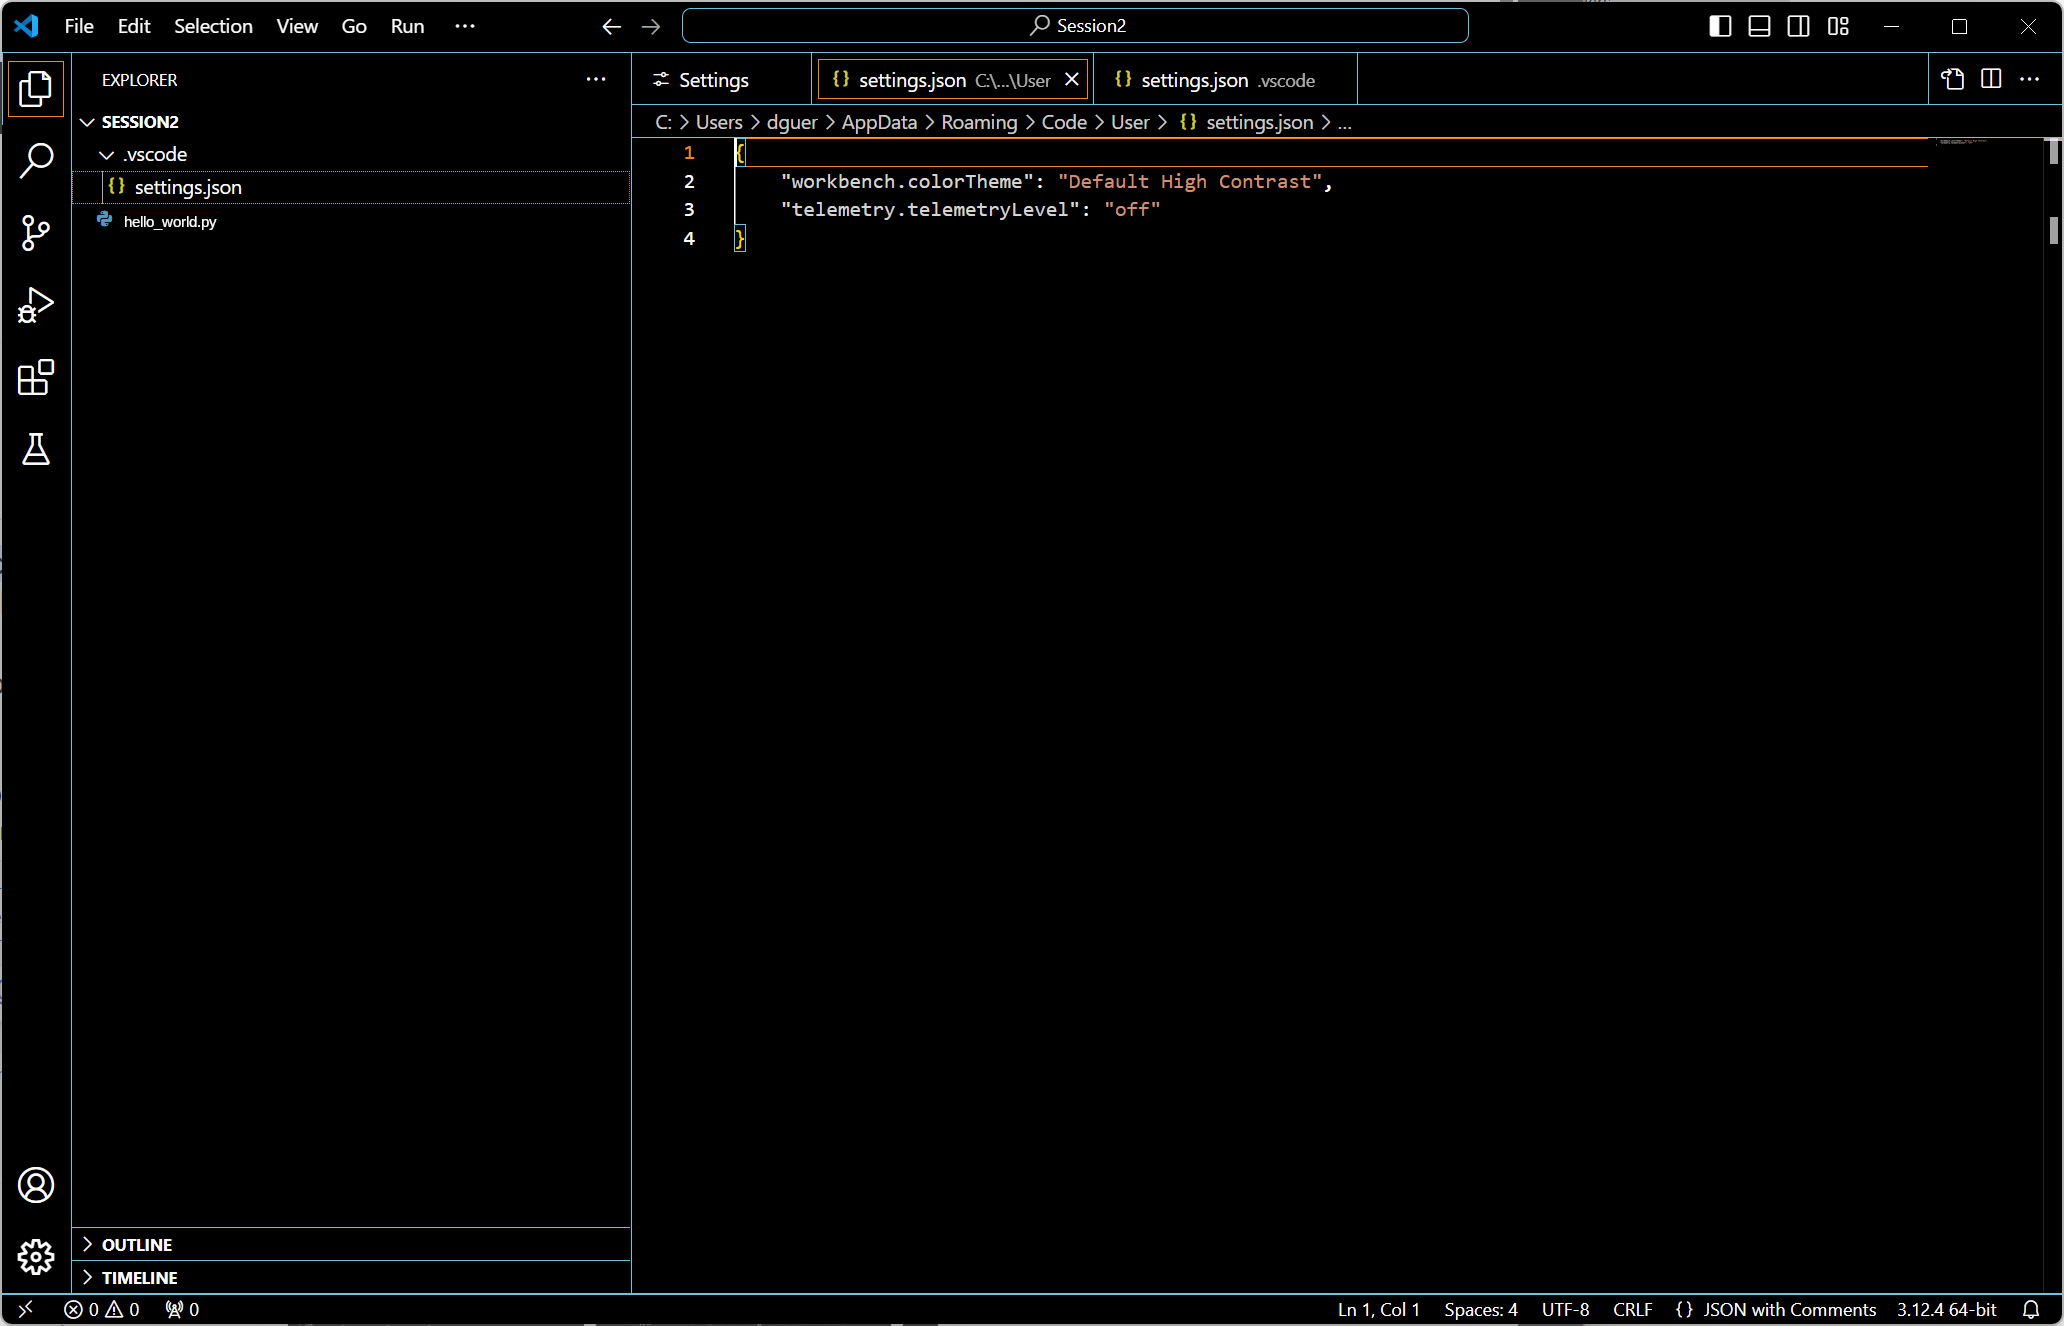
4.4.4 — Where and how are the Workspace settings stored?
Since you changed the font size, have you noticed any other changes?
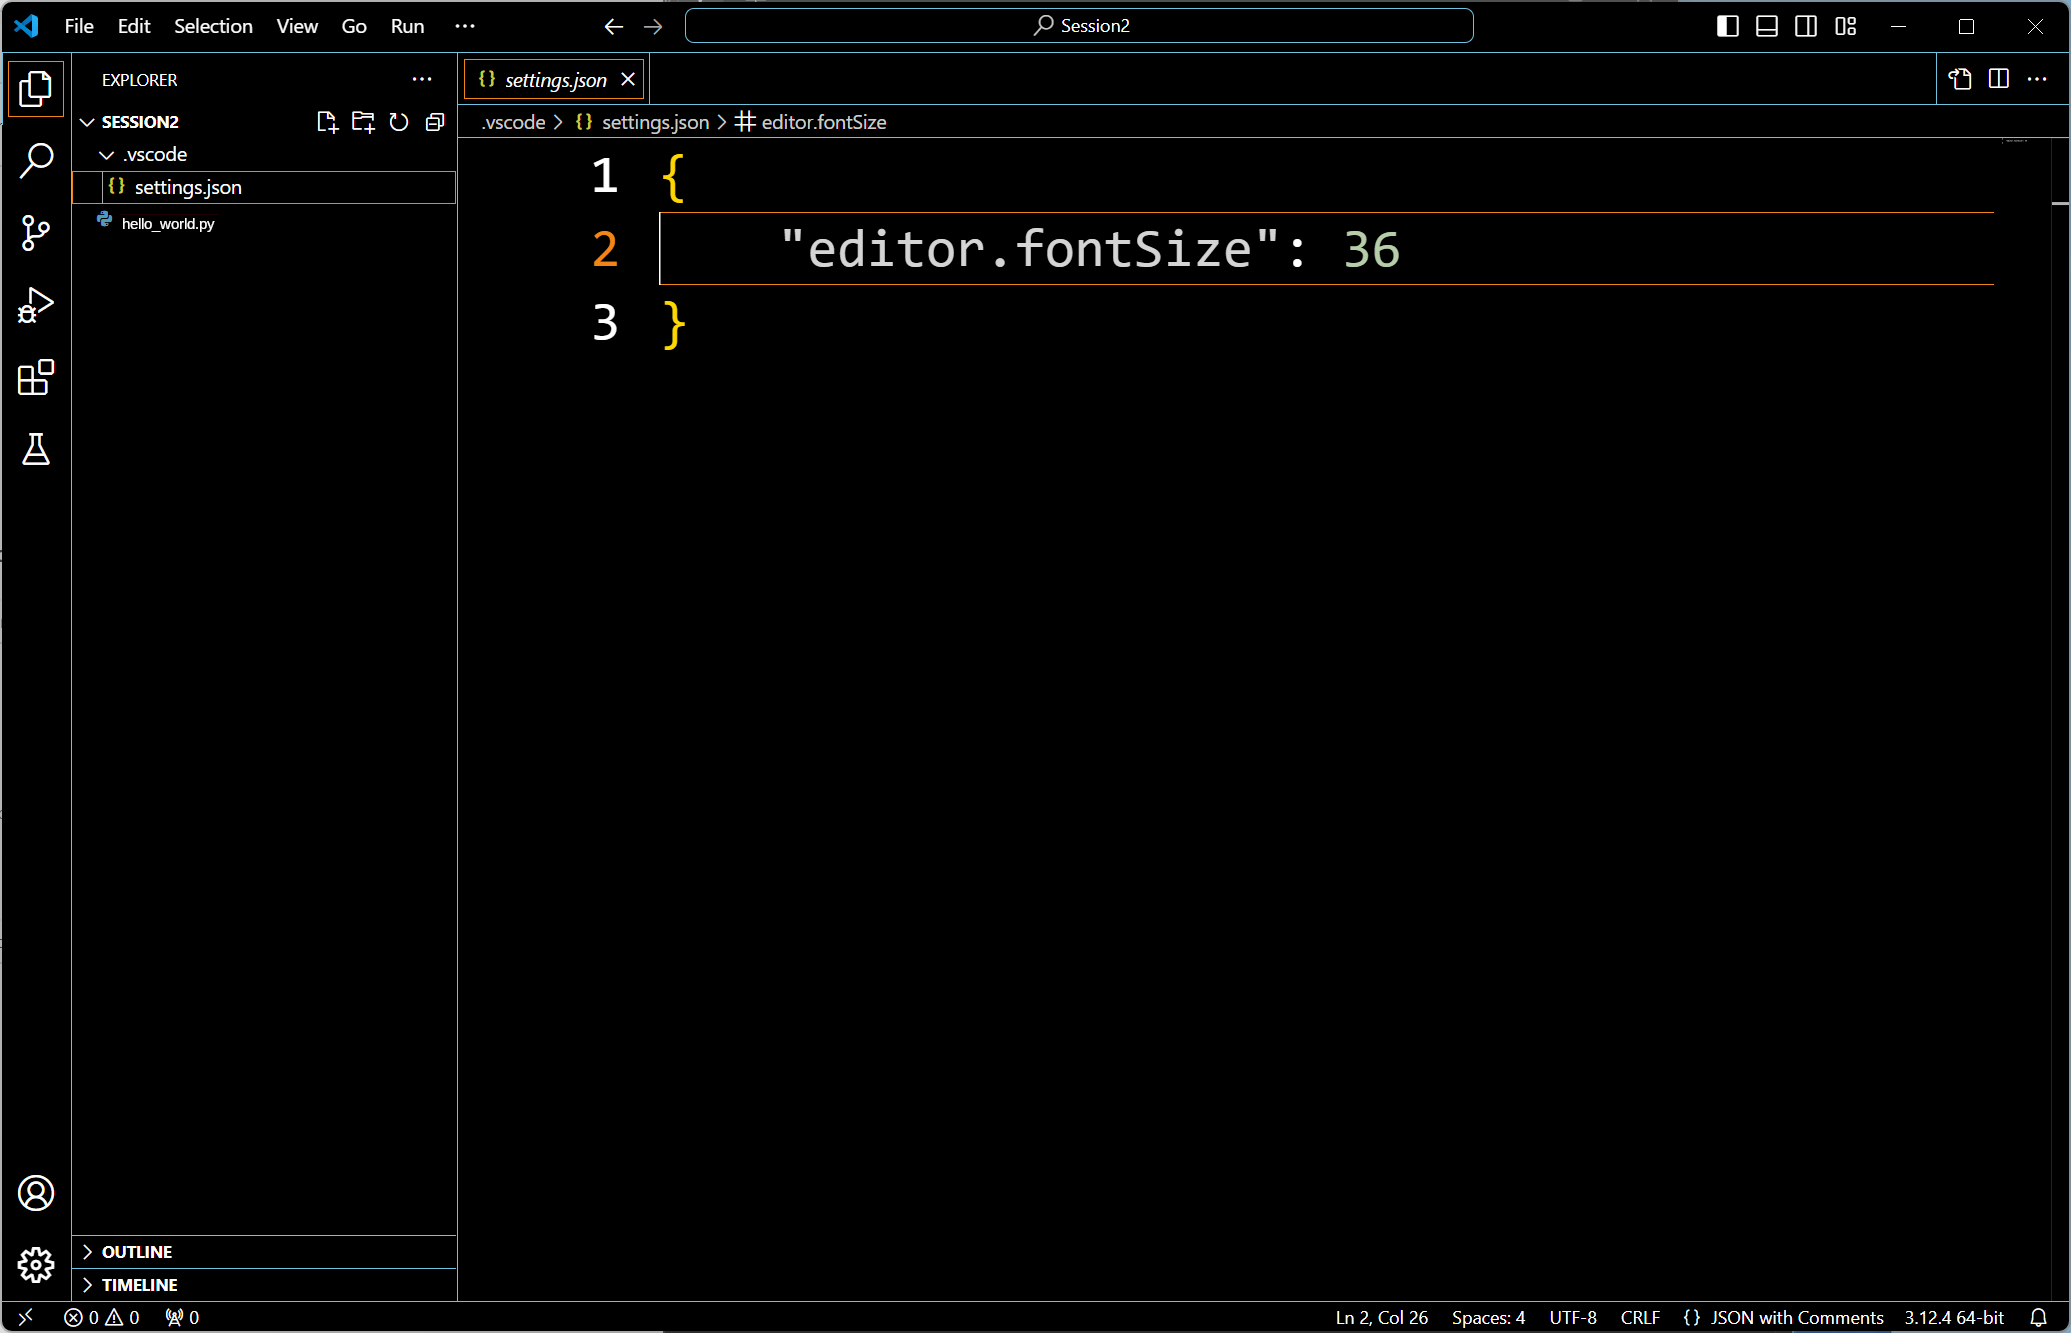
If you look closely, a new sub-folder named .vscode appeared in the <docs>/IMT/computer_science/s5/env/session_2/ workspace folder.
It contains a new JSON file settings.json, which contains all the settings you have modified with their updated values.
Can we manually edit the settings through the settings.json JSON file?
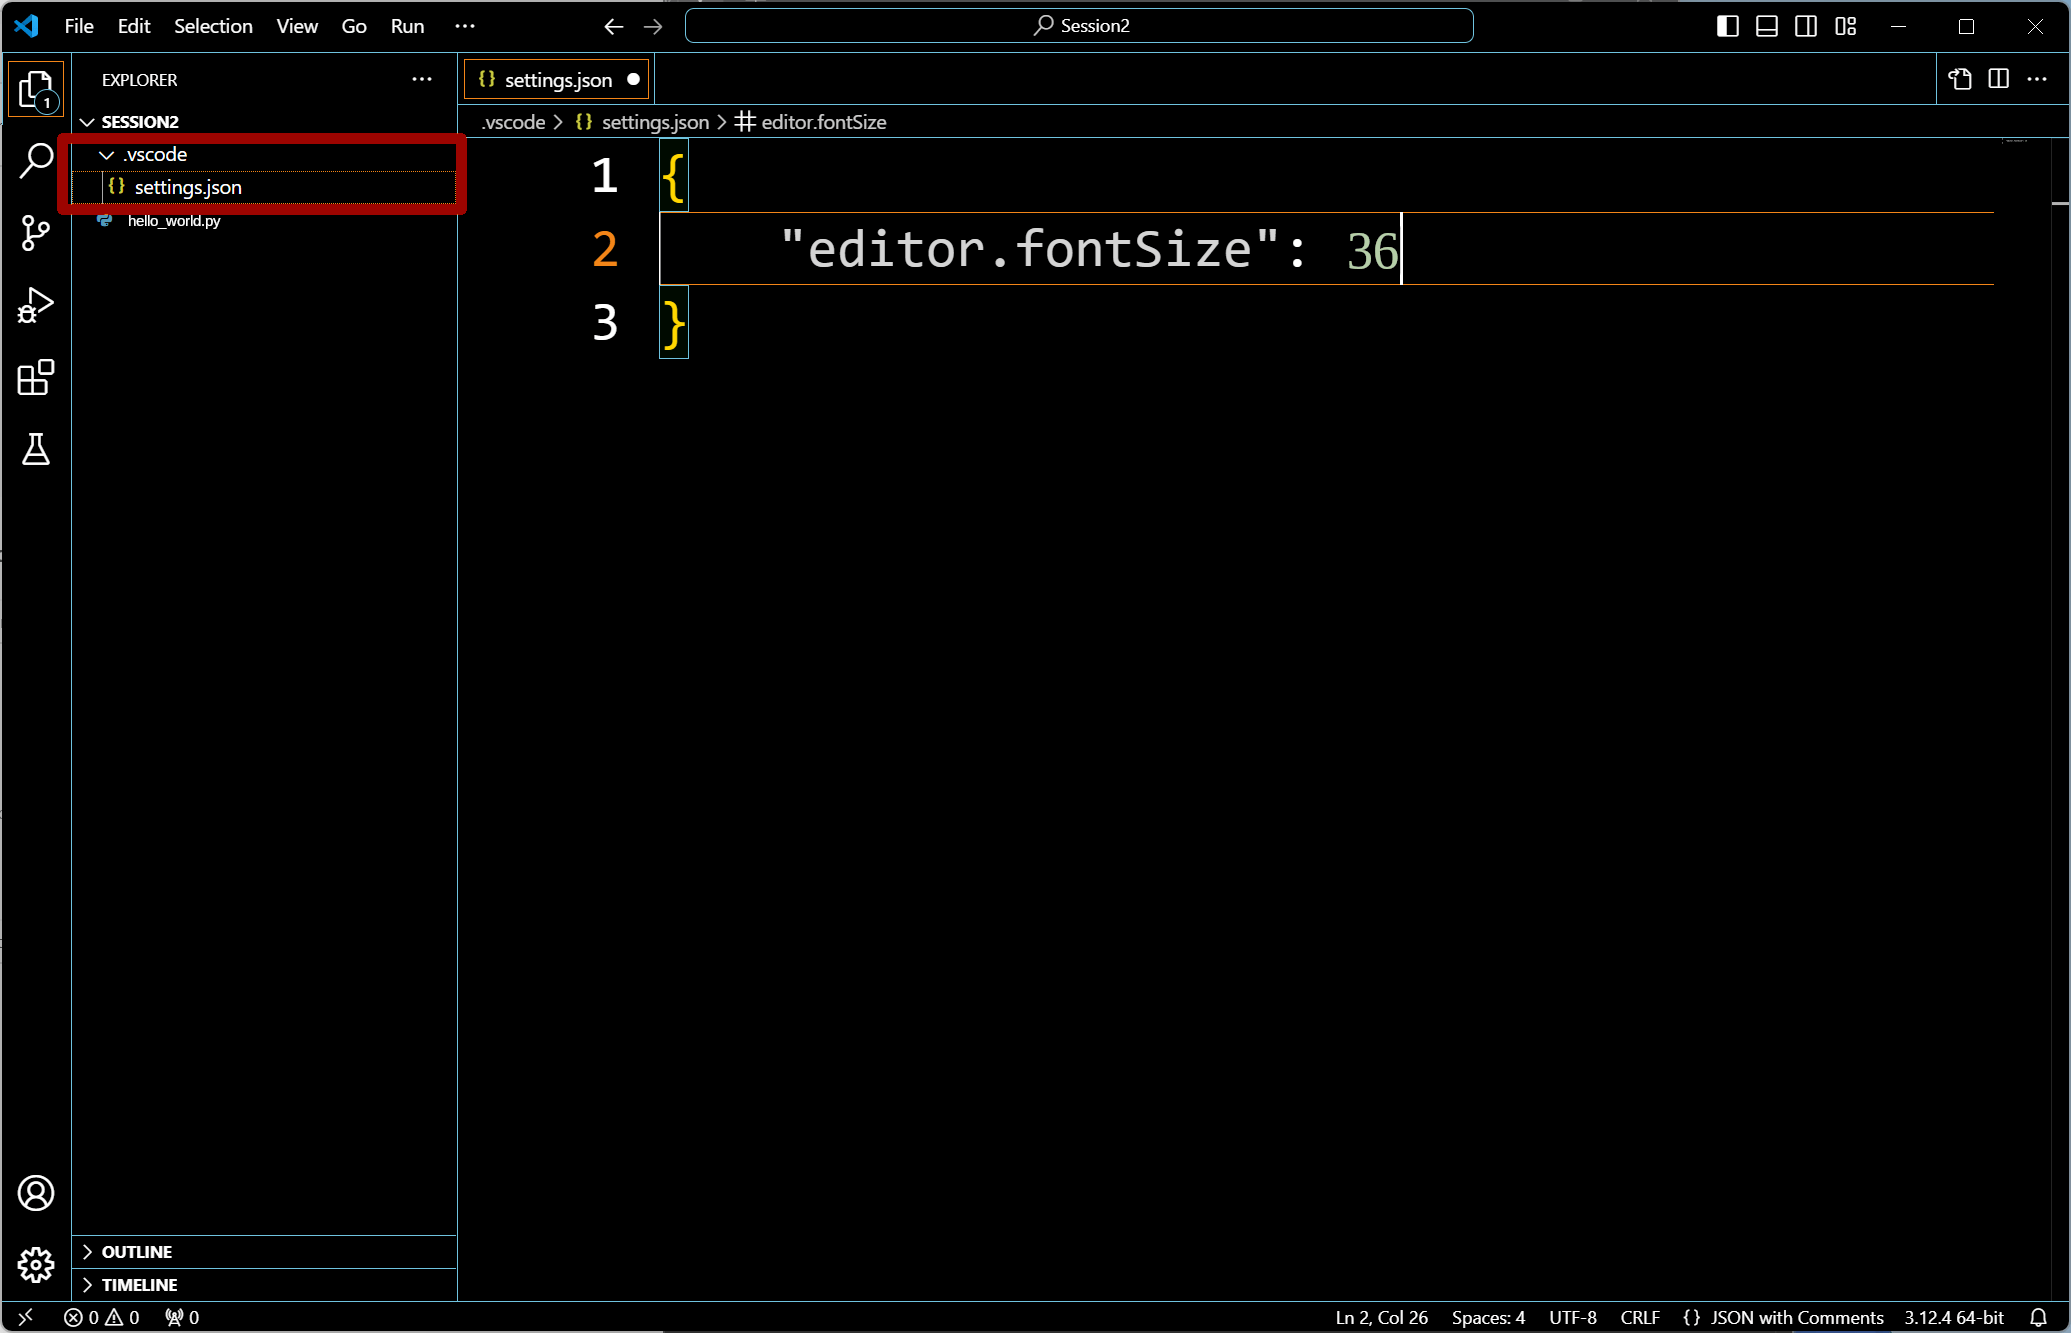 As it is a text file, you can open the JSON
 settings.json file in Visual Studio Code like any text file.
Check the value of the key editor.fontSize (this is the key that stores the editor font size. )
You should find the value you set earlier (here it was 36).
Note that this font size is also used to display the “settings.json” file as the workspace folder “Session2” is currently opened.
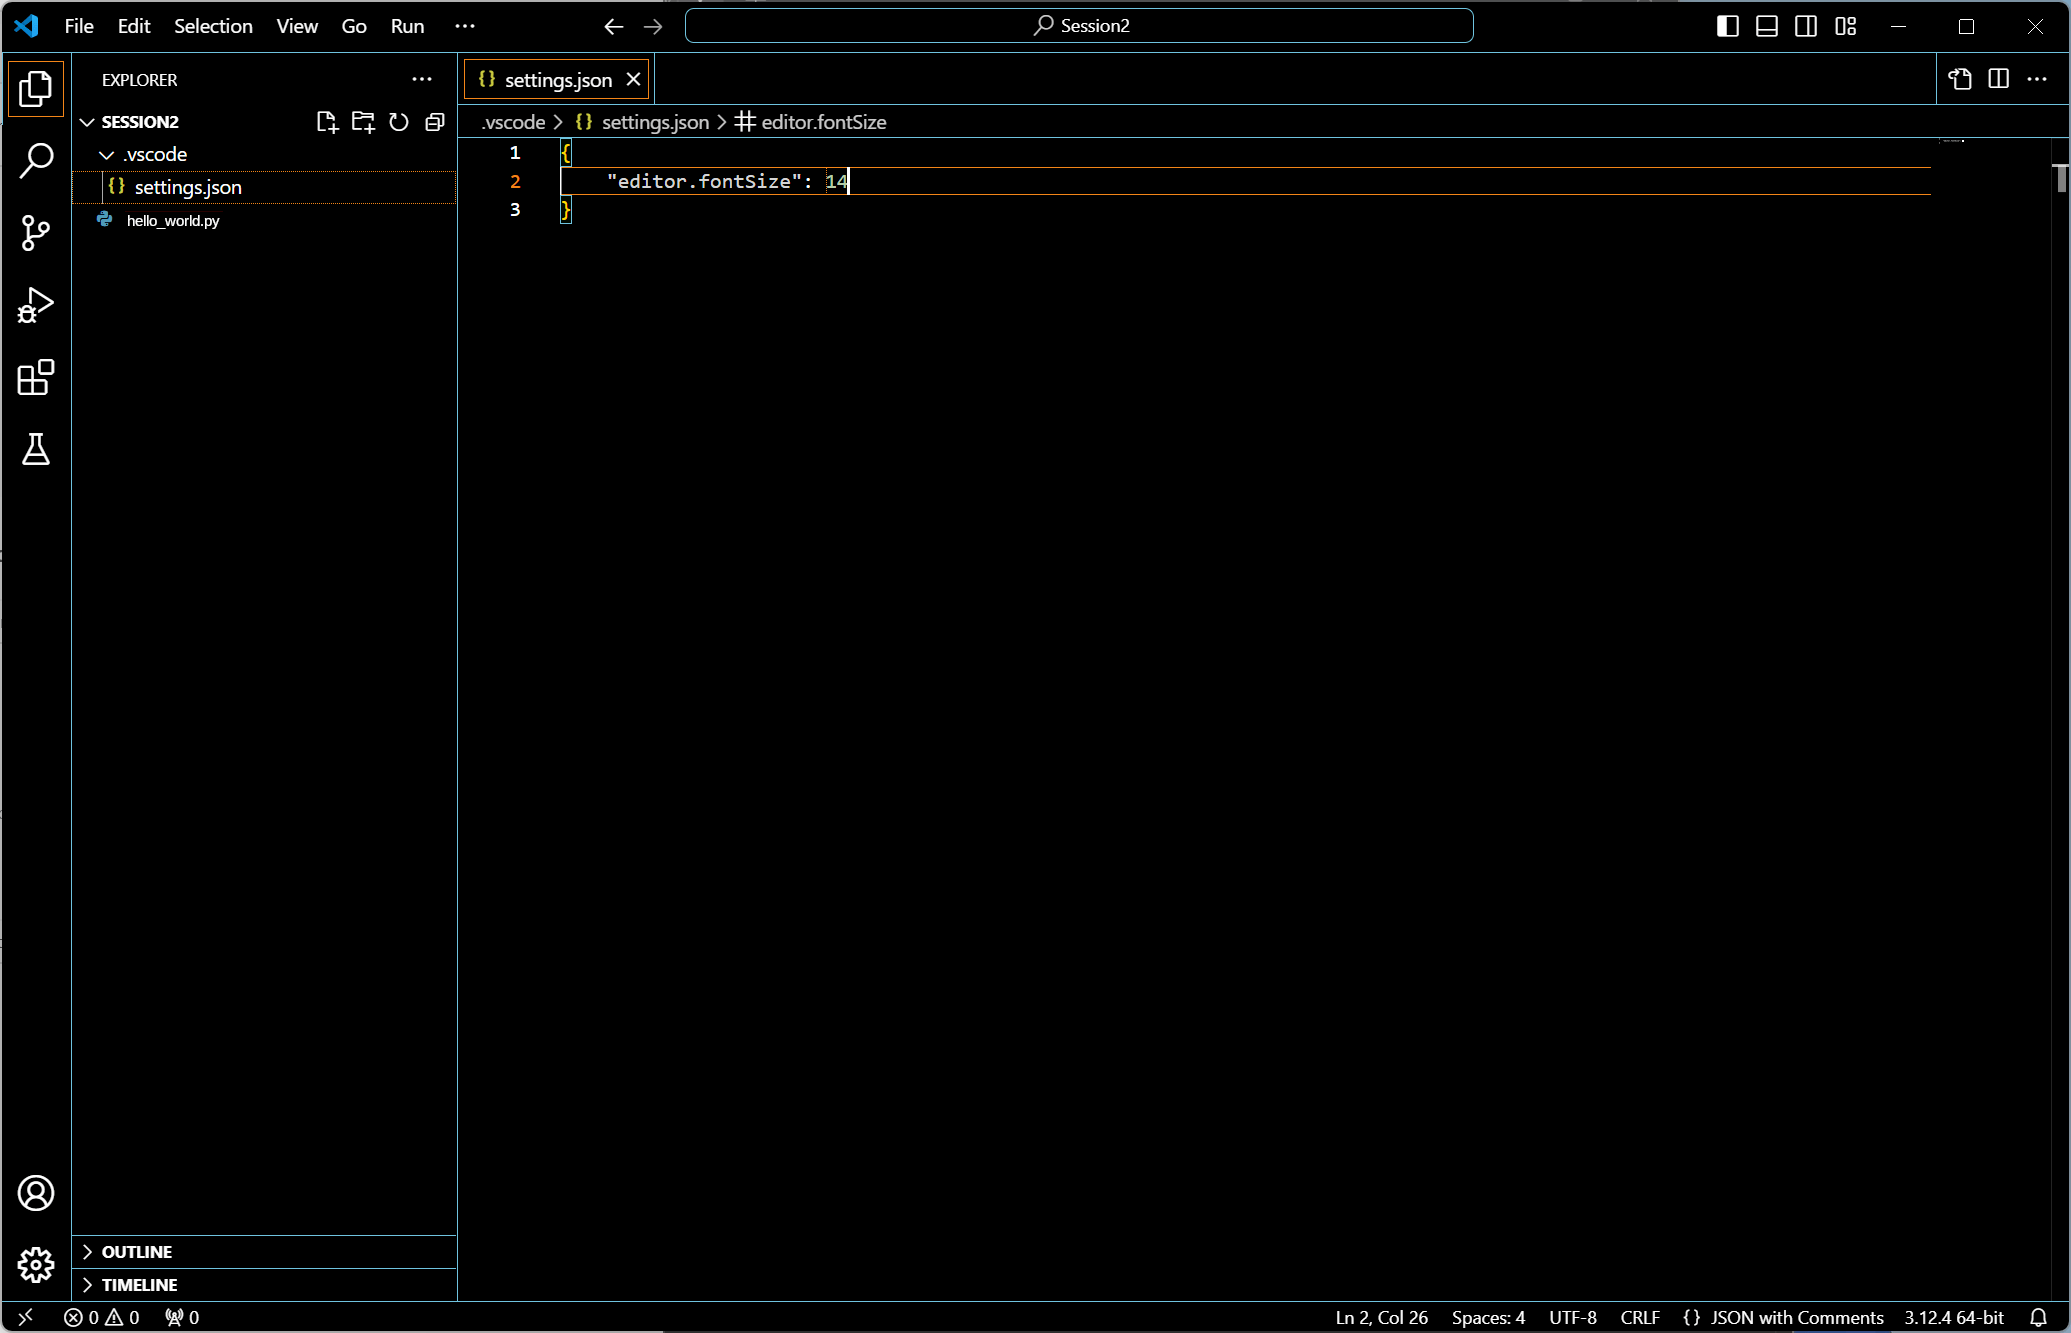 Is the
 settings.json file read only?
No, you can modify it (here, we’d like to come back to a 14 font size).
As soon as you save the settings.json file, the IDE takes into account the new settings (at least for the font size).
If you are curious and want to check the presence of the folder .vscode using a terminal and the command line, note that this sub-folder has the “Hidden” attribute which makes it invisible, unless you specifically ask in your command line, to display all the files including the “hidden” ones.
This is done as follows:
dir /a:hGet-ChildItem -Attributes Hiddenls -als -a4.4.5 — Where and how are the User settings stored?
Logically, the User settings are stored globally (not in the workspace folder), in a different JSON file also named settings.json.
Thus, its location depends on your platform:
%APPDATA%\Code\User\settings.json$HOME/.config/Code/User/settings.json$HOME/Library/Application\ Support/Code/User/settings.jsonYou can open, modify and save this JSON file too. The new User settings will then be applied (note that restarting Visual Studio Code may be needed for some settings).
However, accessing to the location of this JSON file and opening it, is not easy. The “Command Palette” is the tool you need.
4.4.6 — The Command Palette
When using Visual Studio Code, the most important tool is certainly the “Command Palette”. This is clearly one of the most useful mechanism to know for a Visual Studio Code user. Indeed, the Command Palette provides access to all the available commands. For instance, you can run editor commands, open files, search for symbols, and see a quick outline of a file, all using the same interactive window.
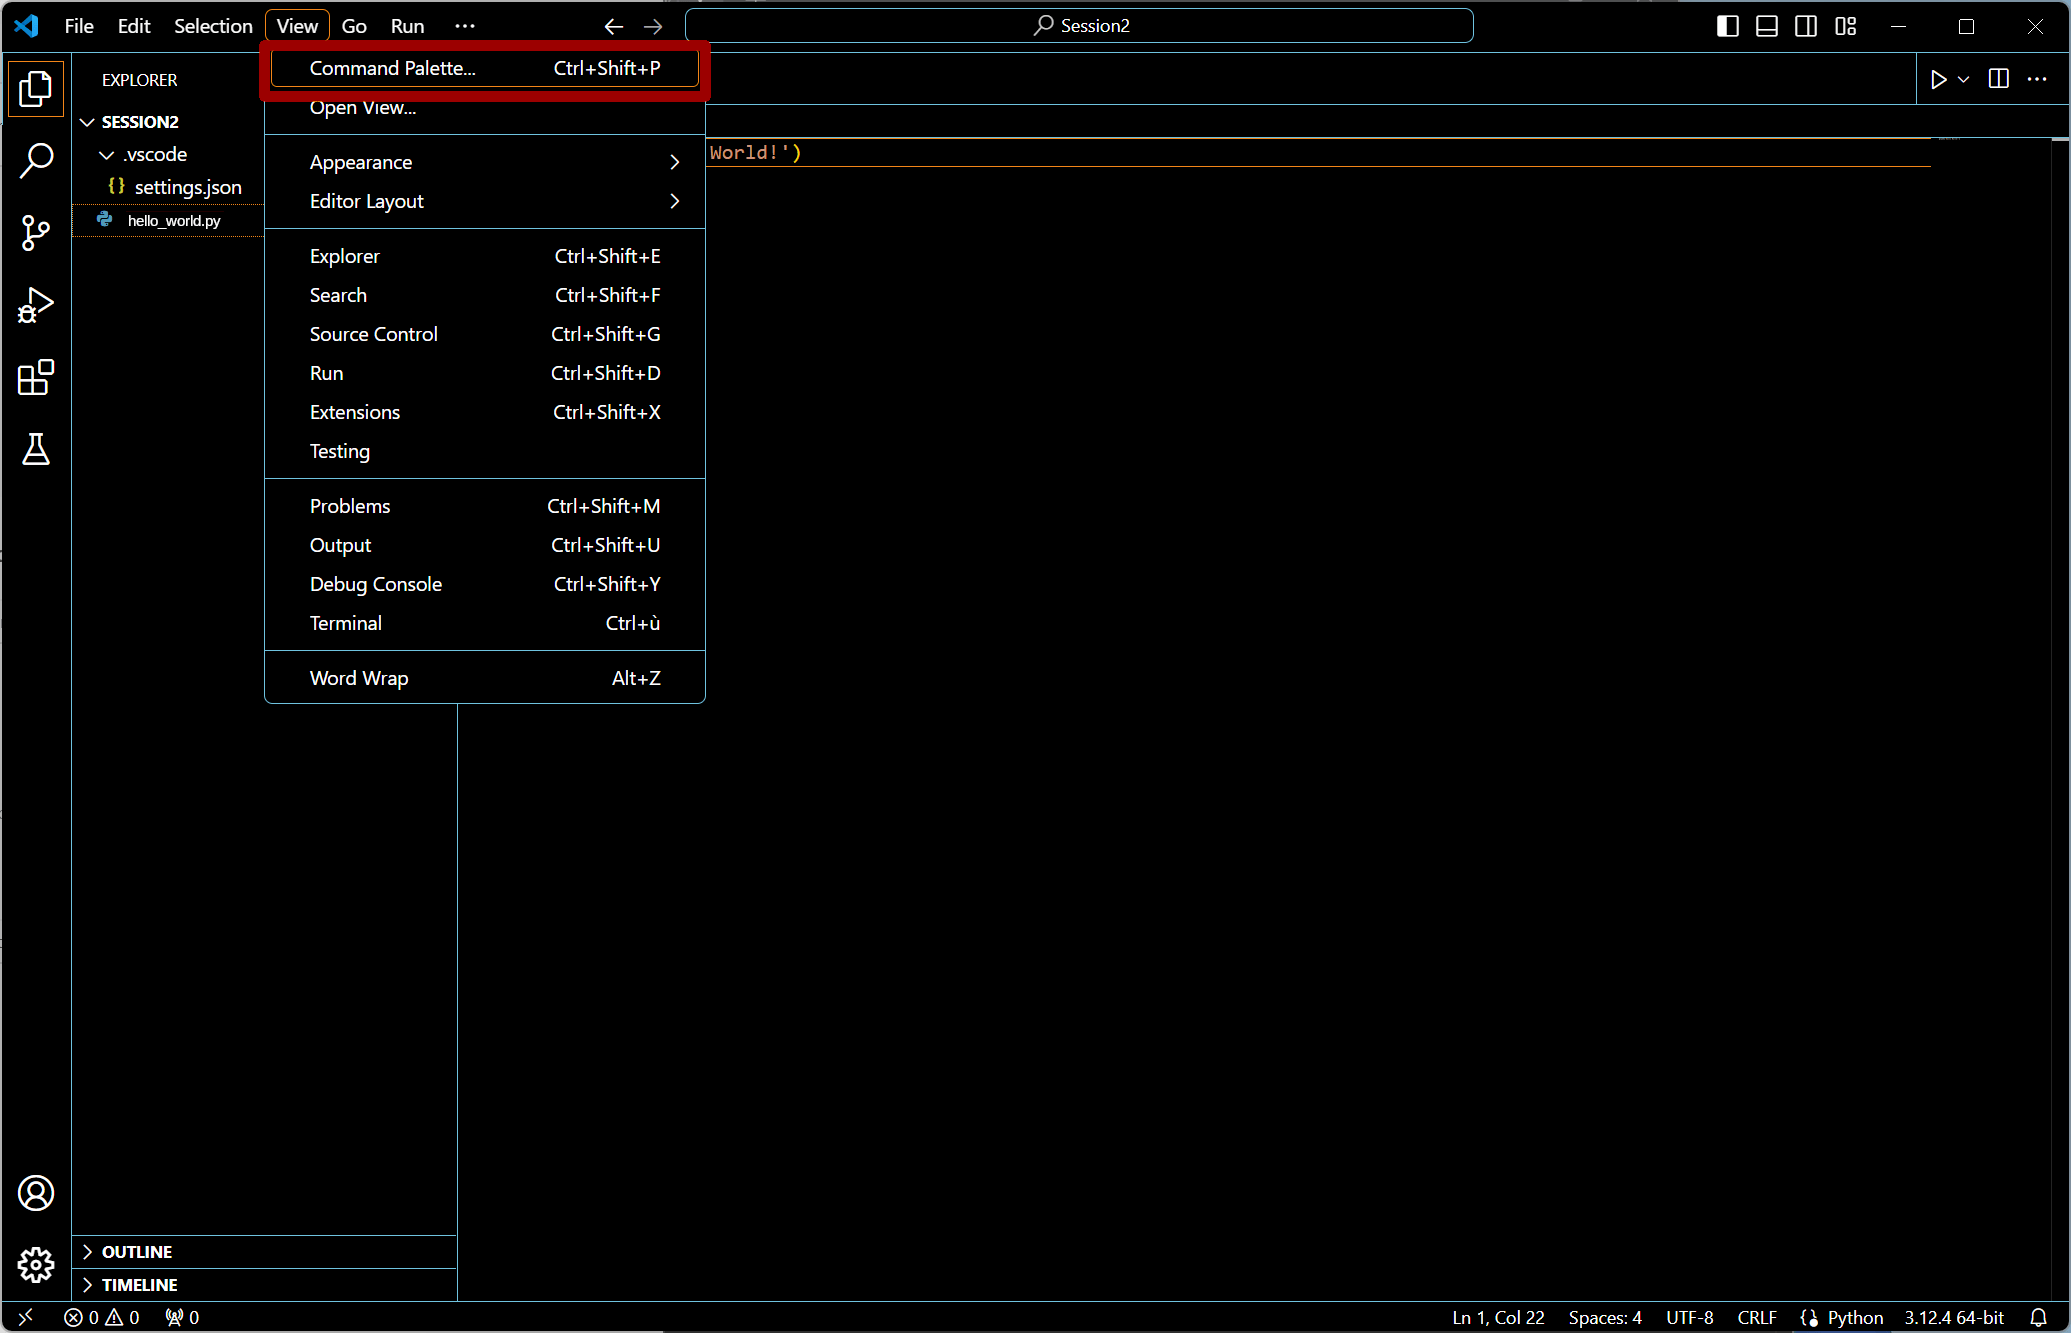 For this first time, we will open it using some mouse clicks, through the “View” menu.
However, the Command Palette is usually brought up using the keyboard through a key combination, as once opened, you have direct access to all functionalities within Visual Studio Code, including keyboard shortcuts for the most common operations.
To directly open the “Command Palette”, you can hit the F1 key.
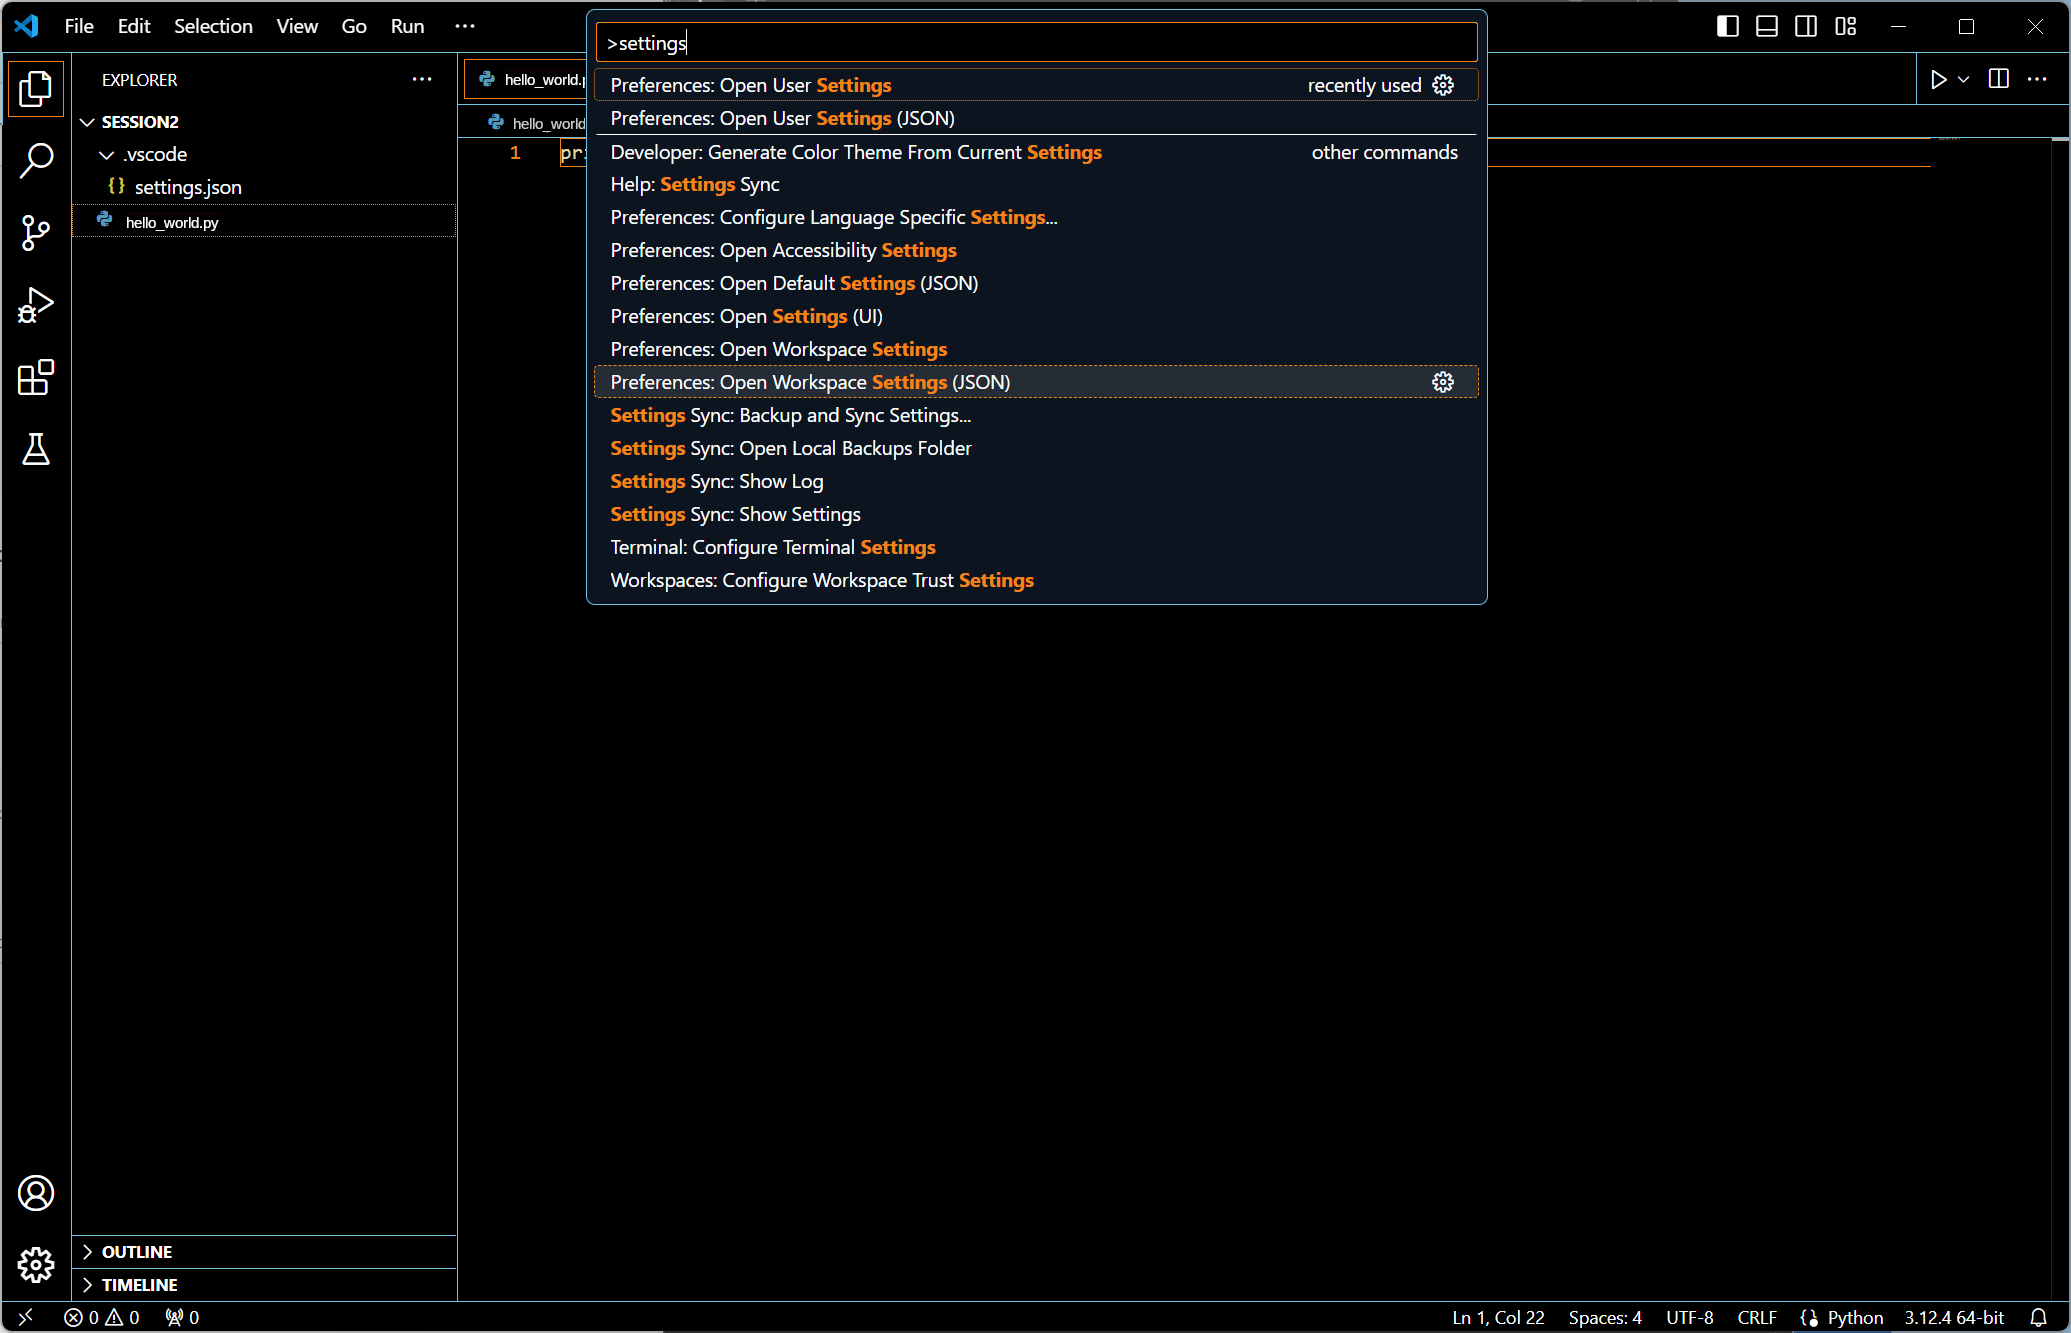 Once opened, type in the field some keywords describing the operation you want to do.
Here, we want to have access to the User
Once opened, type in the field some keywords describing the operation you want to do.
Here, we want to have access to the User settings.json file, so just type “settings”.
When the command you want appears, just click on it (here, “Preferences: Open User Settings (JSON)).
Note that the recent commands are put in the first positions of the list.
With the Command Palette, you can access entry “Help: Keyboard Shortcuts Reference”. It will show you a PDF file containing all the keyboard shortcuts.
The Command Palette is where all commands are found, including the commands provided by the extensions. It allows external commands to be called the same way as internal commands, and participate in the flexibility of Visual Studio Code interface.
Thus, if you want to develop your own VSCode extensions, it’s important that your command names are labeled appropriately, so users can easily find them.
4.4.7 — Telemetry
Visual Studio Code collects telemetry data that may be sent to Microsoft in order to have feedback on the IDE crashes or bugs, to improve the behavior and performances of the IDE, etc. You have control on what kind of information are actually sent.
Using the “Command Palette”, search for the user settings related to “telemetry” (alternatively, you can search for “telemetry” in the “File > Preferences > Settings” menu). You should get one setting “Telemetry: Telemetry Level” that allows you:
- to better understand what telemetry means.
- to select the telemetry level you wish.
- to read both the Microsoft data collection policy and privacy statement.
 By default, “all” is the default telemetry level, and we will set it to “none”.
However, you may select the level you want.
By default, “all” is the default telemetry level, and we will set it to “none”.
However, you may select the level you want.
 How can you check that the previous choice has been taken into account?
Like in the previous section, open the user settings JSON file using the command palette for instance.
Indeed, a new entry has been added to the file, storing your new setting.
How can you check that the previous choice has been taken into account?
Like in the previous section, open the user settings JSON file using the command palette for instance.
Indeed, a new entry has been added to the file, storing your new setting.
4.4.8 — UI Language
Visual Studio Code allows you to change the language used for its UI. This may be interesting for many reasons. However, for this lab, we recommand to keep the English language as all the examples and help are tailored for this language. Obviously, the Visual Studio Code functionnalities remain valid independently of the language (the keywords may logically change though).
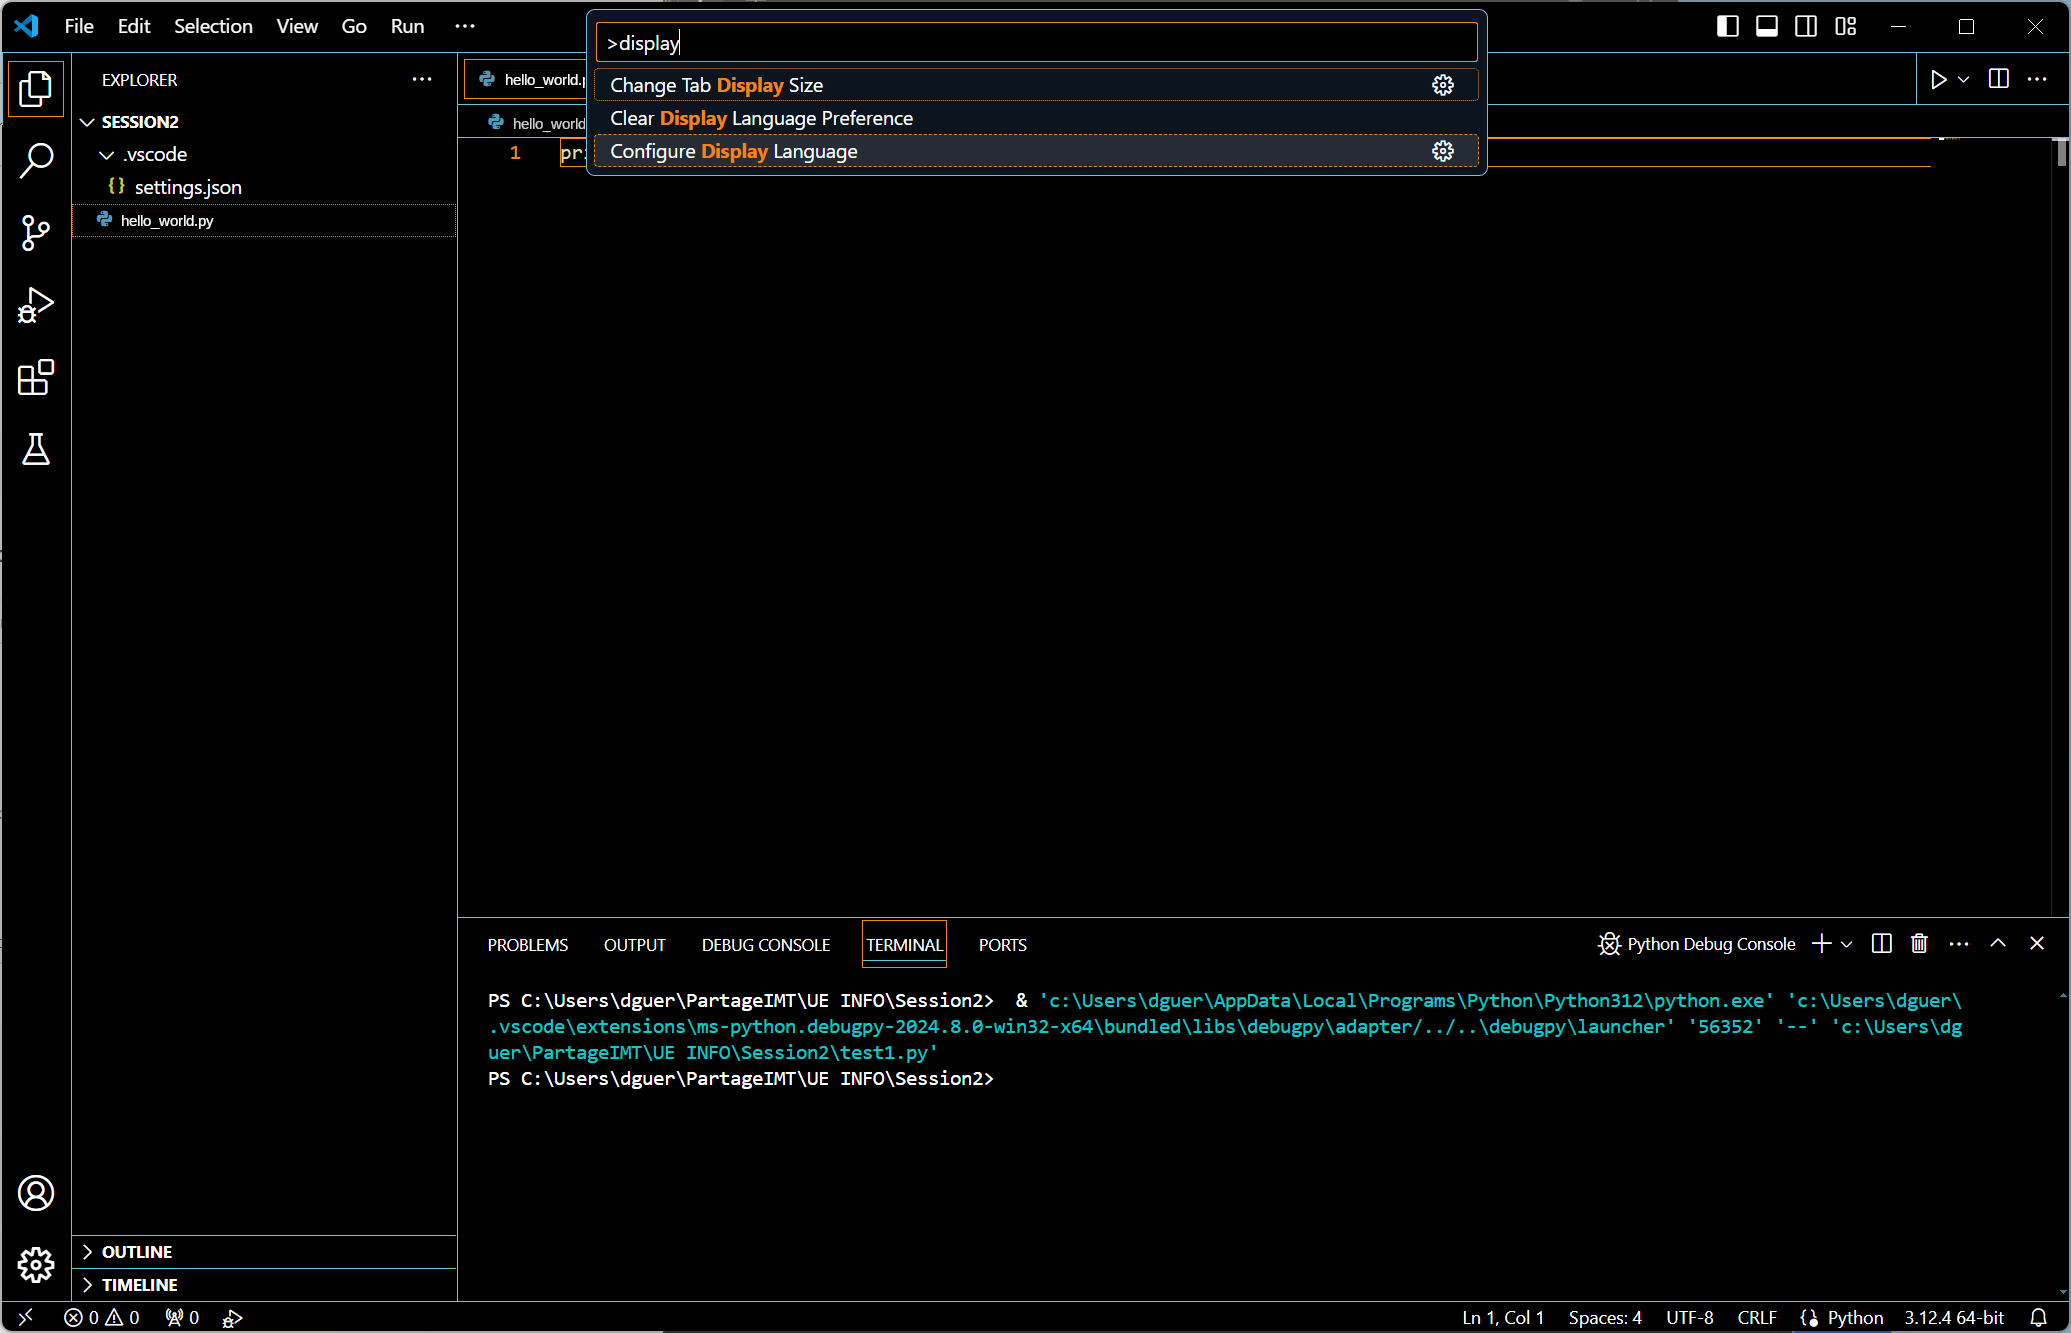 Using the “Command Palette”, search for the keyword “display” as in “display language”.
Select the command “Configure Display Language”.
Using the “Command Palette”, search for the keyword “display” as in “display language”.
Select the command “Configure Display Language”.
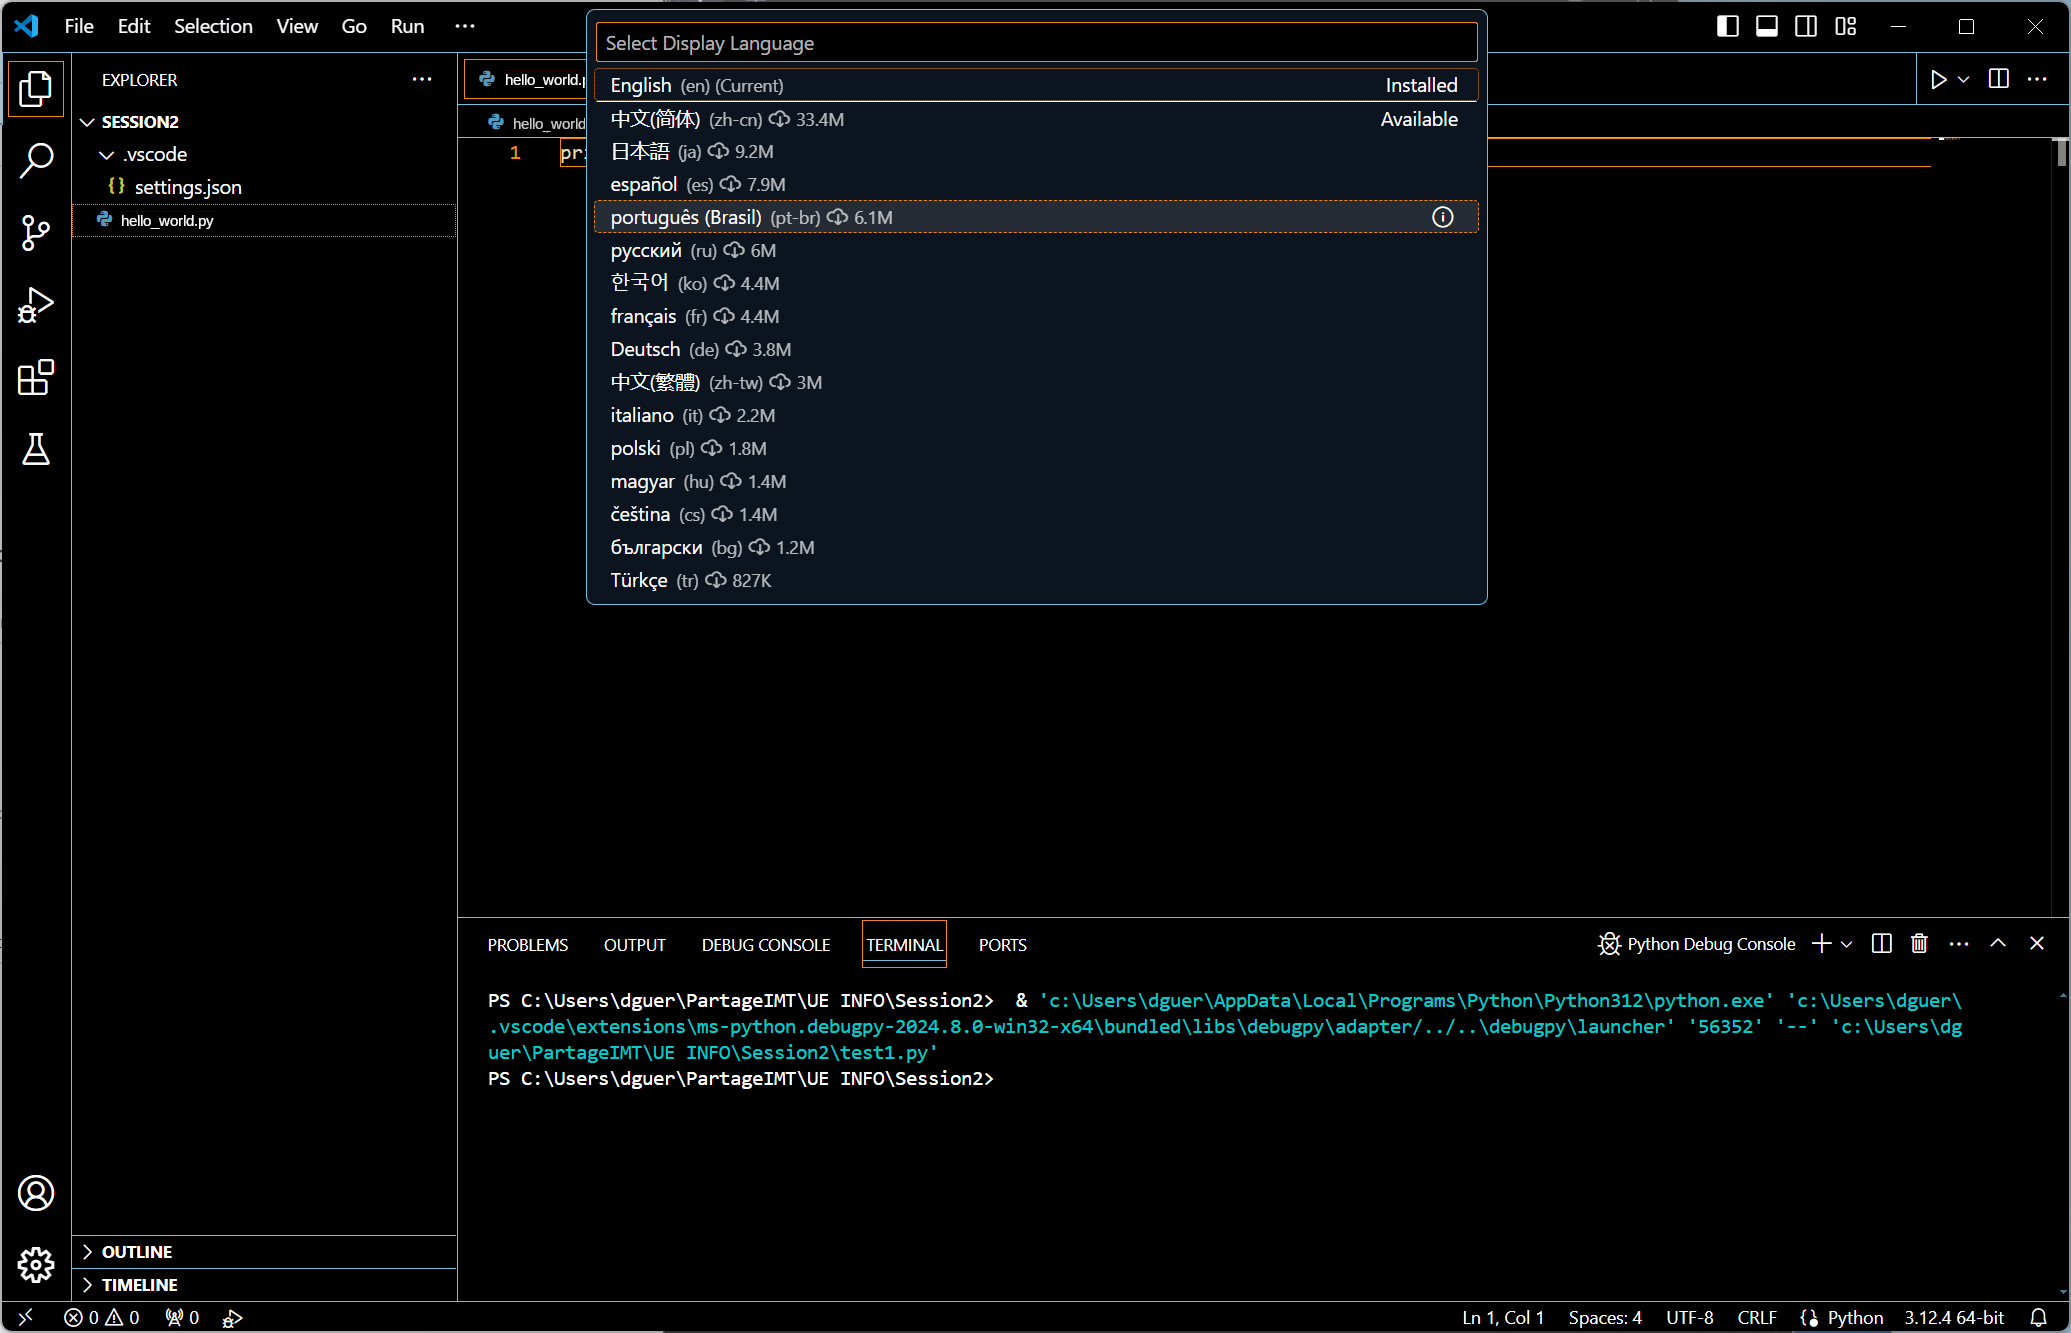 A popup window proposes a series of possible languages for the UI.
Imagine you want to use the Brazilian language for the UI.
Just select the appropriate language in the list.
It may take a few moments to download the corresponding language pack.
A popup window proposes a series of possible languages for the UI.
Imagine you want to use the Brazilian language for the UI.
Just select the appropriate language in the list.
It may take a few moments to download the corresponding language pack.
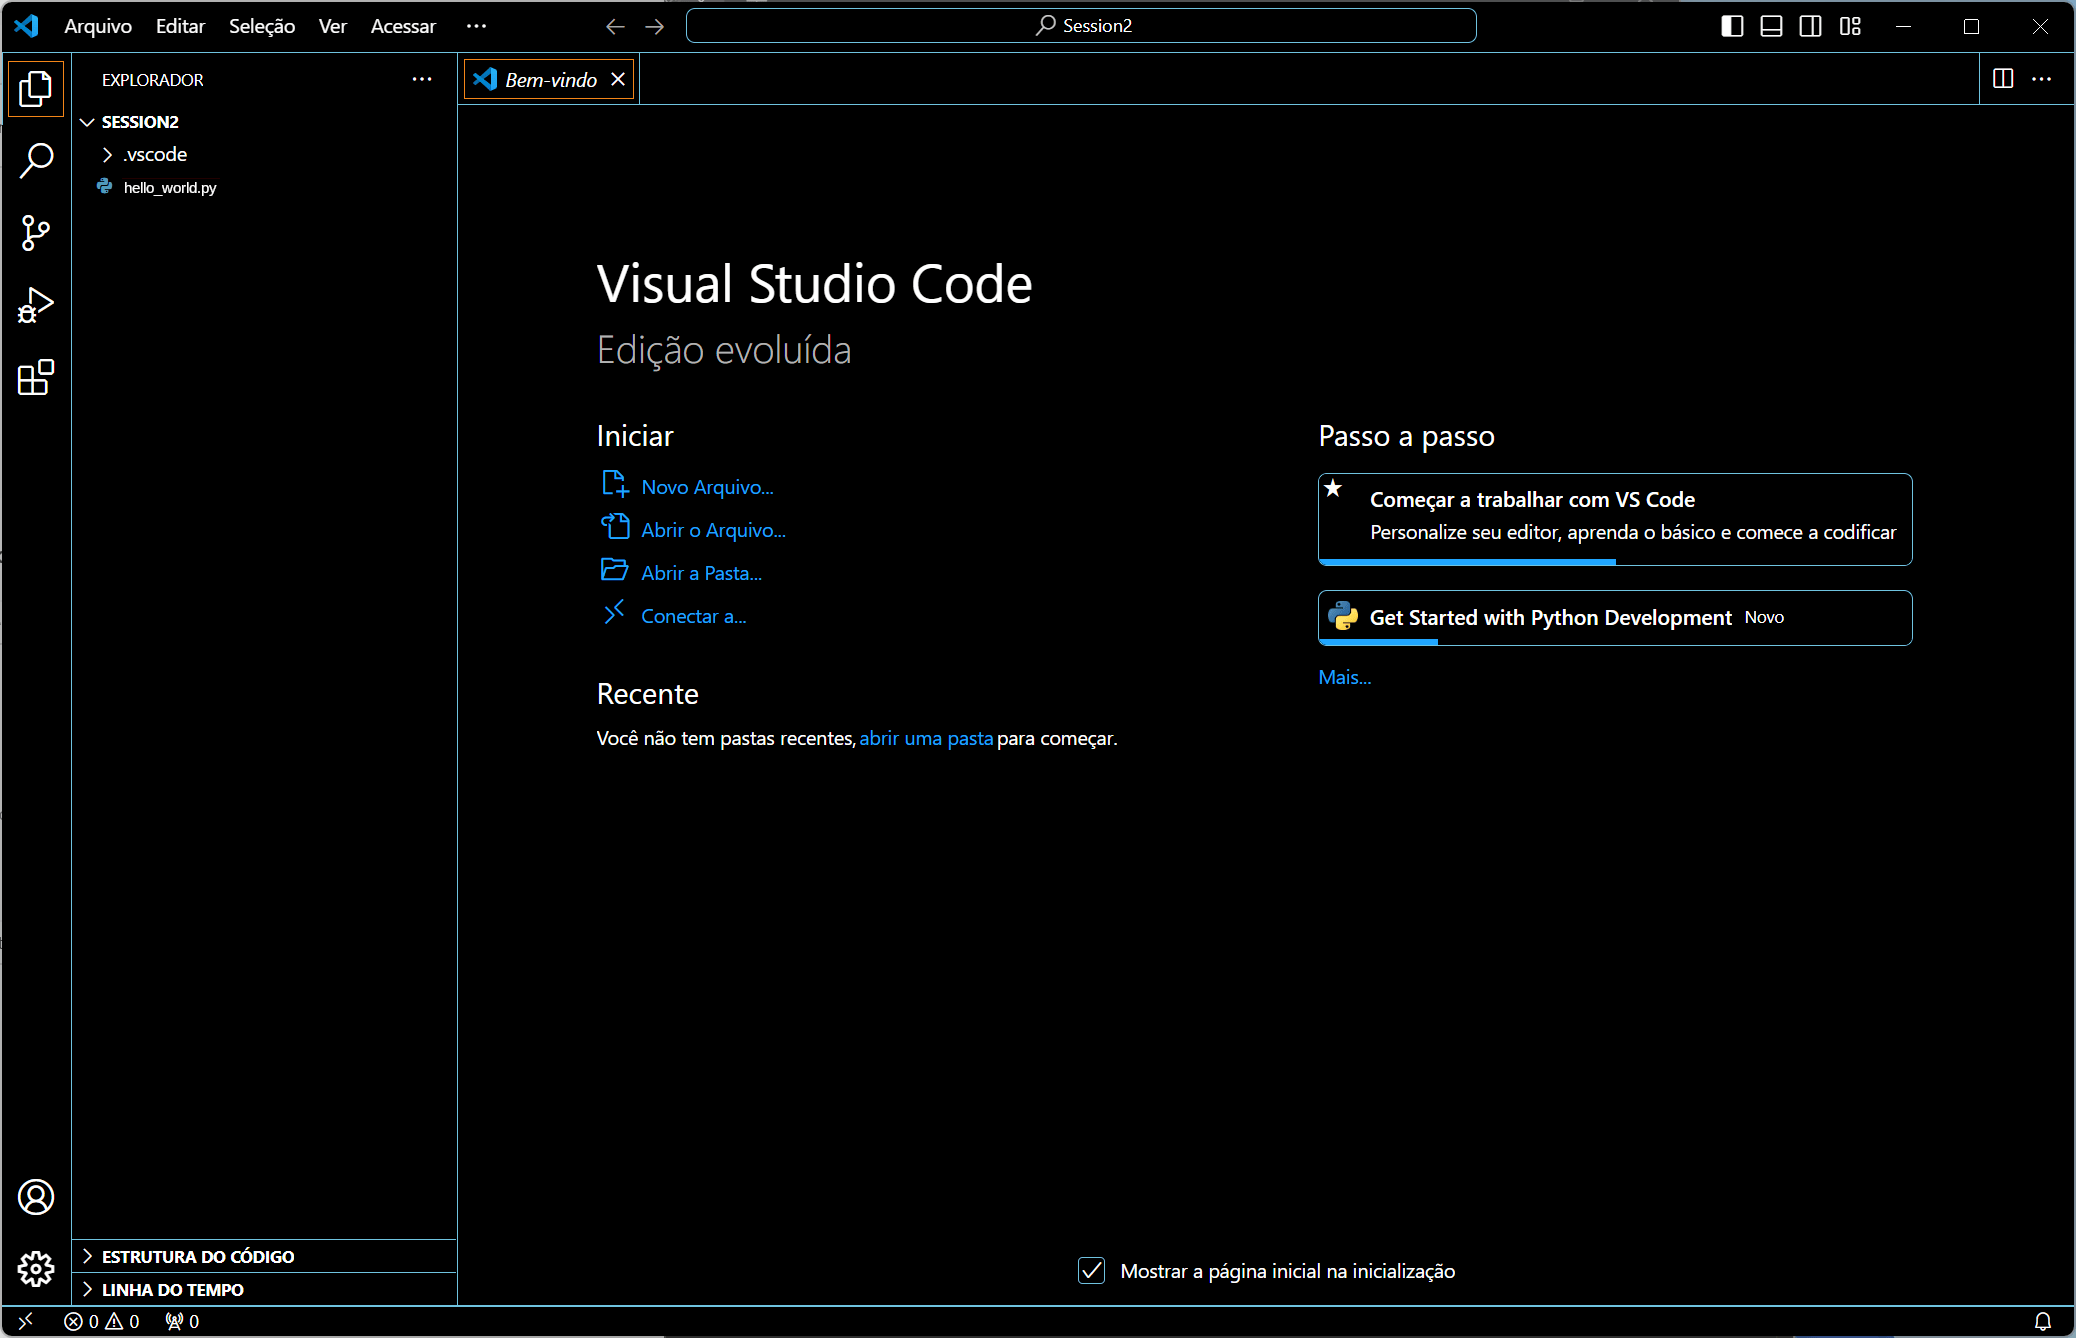 Visual Studio Code ask you to restart in order to take into account the new language, and that’s it!
Go back to the English version of the UI.
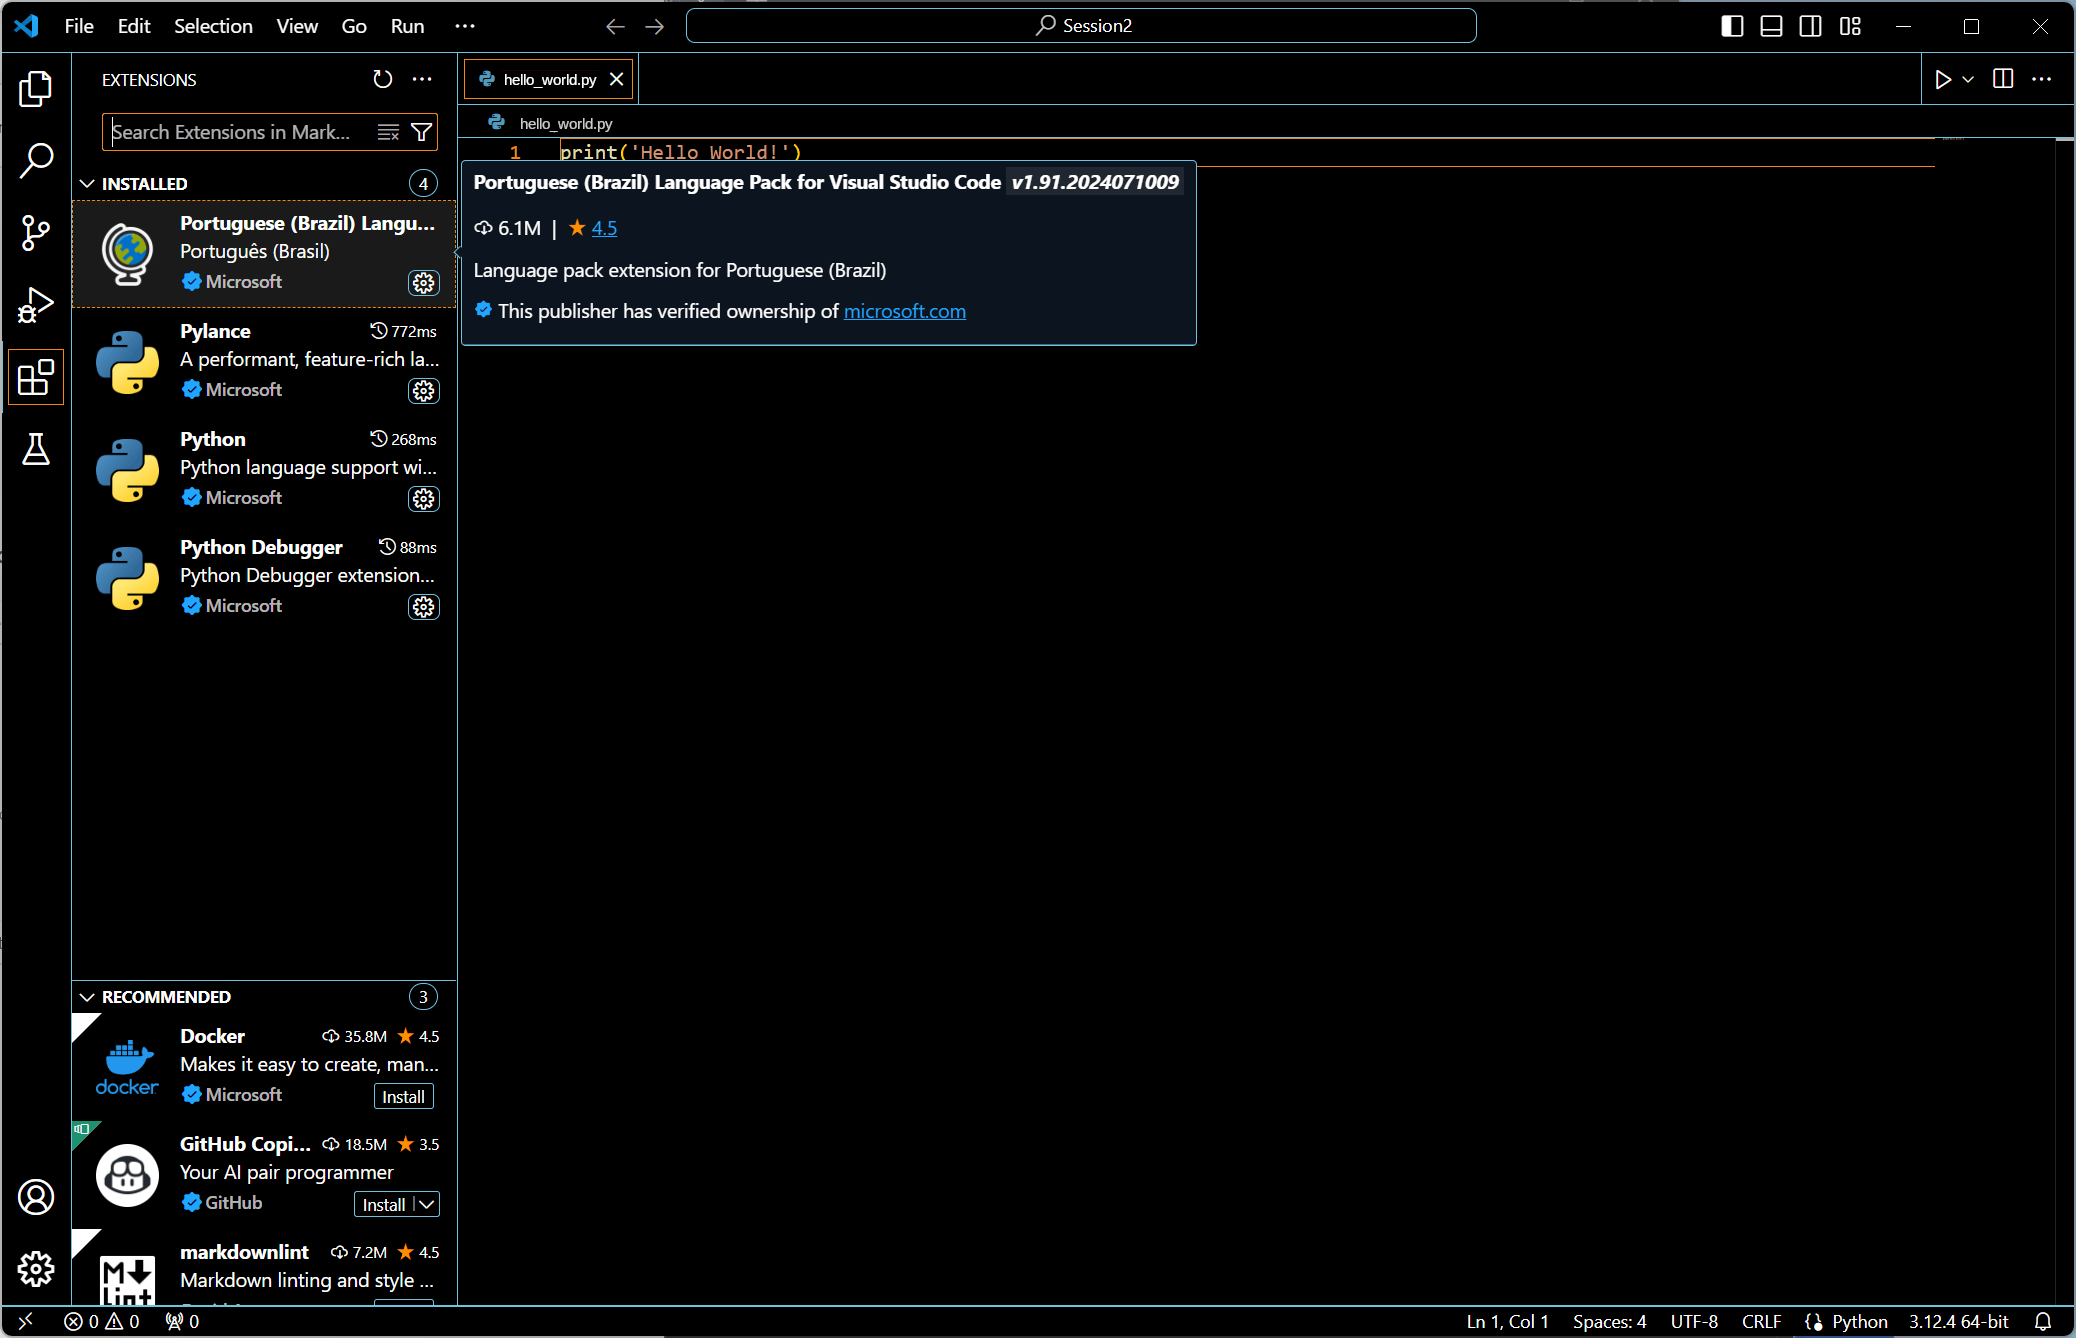 Another way to select a new UI language is to click on the Extensions button, in the Activity sidebar, search for and select the “Language Pack” that corresponds to the language you want.
In fact, you did that using the “Command Palette” as you note that the “Brazilian Language Pack” extension has been installed in your Visual Studio Code.
Another way to select a new UI language is to click on the Extensions button, in the Activity sidebar, search for and select the “Language Pack” that corresponds to the language you want.
In fact, you did that using the “Command Palette” as you note that the “Brazilian Language Pack” extension has been installed in your Visual Studio Code.
You may now remove the pack from your installation if you no need to keep it of course.
5 — Edit your script using code completion
 The goal of this section is to edit your Python script to finally get this script.
We will also benefit from the code completion mechanisms offered by the Python extension, to quickly edit the script. Additionally, we will use the static code analysis offered by the Pylance extension, to help you correct the mistakes you may write.
5.1 — Editing the script step by step, using code completion
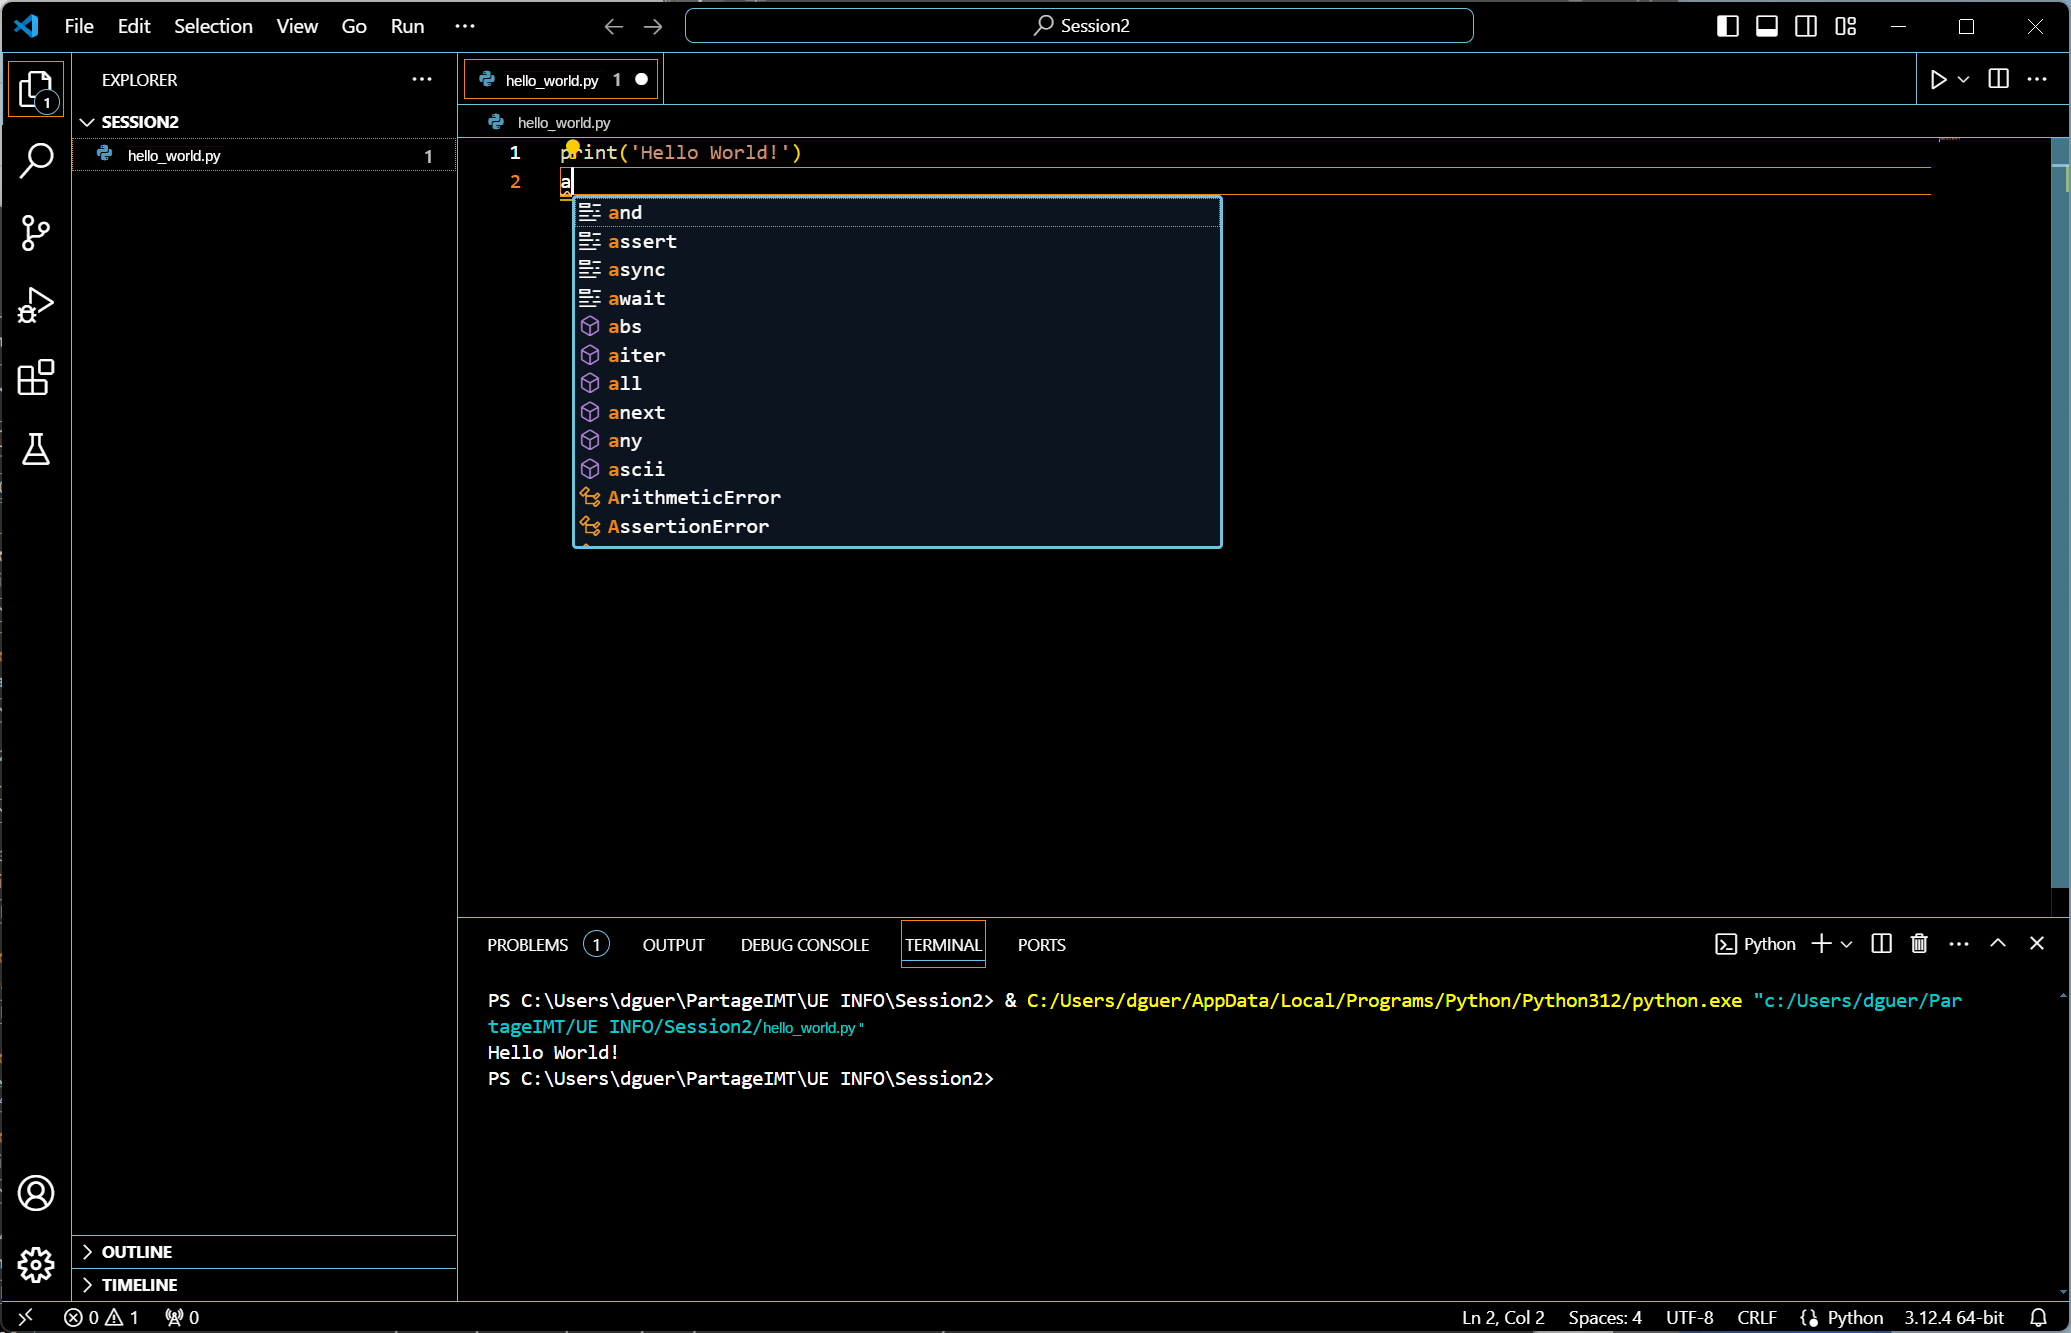 Go to the editor and begin to type “a” on a new line.
A small window will pop up to propose you choices to complete the line you are typing.
Here, we just want to have a variable
Go to the editor and begin to type “a” on a new line.
A small window will pop up to propose you choices to complete the line you are typing.
Here, we just want to have a variable a so just hit space to go on: no completion to use.
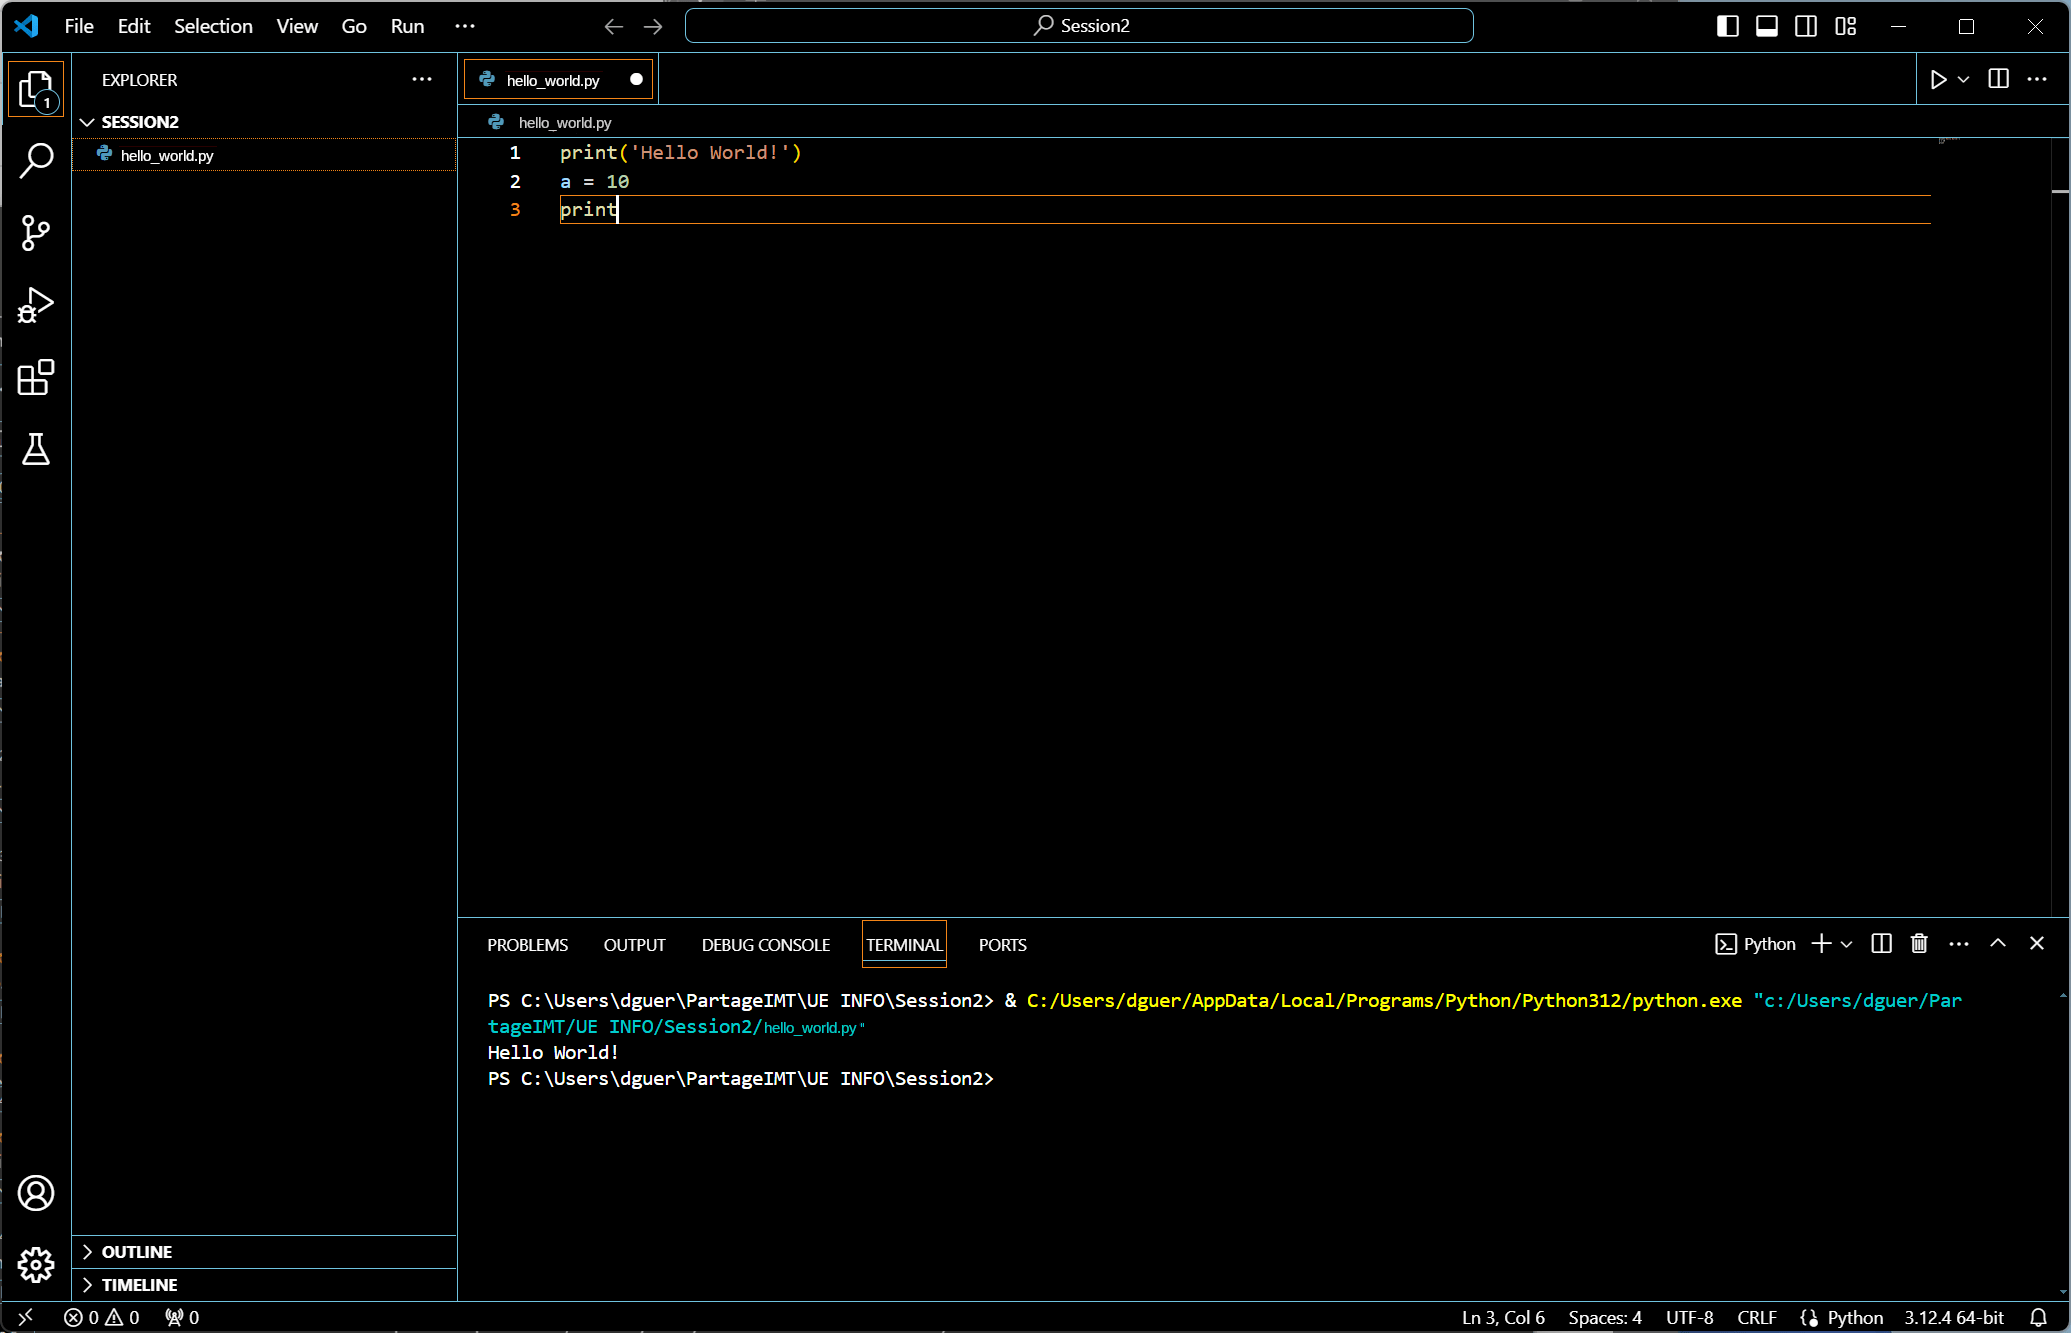
Finish writing line 2.
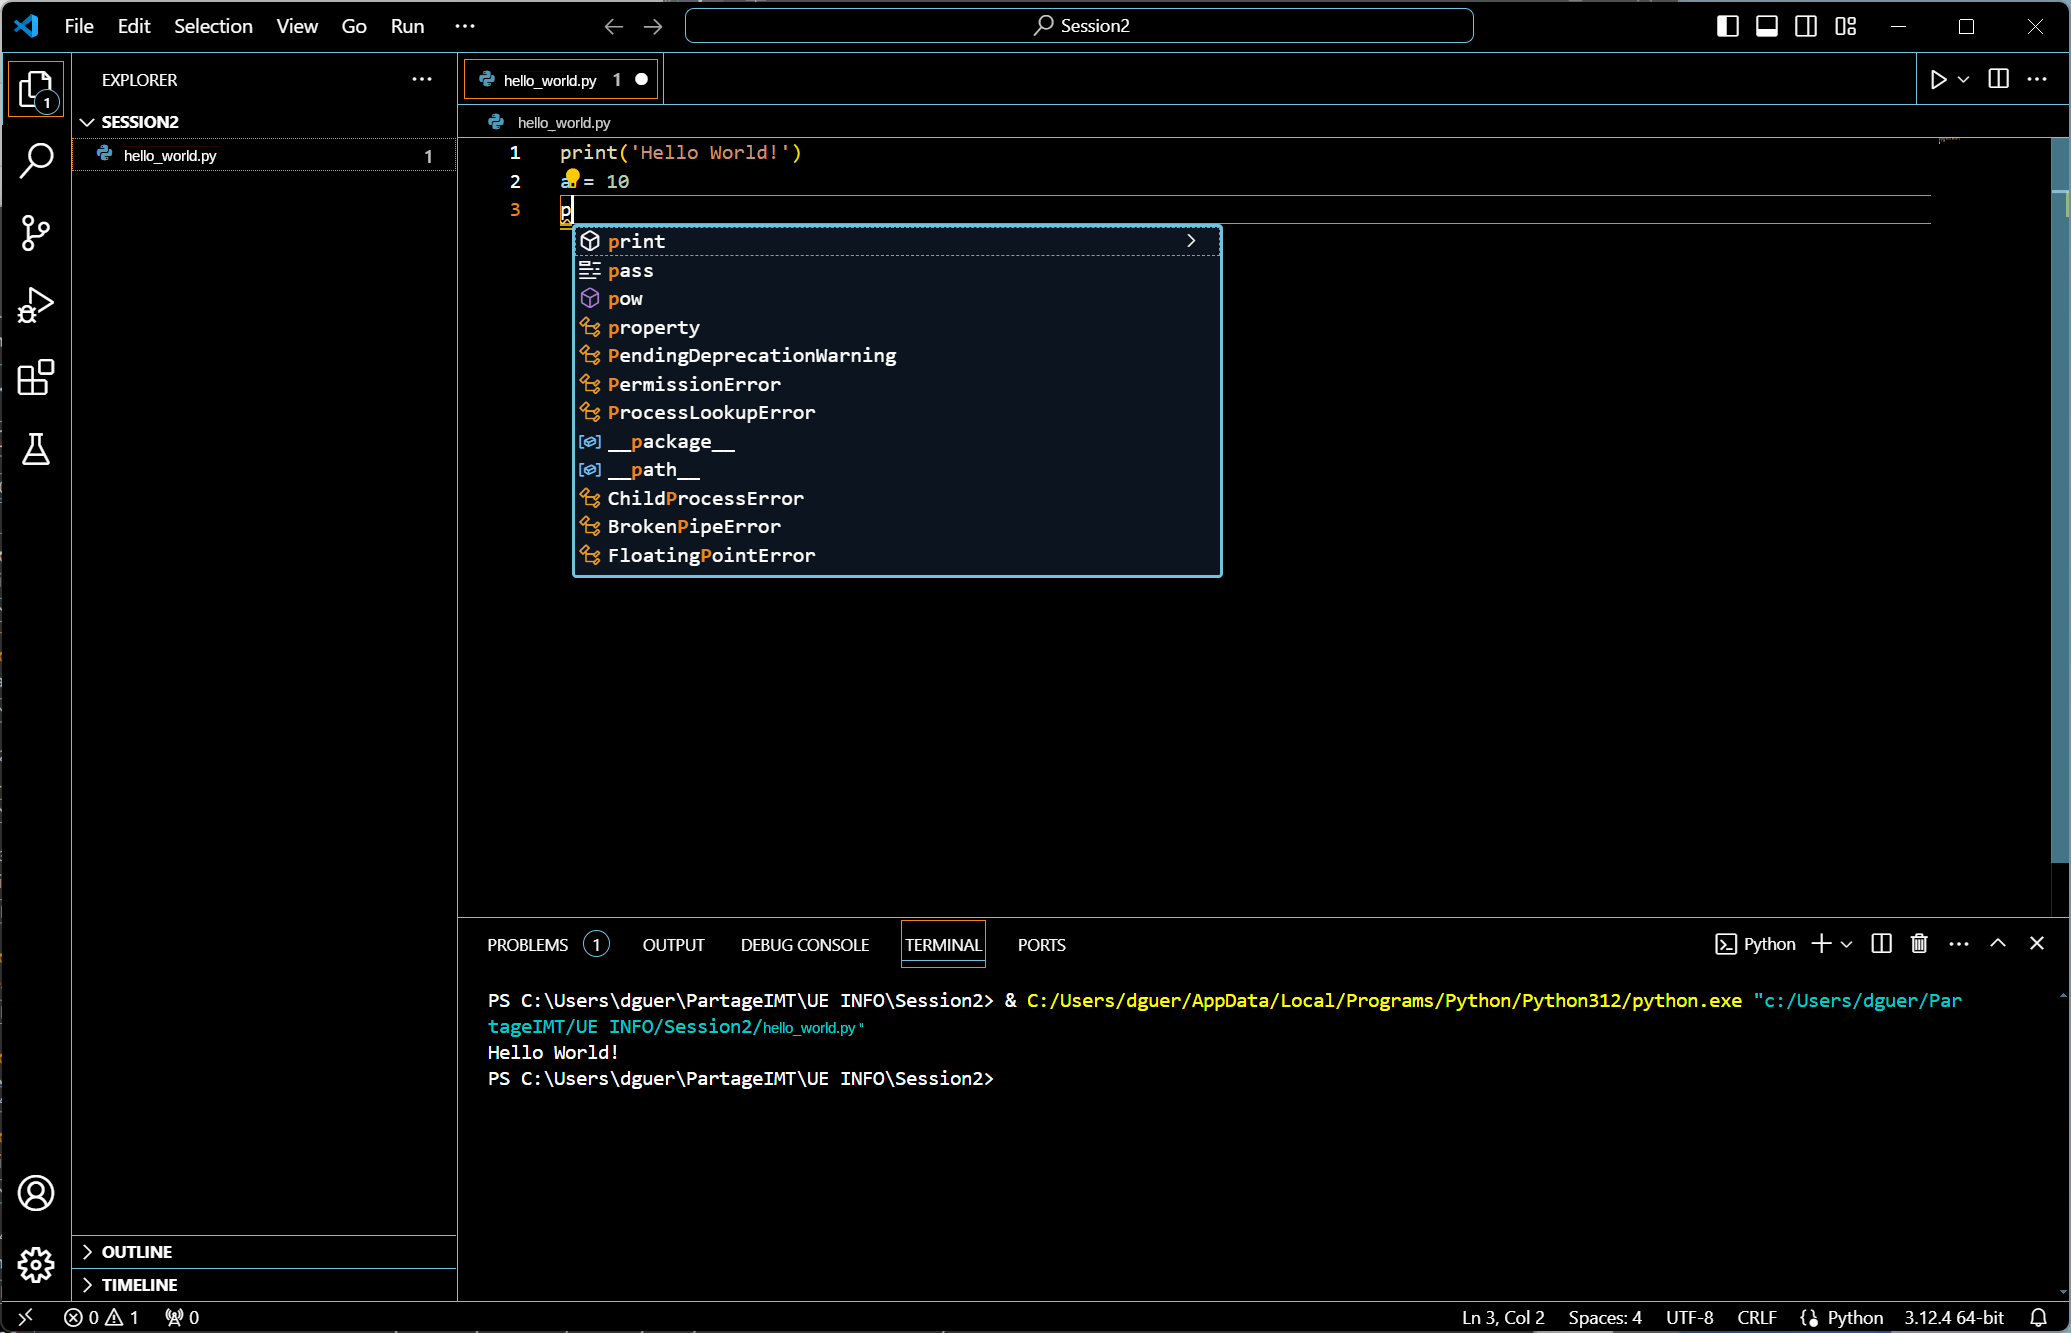 On the next line (line 3), we will call the
 print Python function.
Just begin typing “p” and a popup window will propose you the print function, among other choices.
 To accept one choice, select it with the keyboard and hit the Enter key, or using the mouse.
Here, the
To accept one choice, select it with the keyboard and hit the Enter key, or using the mouse.
Here, the print function is the first choice in the list, so you just have to hit Enter and the function name is inserted in the editor.
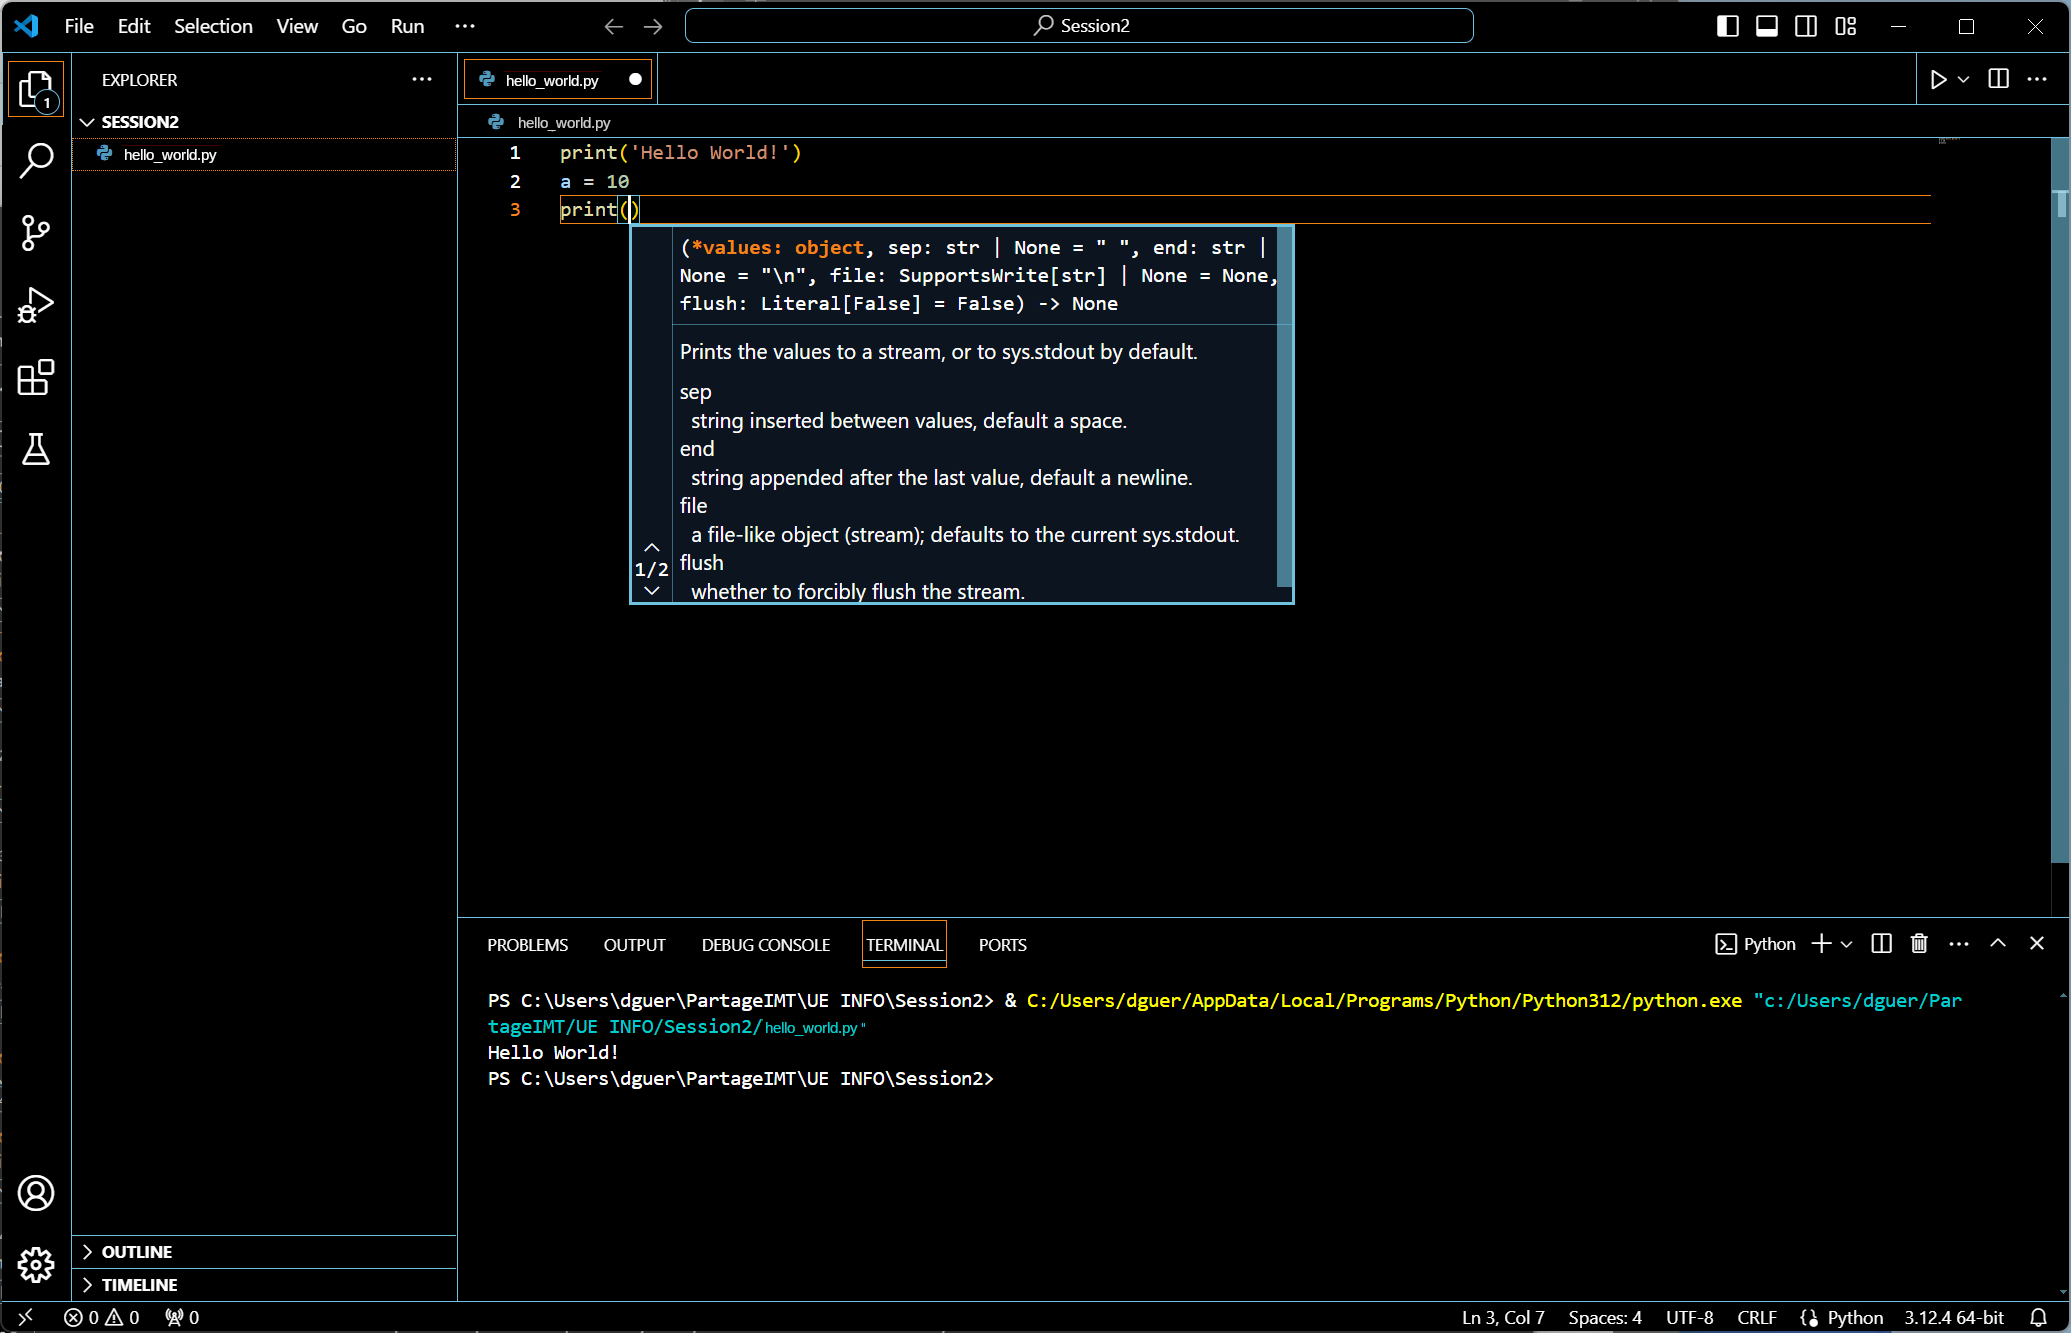 The
The print function needs some inputs to be provided by you, within parentheses.
Thus, just type “(”, the opening parenthesis after the print command and observe what the editor does for you.
The closing parenthesis is automatically added… very useful!
Also, a new popup window gives you information on the parameters you may feed the function with (e.g., amount, types, order, semantics).
Here, we just want to feed the print function with the string “End of program is coming”, so just type the string.
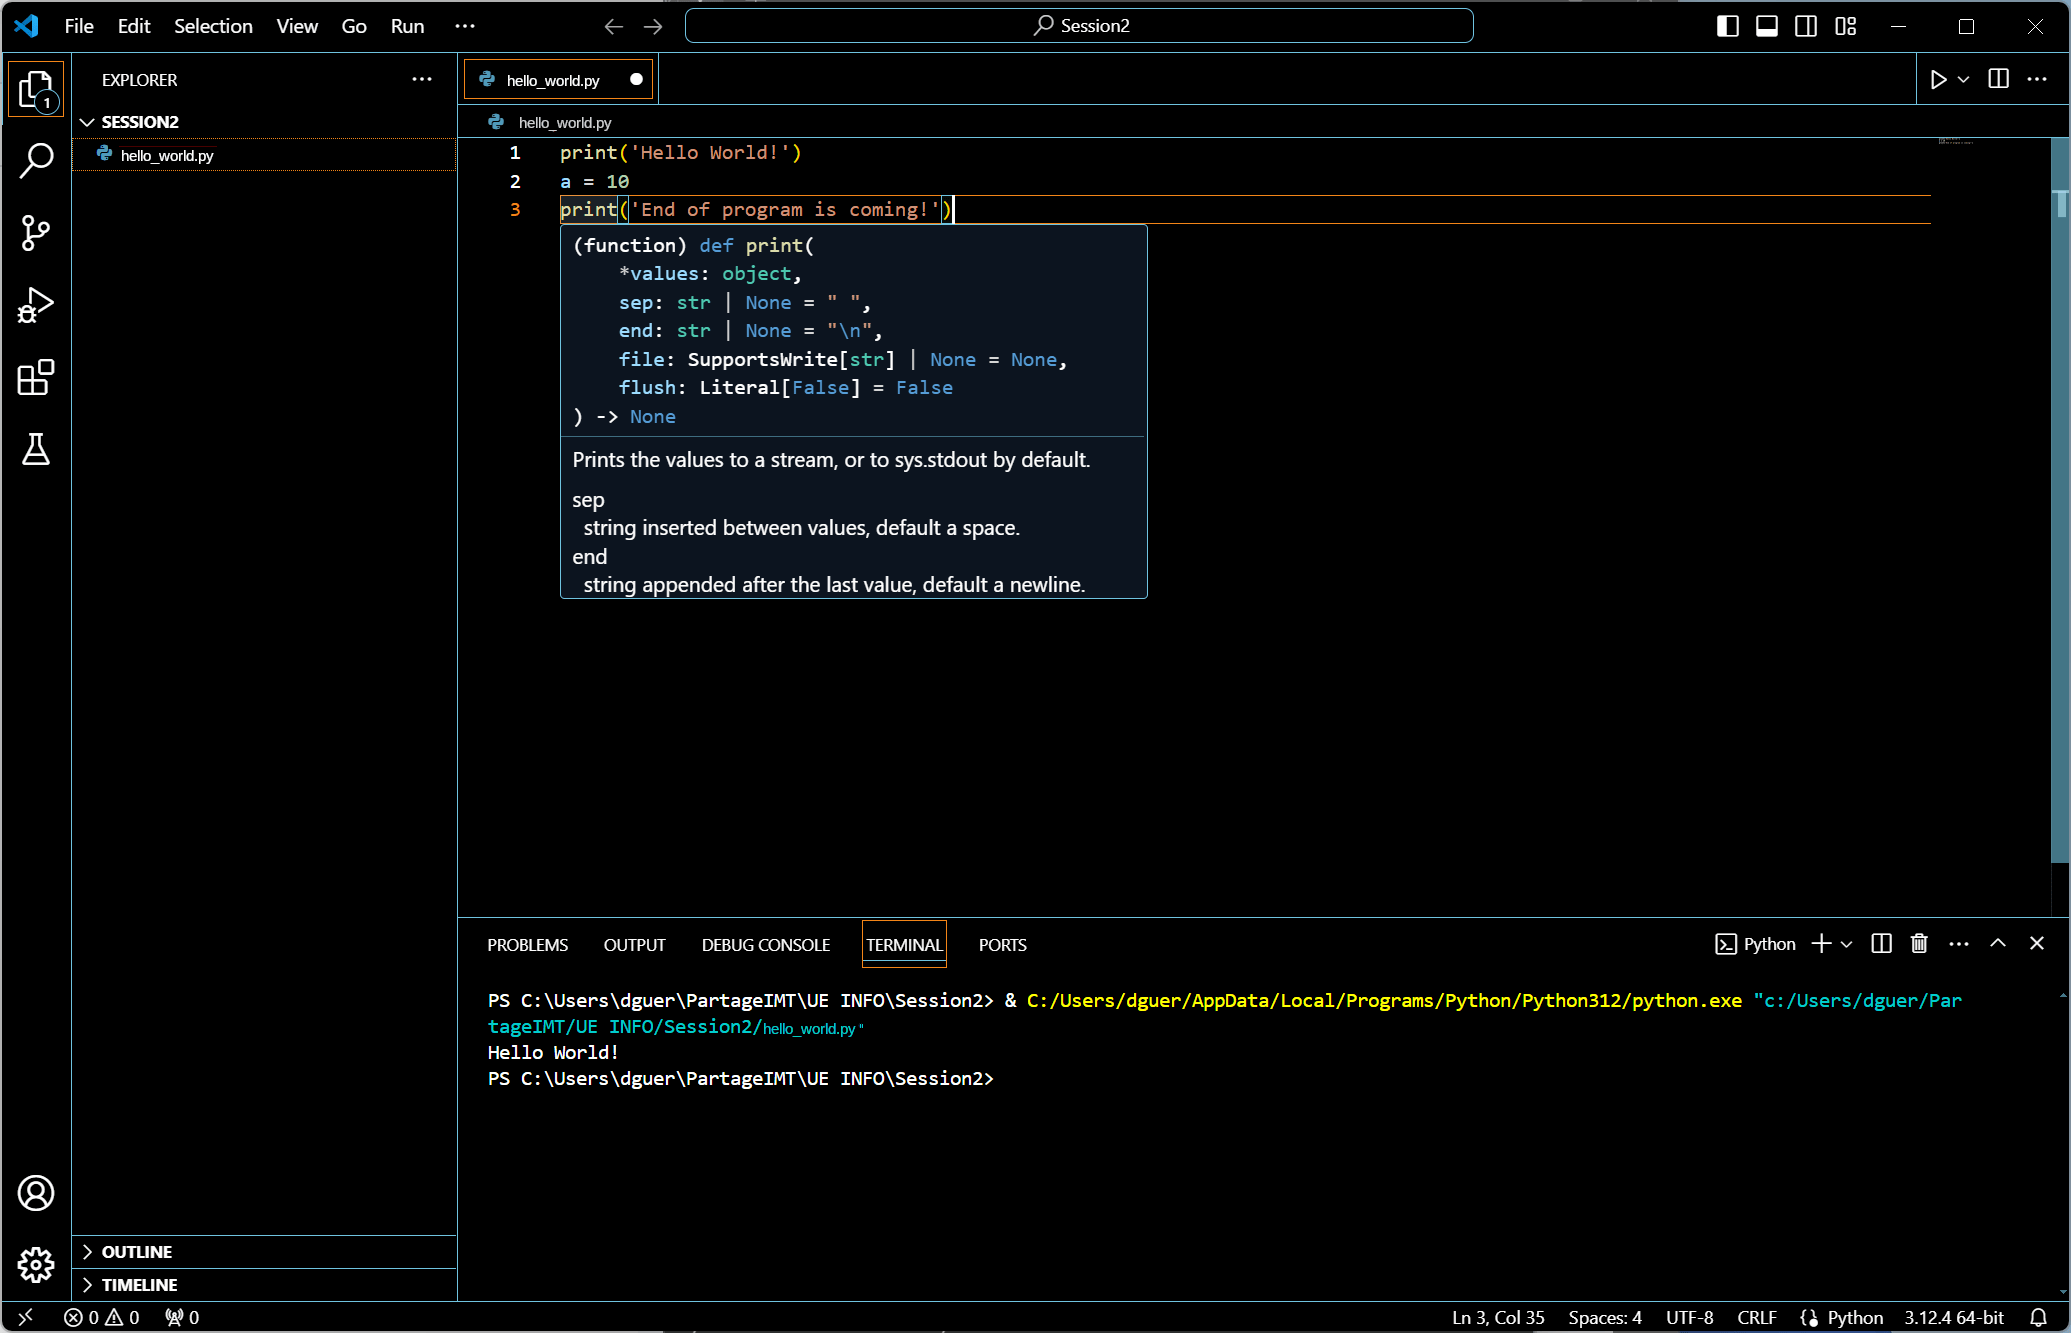 At any time, if you position your mouse cursor over the word
 print (i.e., a function from the Standard Python Library or from any installed packages) in the editor, and wait a few milliseconds, some useful information about the function will pop up too.
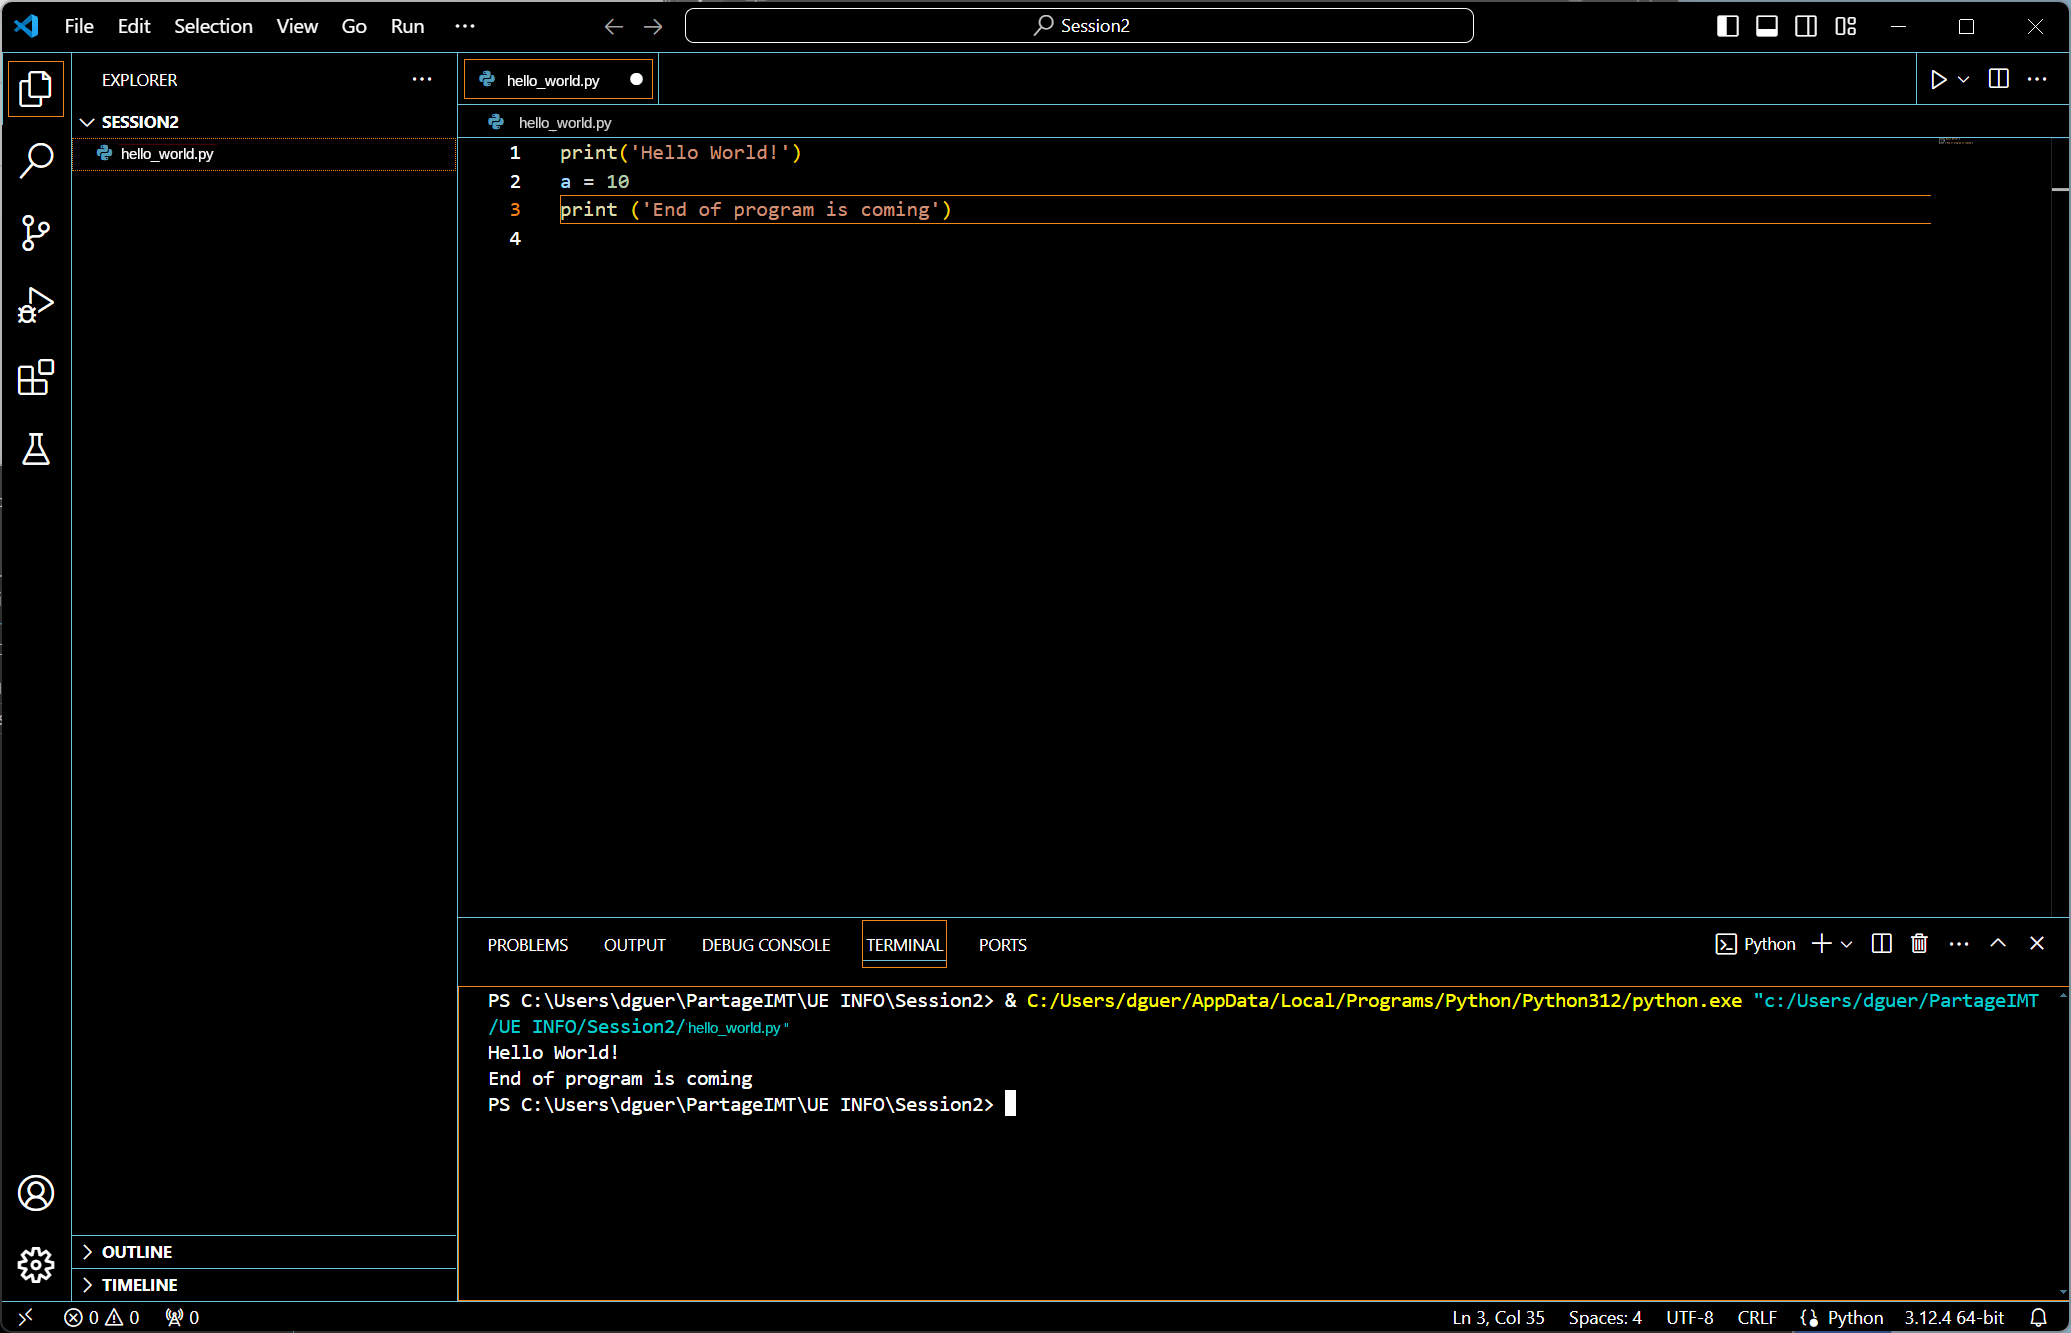 Do not forget to save your file (a big white dot next to the name of your script means your modifications aren’t saved on the disk).
Then, execute your script.
Do not forget to save your file (a big white dot next to the name of your script means your modifications aren’t saved on the disk).
Then, execute your script.
5.2 — What happens in case of mistakes during editing?
The Python extension Pylance you installed along with the Python Extension, may help you find some errors you may commit while writing your code. Indeed, Pylance is a language server, which provides features like IntelliSense, logical linting (e.g., errors and warnings), code actions, code navigation, semantic colorization, etc.
Lint is the computer science term for a static code analysis tool used to flag programming errors, bugs, stylistic errors and suspicious constructs.
Visual Studio Code, through the extensions mechanism, allows you to install more dedicated extensions for linting, like the Pylint extension that relies on the Pylint package.
For the sake of clarity, two simple examples are introduced. However, try adding your own Python lines to the script (with potential errors), and see to what extent the IDE may be helpful to you.
5.2.1 — Example 1
 In this example, you forget to close a set of parentheses (here the one closing the
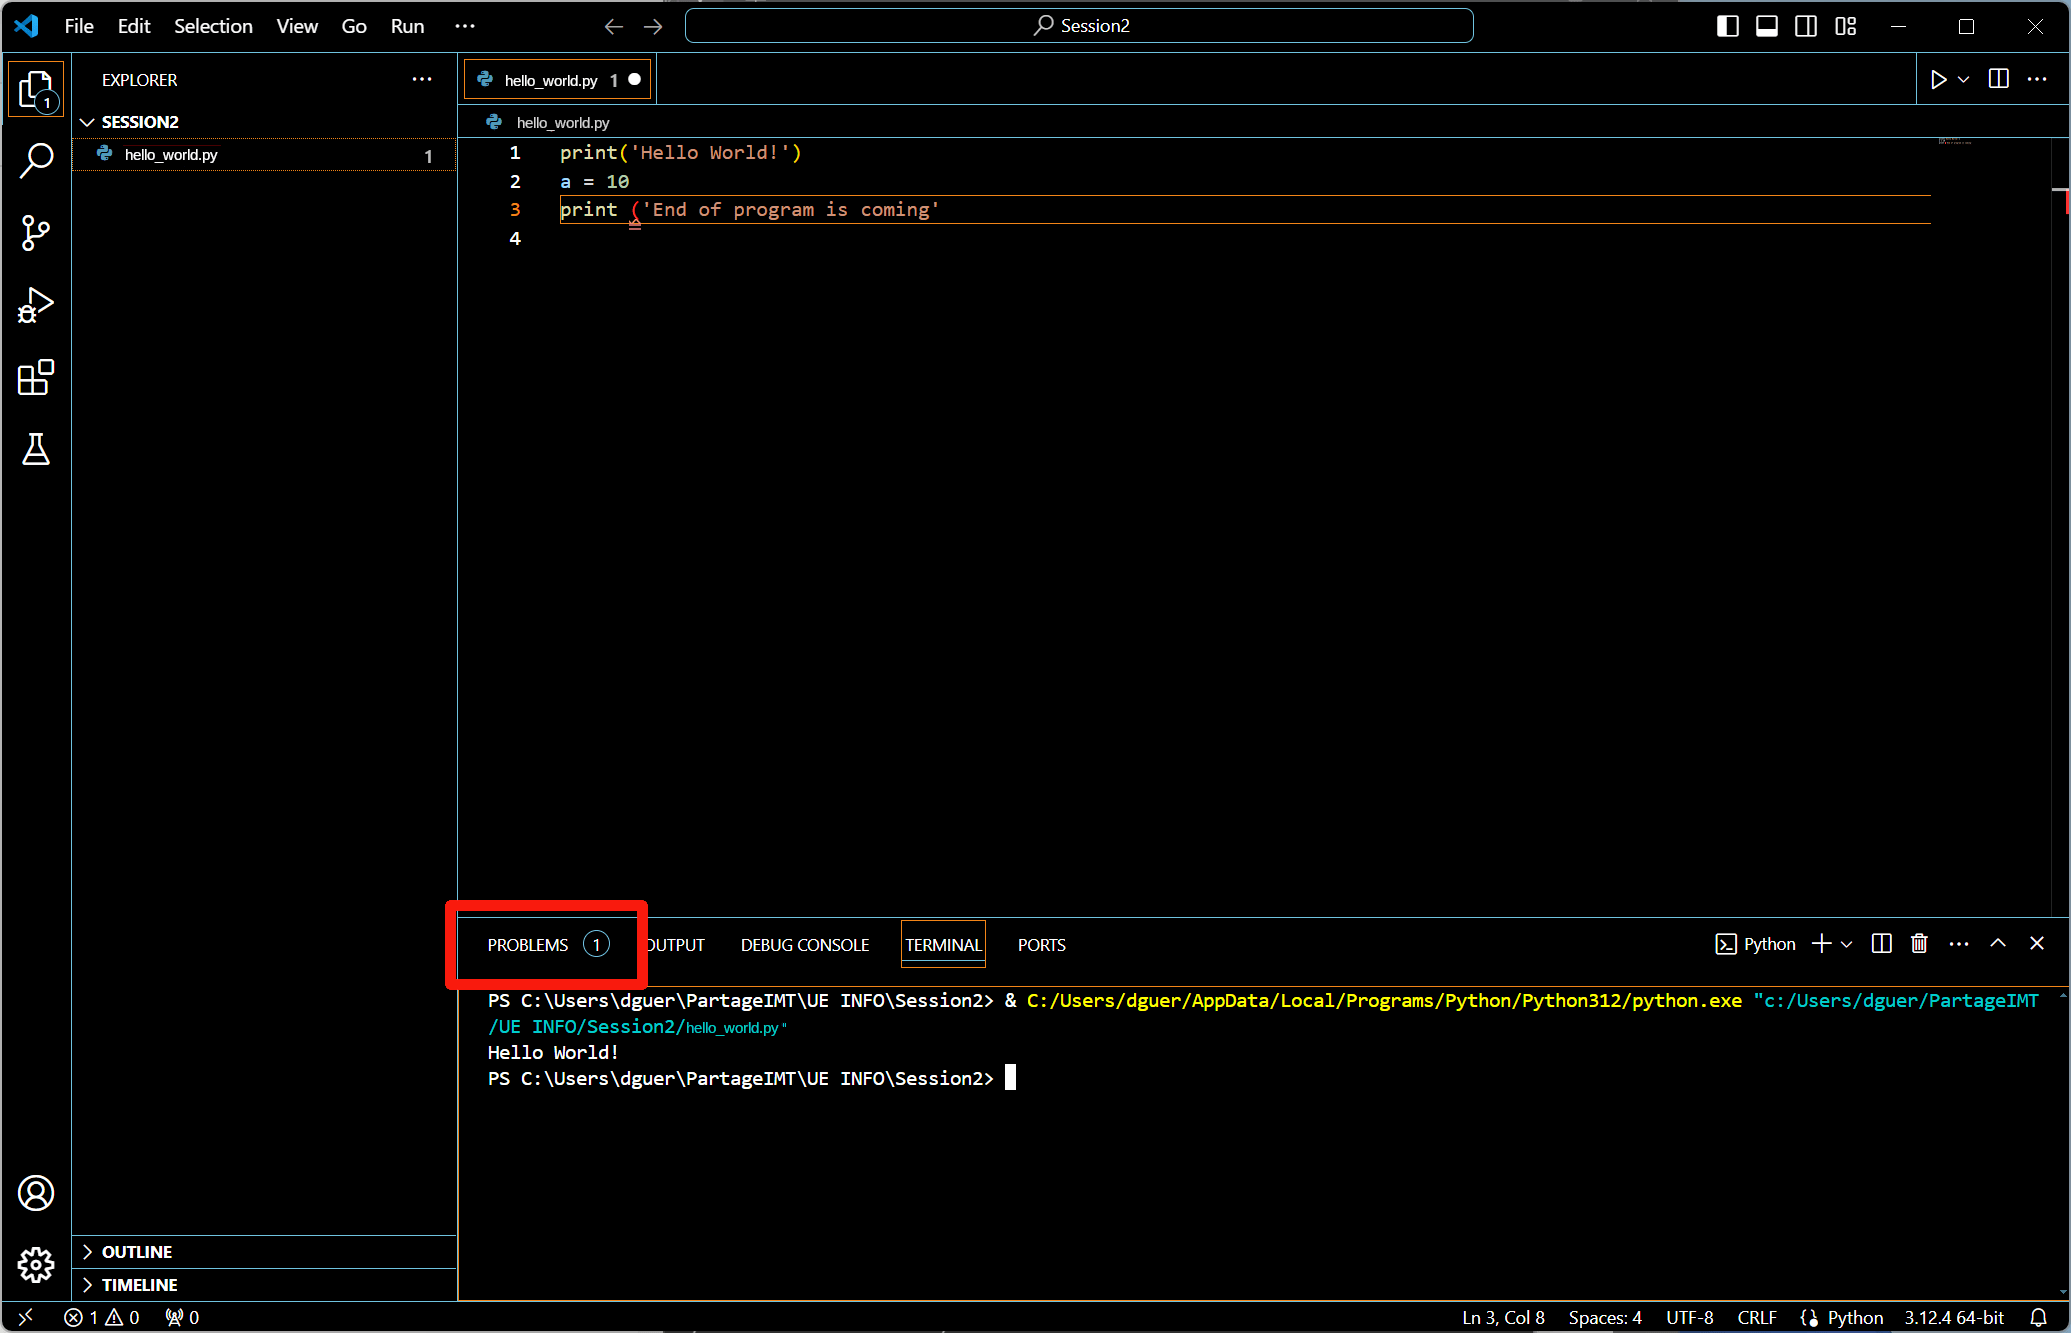
 print call on line 3).
The portion of the line where a syntaxic error has been detected is highlighted.
If you position your mouse on the highlighted parenthesis, a message explaining the error is displayed.
Moreover, in the panels area, a badge containing the number “1” appears in the “Problem” tab.
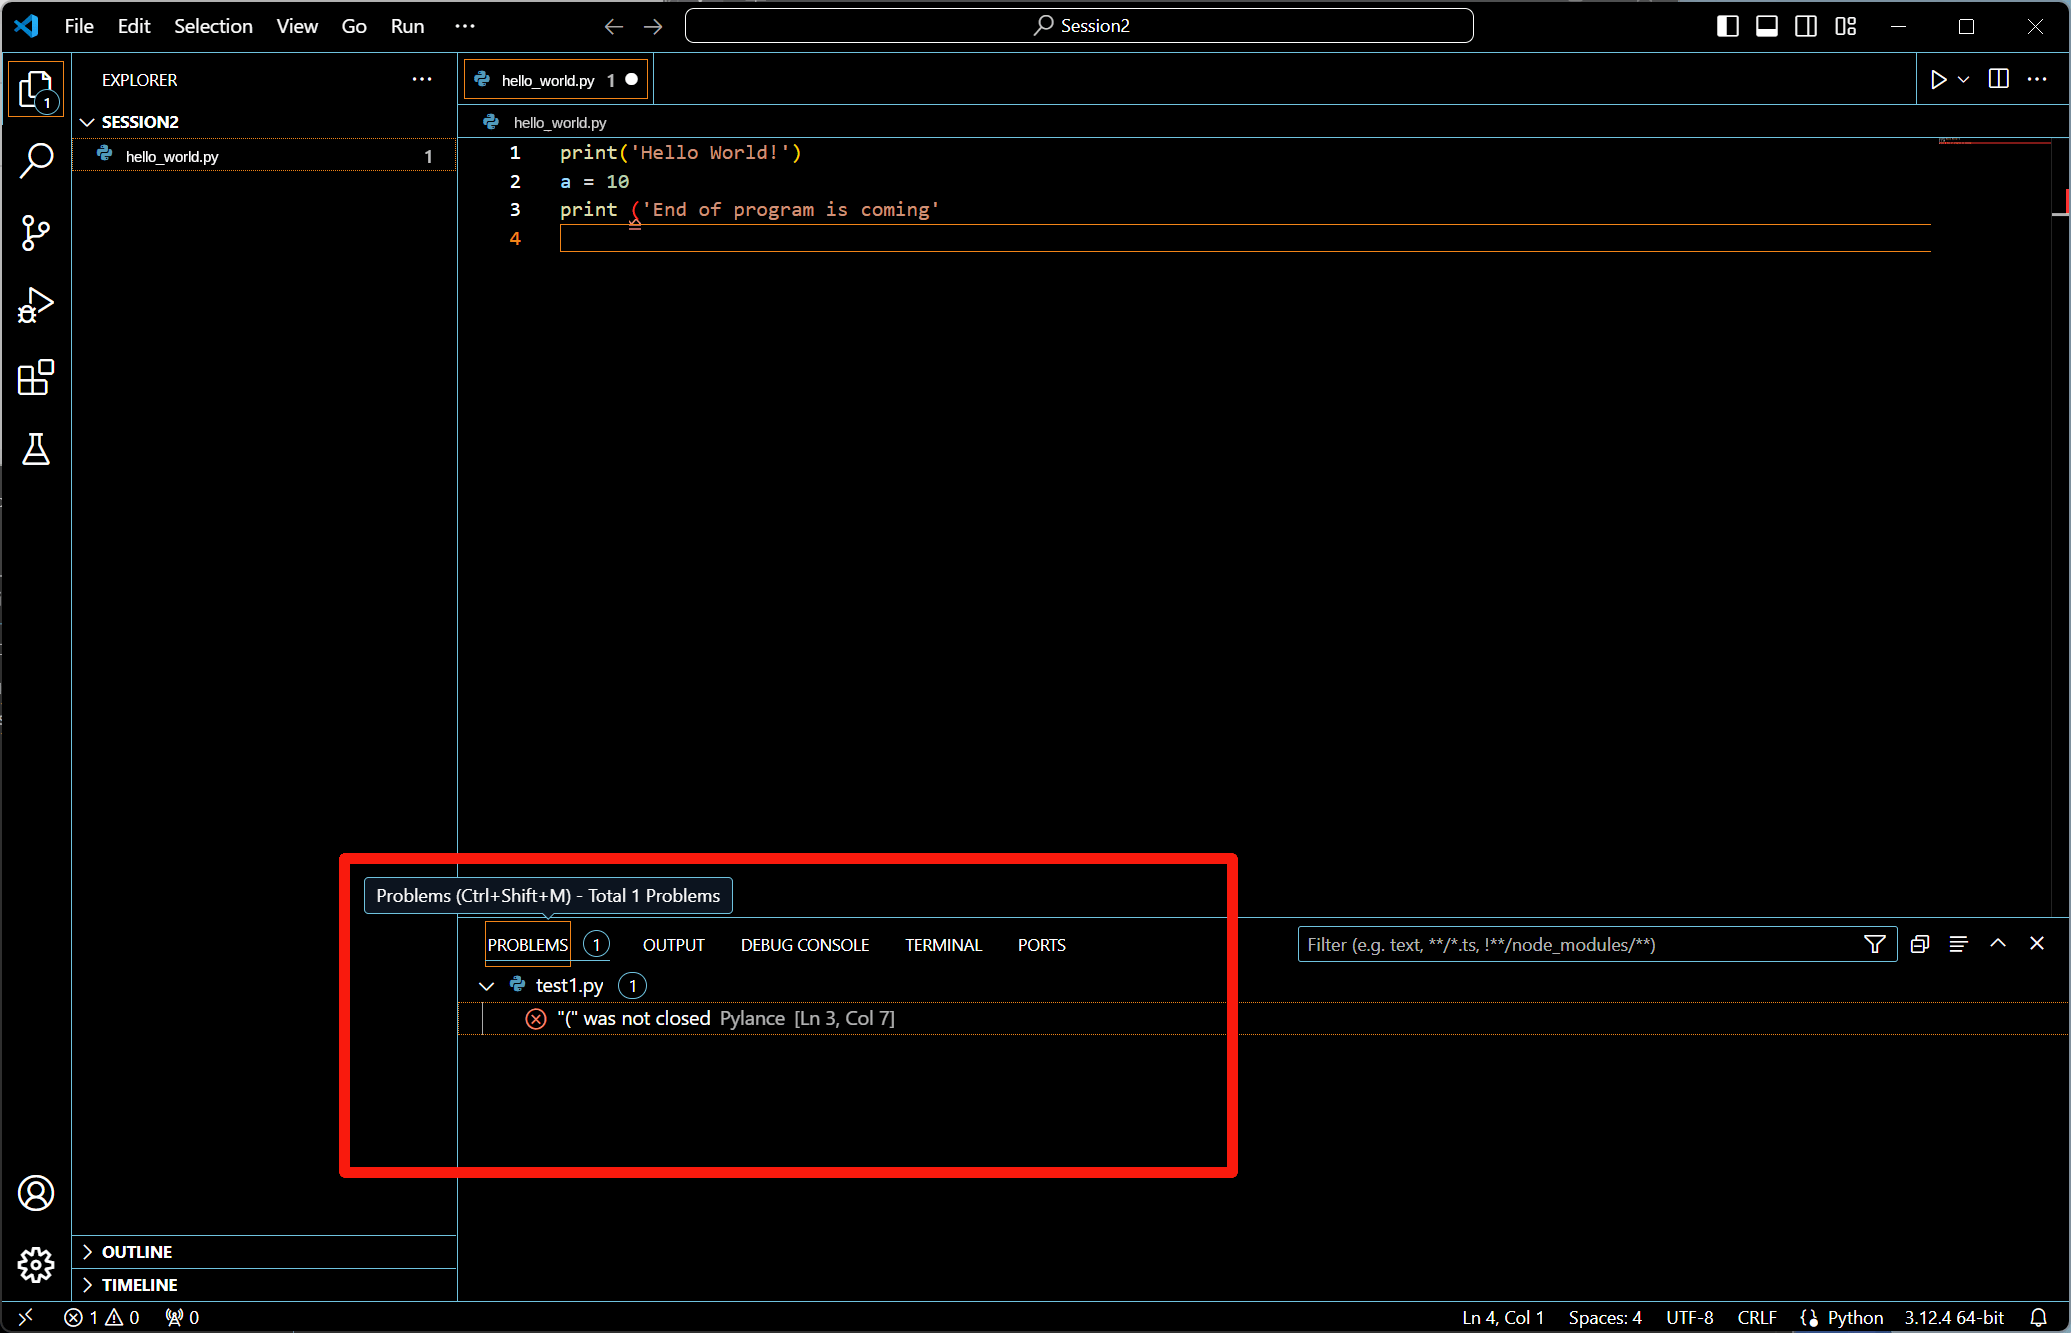 Click on the “Problem” panel tab to see the message:
The “Problem” panel lists all errors and warnings (here just one error) that need your attention. The list view is particularly useful when you have many errors or warnings, on a quite lengthy script. In our case, Pylance tells you a missing parenthesis has been detected: it is up to you to correct the problem.
5.2.2 — Example 2
The second example is trickier. Imagine you are a Python newbee, but you know another language for which there is no need to put parentheses around the values used to call a function. You will probably get this:
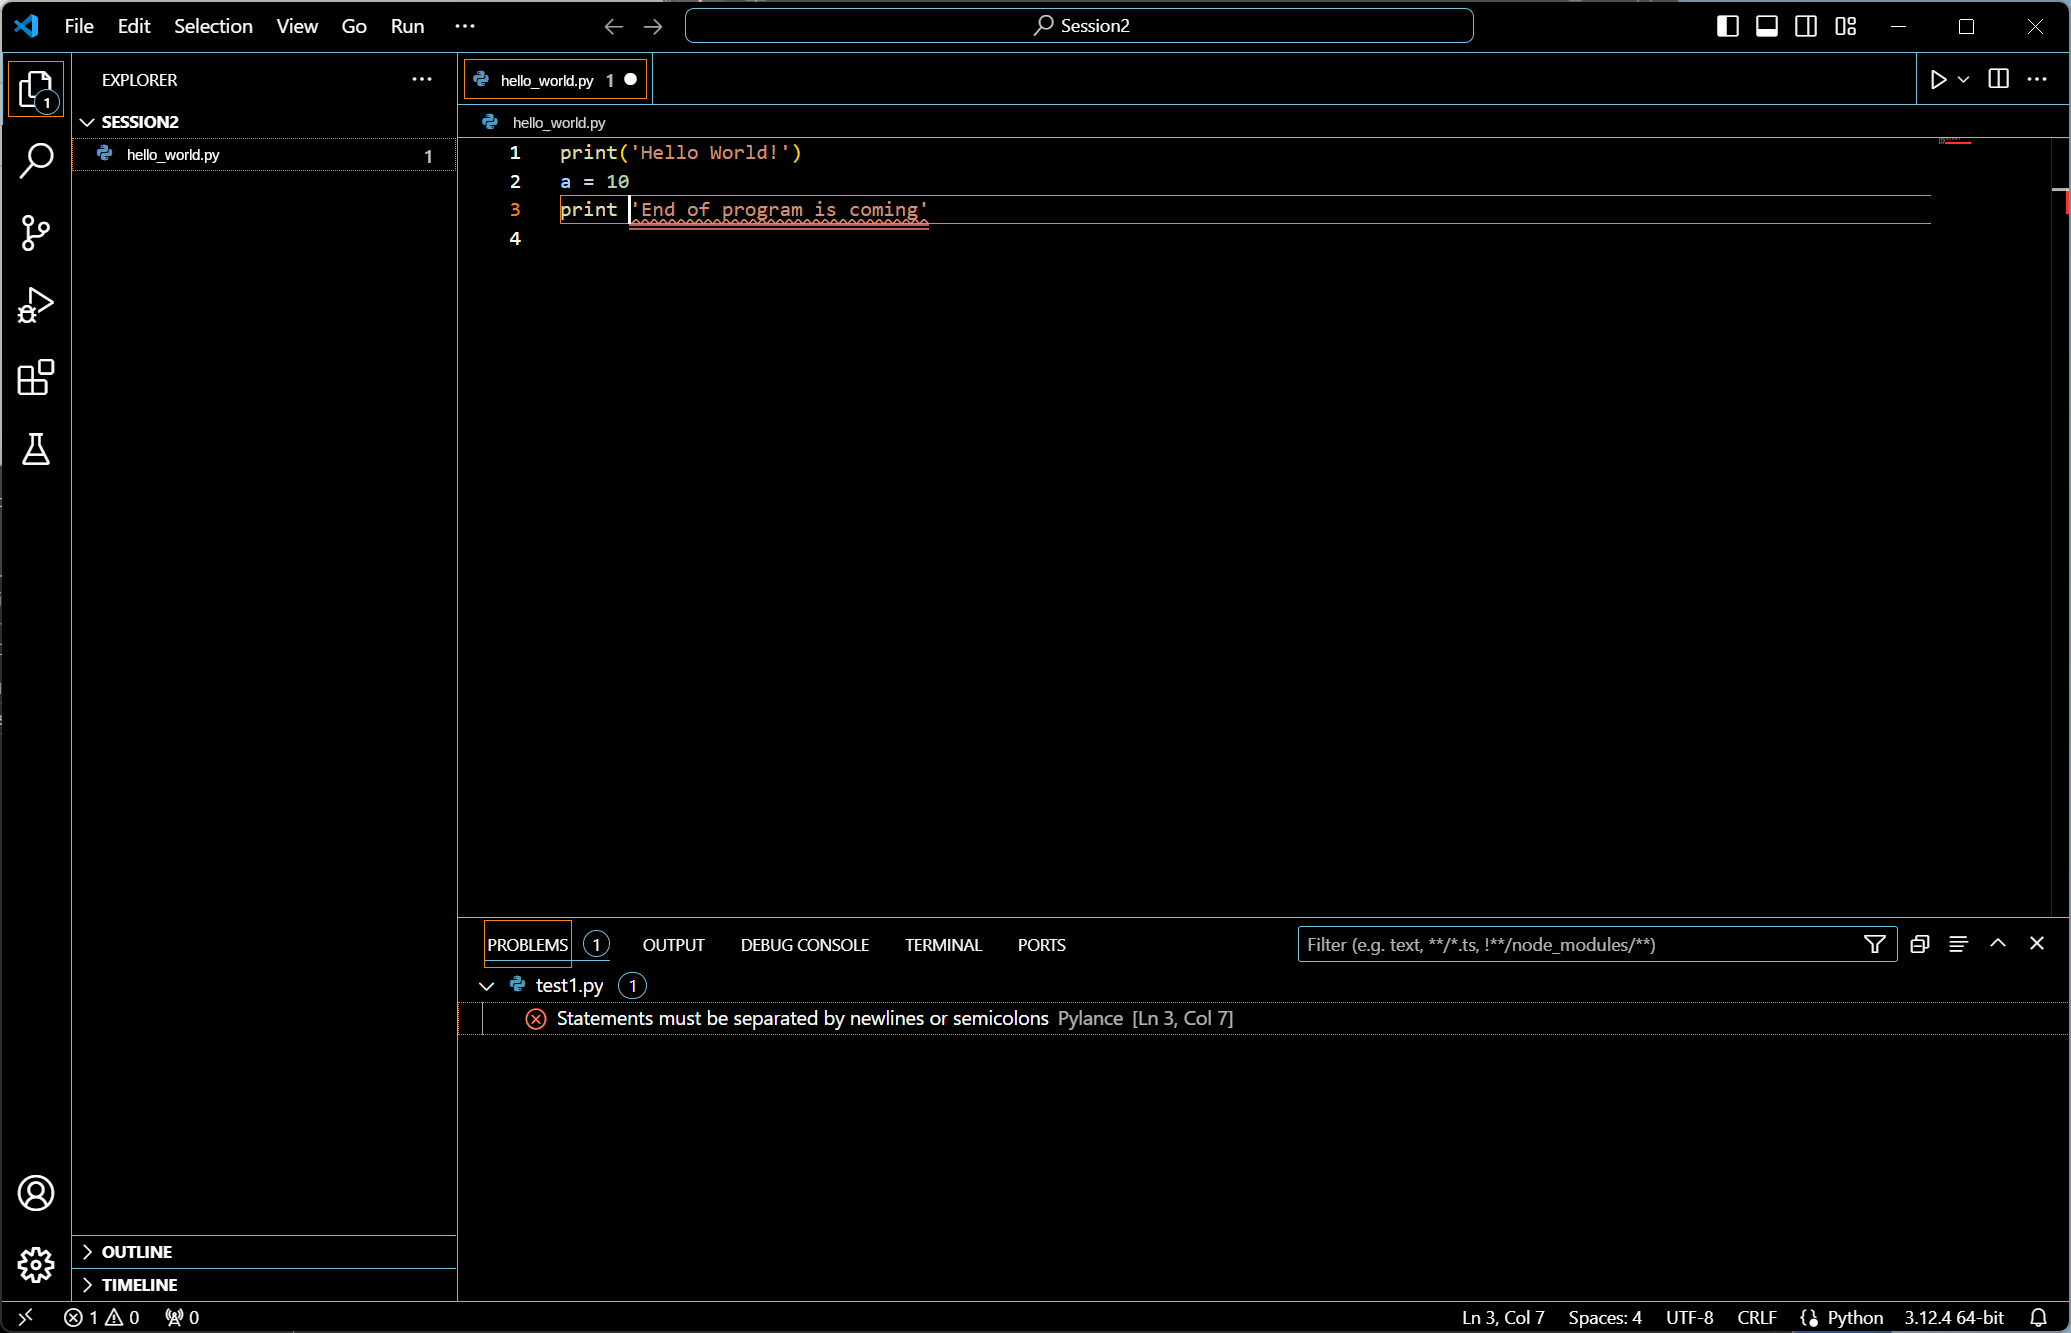 The string “End of program is coming” is highlighted.
It means a problem has been detected.
However the reason for the detection is not “Missing parentheses” but “Statements must be separated with newlines or semicolons”.
Indeed, the Python interpreter considers the function
The string “End of program is coming” is highlighted.
It means a problem has been detected.
However the reason for the detection is not “Missing parentheses” but “Statements must be separated with newlines or semicolons”.
Indeed, the Python interpreter considers the function print as a first statement (doing nothing here, the function will not be called) and the string as a second statement.
 One rule in Python is that two statements must be either on different lines or on the same line, but separated with semicolons.
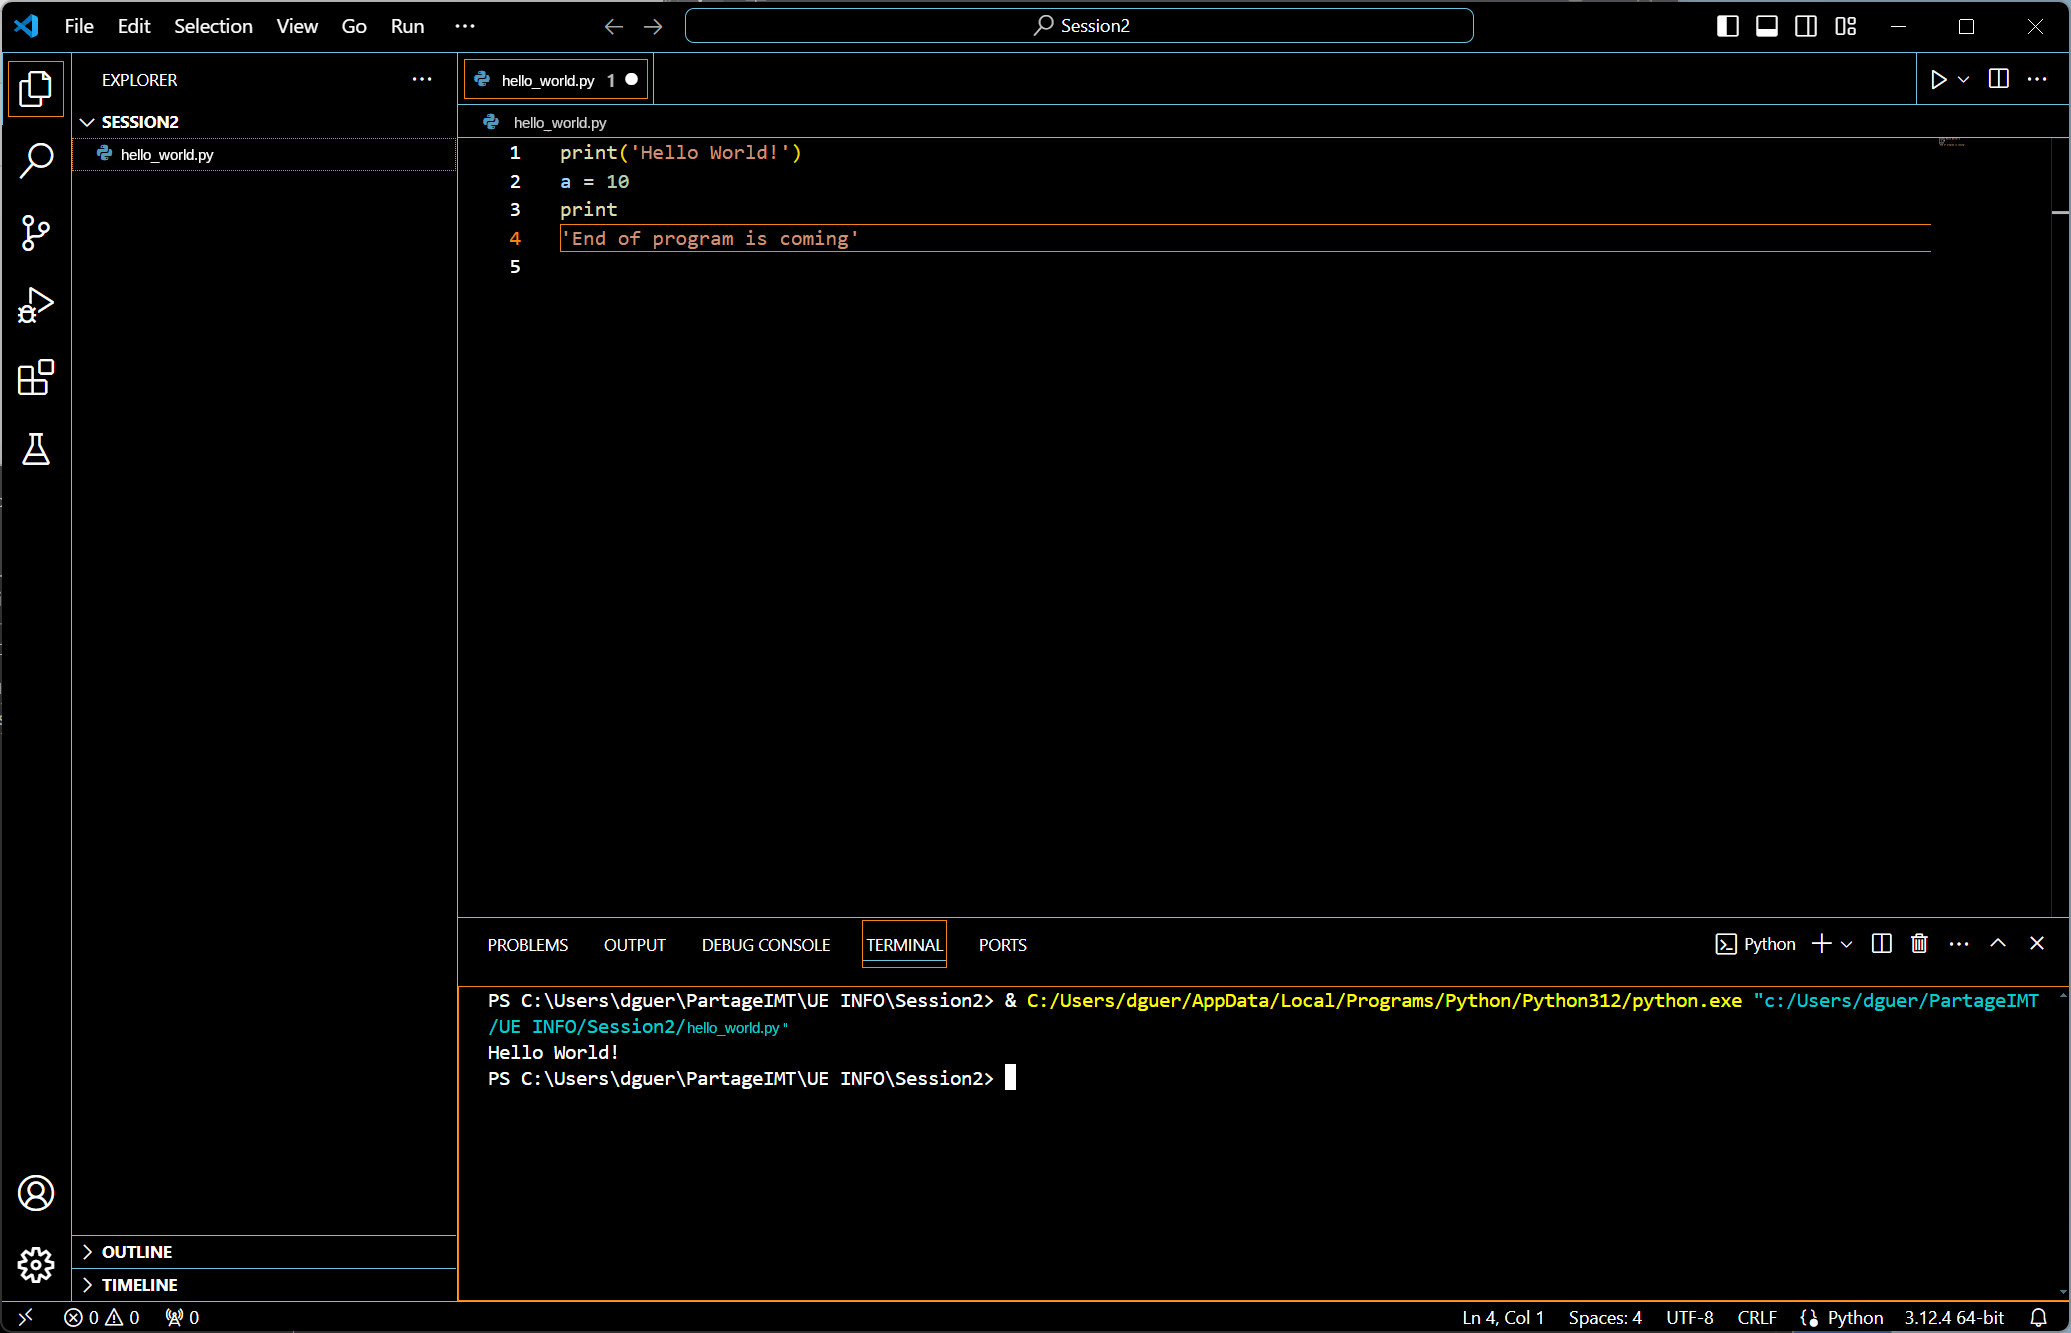
Thus, you may comply with the Pylance message and put the two statements on two different lines. No more errors are reported, but if you execute the program, it will not print the string “End of program is coming!”.
Respecting the Python syntaxic rule, this behavior is correct. However, is it the one you expected? In our case, the answer is no. In fact, you should have added the set of parentheses instead of complying blindly with the error message.
This very basic second example illustrates that these static tools are only here to help you. However, you are the developer, and it is up to you to make the relevant decisions. This will be even more true when using AI tools to develop some codes.
6 — Debug your first Python script
You need to debug your program when it crashes at runtime, or when the results it produces are not the ones it should give. In those cases, you have to investigate, find the problems and make the appropriate corrections: that’s the essence of debugging.
There are many ways to debug a program:
-
You may add some
printstatements to your code in order to output messages or variables contents. While this debug code helps you find the problems, it also clutters both your terminal outputs and your source code. -
You probably should use a debugger either from the command line (may be tricky) or from an IDE. Indeed, modern IDEs mainly render debug code unnecessary by allowing the placement of stop points at specific places in the program, and providing the ability to view the value of variables through the IDE rather than program outputs.
In this section, the goal is to show how you can interrupt the execution of a script at one or several locations you find relevant, and inspect for instance the contents of the current variables to see if everything is nominal.
Testing is not debugging! Software testing is the act of checking whether software satisfies expectations. Depending on the testing results, debugging “may” be required.
6.1 — Adding a breakpoint
A breakpoint is an intentional stopping or pausing place in a program, put in place for debugging purposes. More generally, a breakpoint is a means of acquiring knowledge about a program during its execution.
During the interruption, the programmer inspects the test environment (e.g., general-purpose registers, memory, logs, files) to find out whether the program is functioning as expected.
In practice, a conditional breakpoint adds to the standard breakpoint of one or more conditions that determine when a program’s execution should be interrupted at the breakpoint location.
Let’s set a breakpoint at line 2.
That means you want to start the script execution, but pause it just before executing line 2, i.e., assigning the value 10 to the variable a.
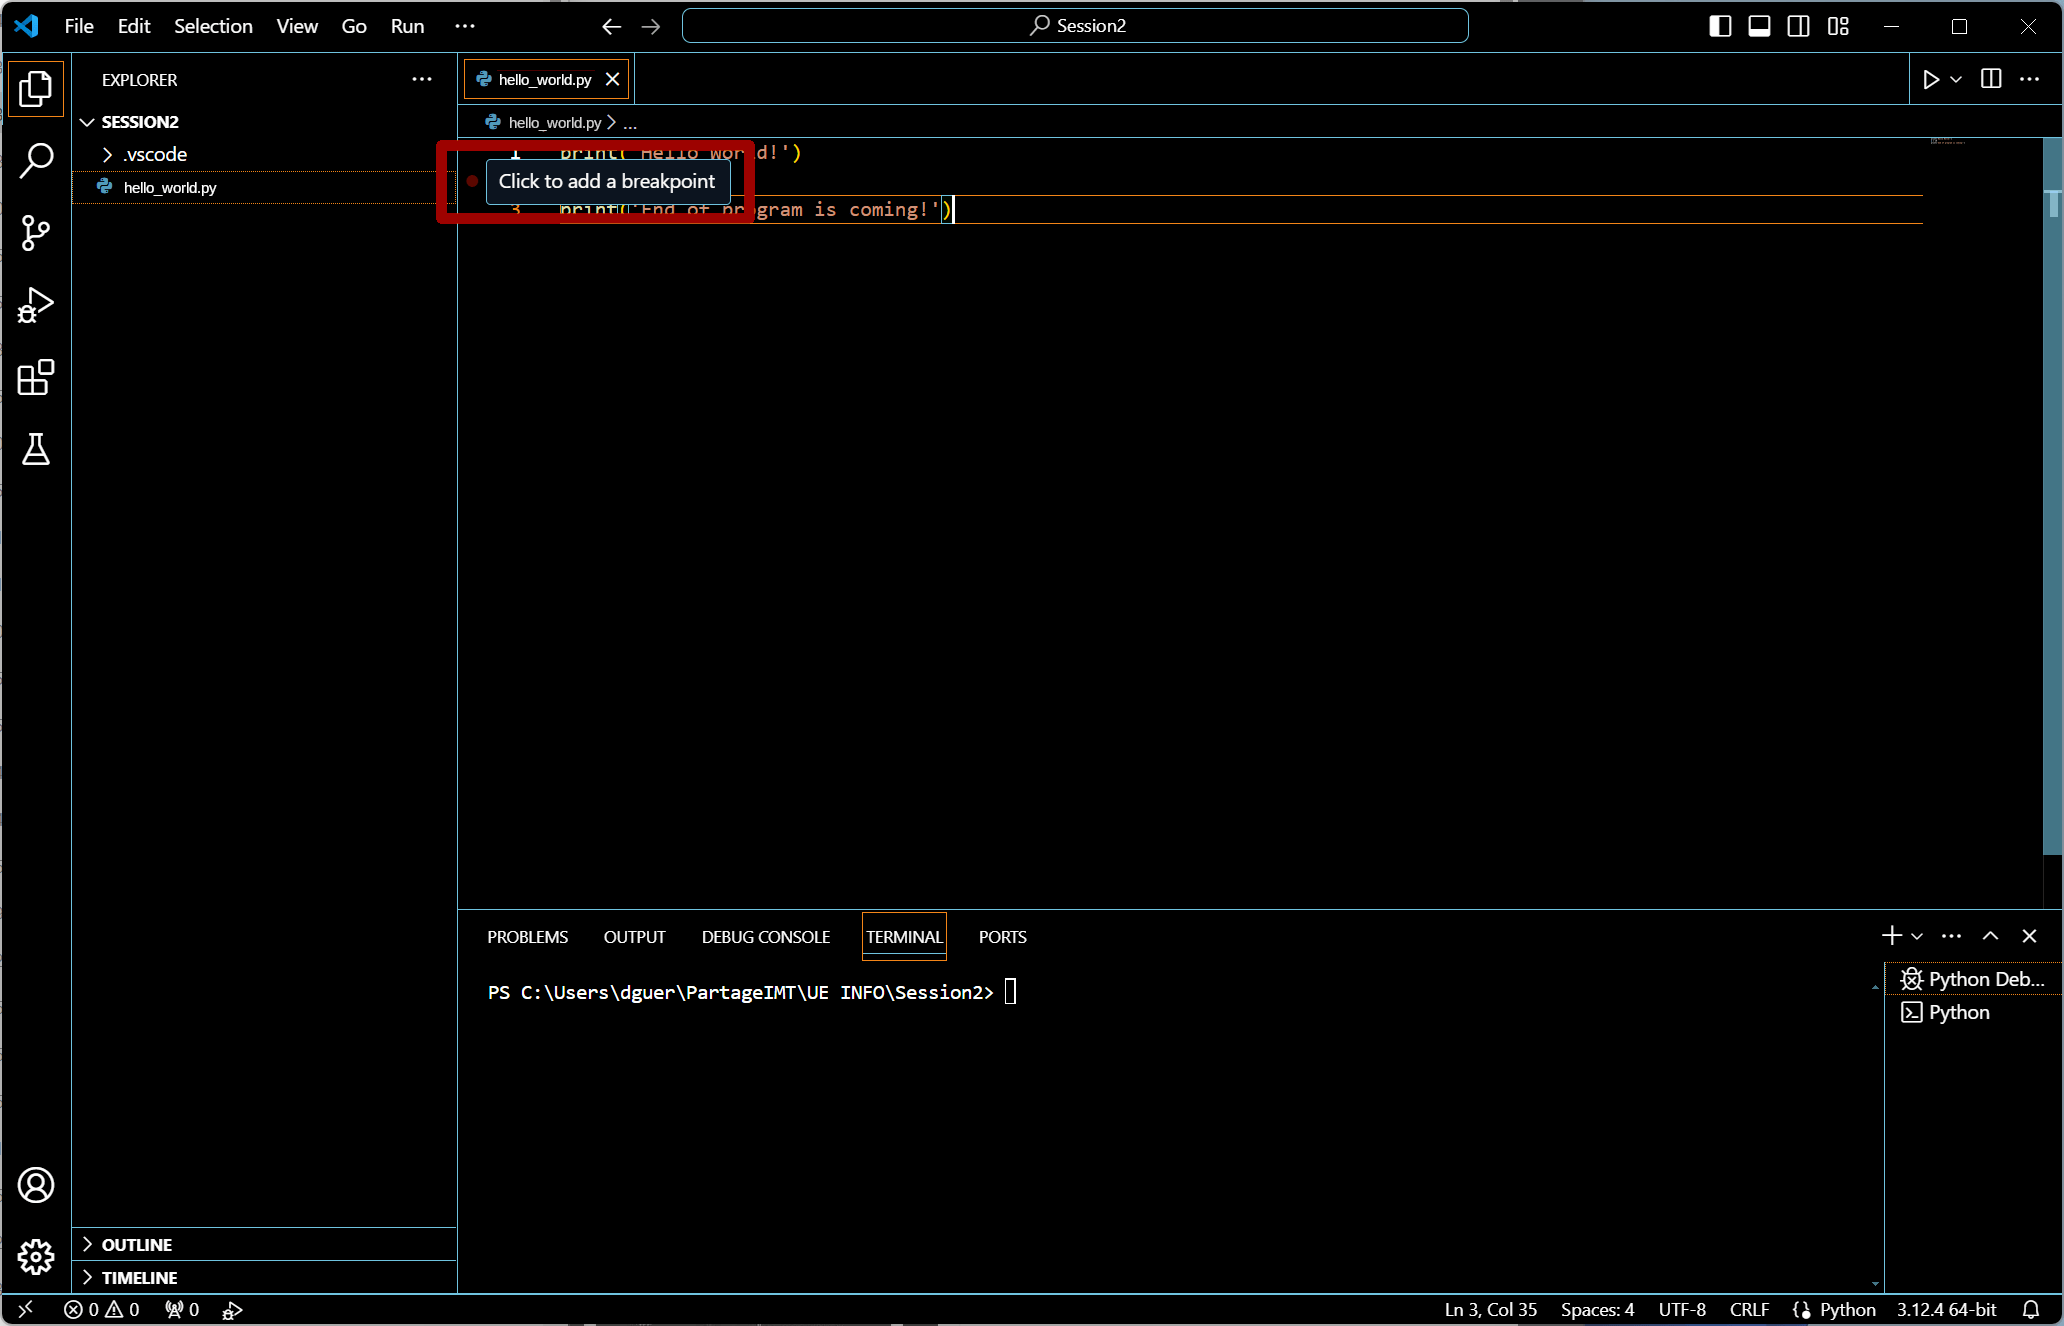 To add a breakpoint to a Python script, use your mouse to go over the margin in the editor of the
 hello_world.py, just left to the number 2 (i.e., the second line of your script).
A popup window will tell you to click to set the breakpoint at this location.
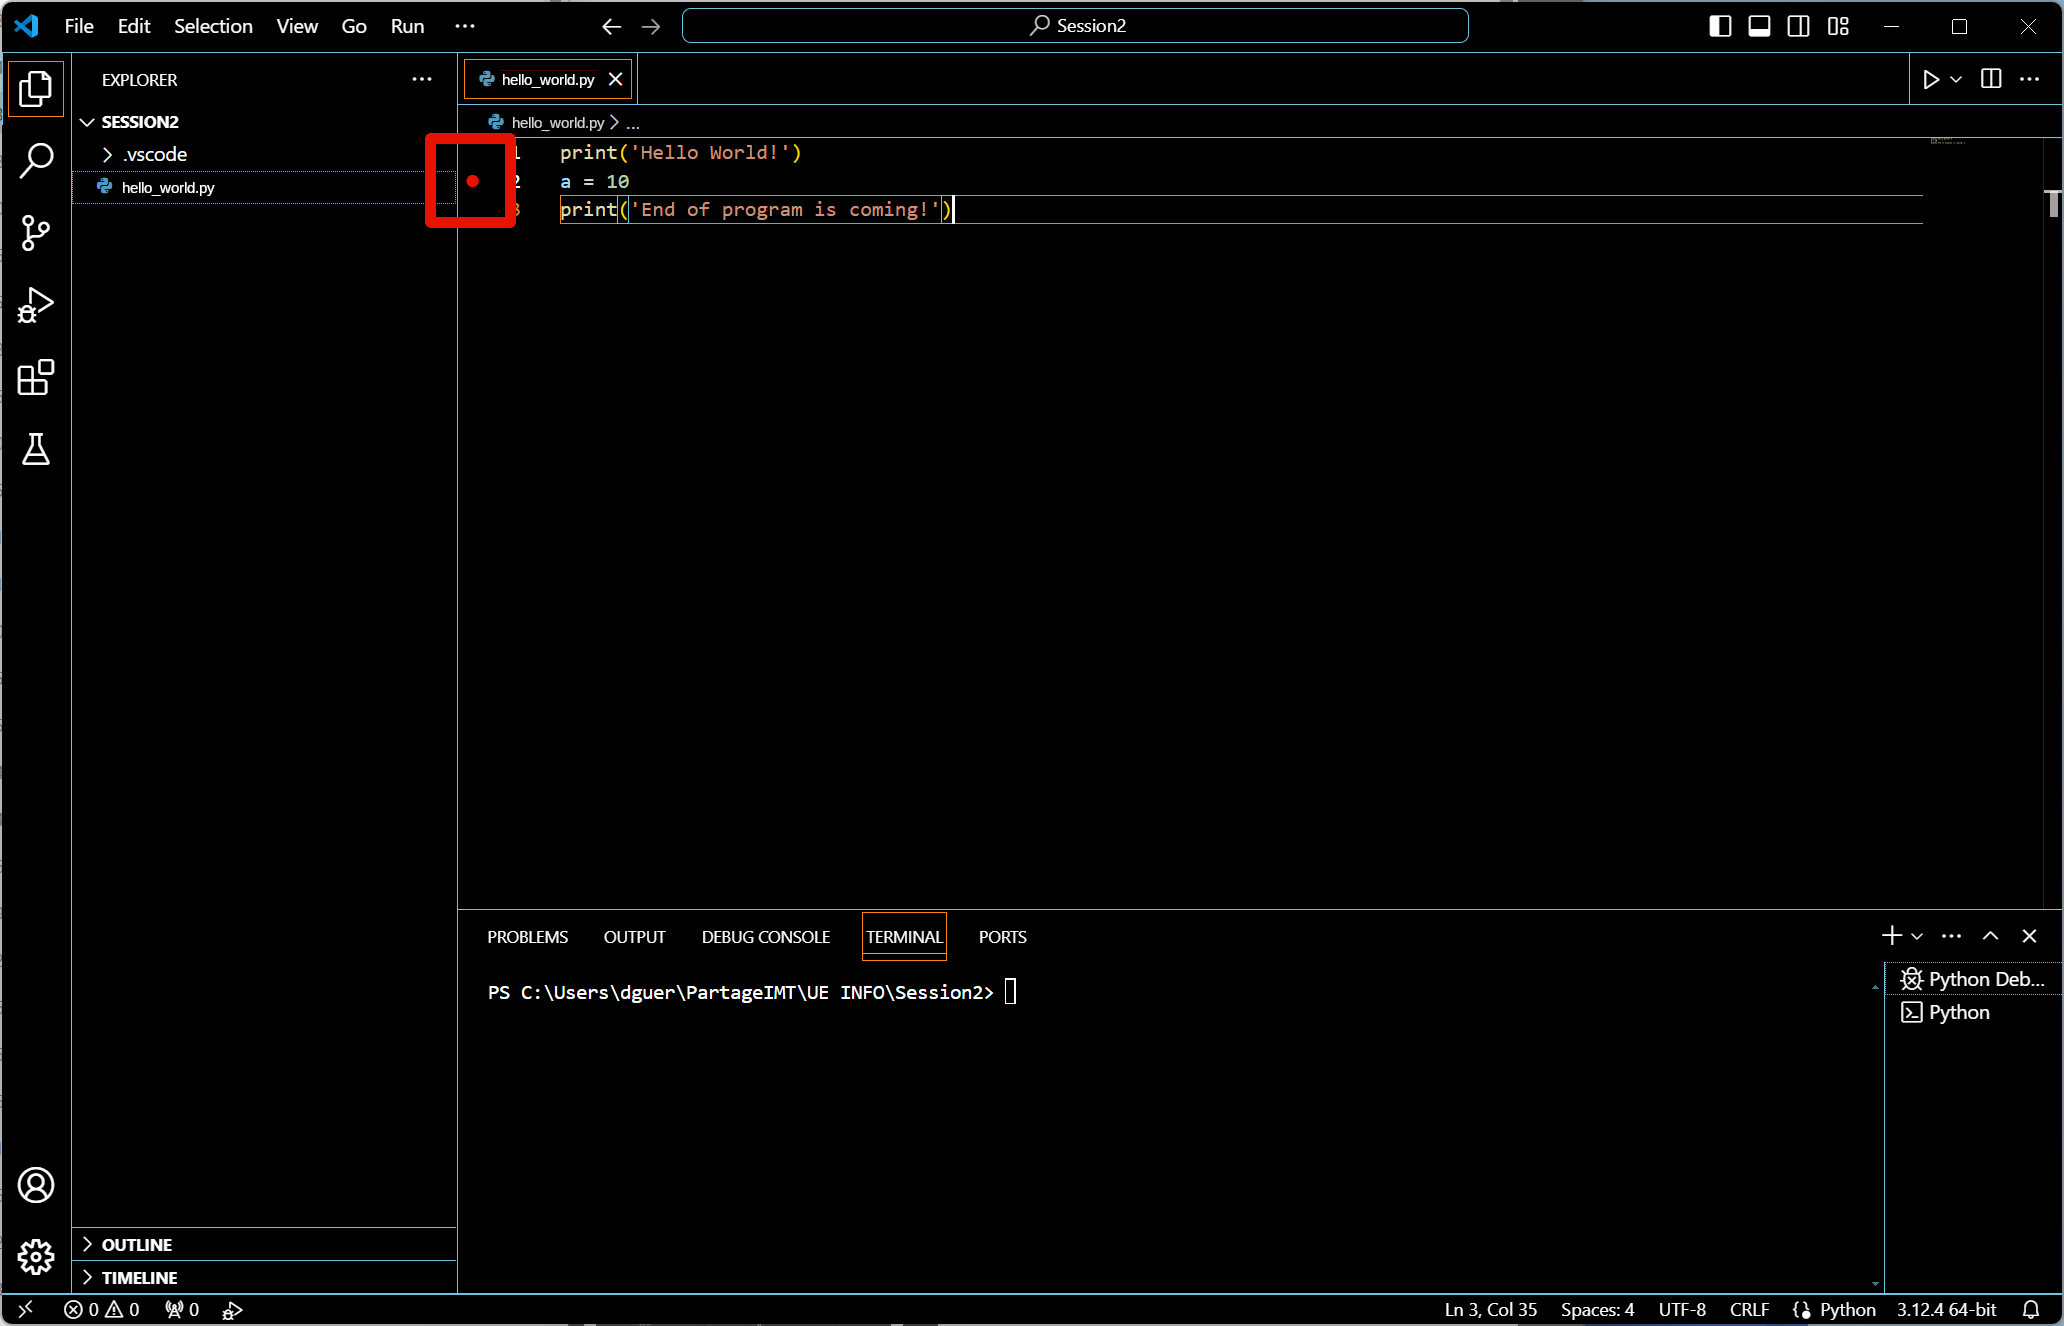 Once done, a red dot indicates a breakpoint is set for line 2.
If you want to remove the breakpoint, click on this red dot.
Once done, a red dot indicates a breakpoint is set for line 2.
If you want to remove the breakpoint, click on this red dot.
6.2 — Run the program in debug mode
 To take benefit from setting the breakpoint, you need to execute the script in debug mode, so that breakpoints are activated.
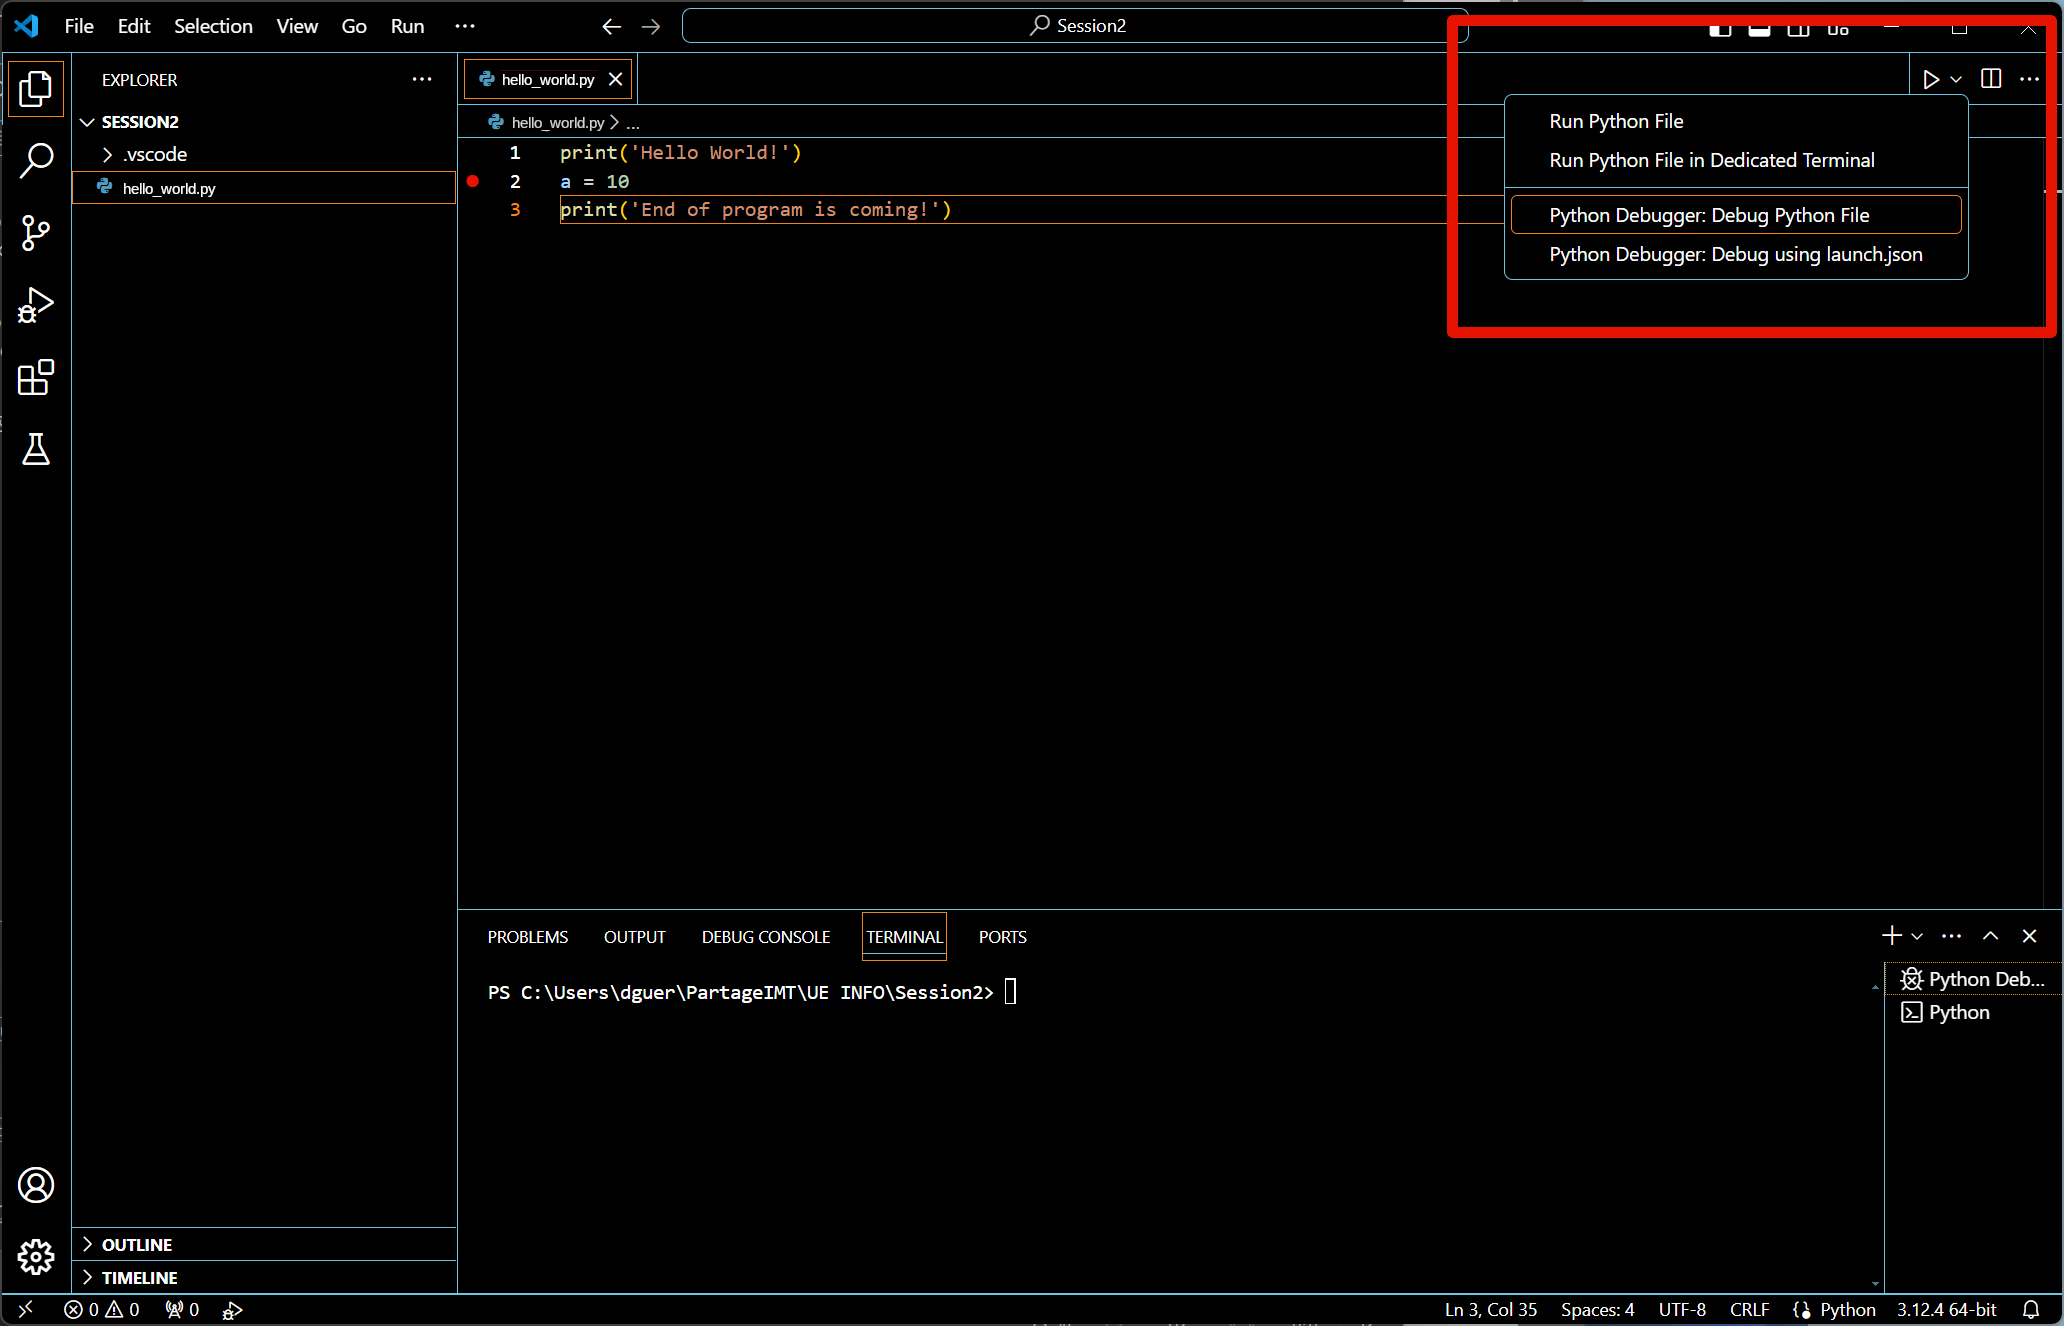
To run your script in debug mode, open the drop-down menu just right to the “Execution” triangle you used to launch the script execution and select “Python Debugger: Debug Python File”:
To take benefit from setting the breakpoint, you need to execute the script in debug mode, so that breakpoints are activated.
To run your script in debug mode, open the drop-down menu just right to the “Execution” triangle you used to launch the script execution and select “Python Debugger: Debug Python File”:
 The execution starts then pauses.
Note that it took more time to start the execution compared to your previous standard execution.
Indeed, the debug environment must be prepared to process your breakpoints, and allow you, at these occasions, at runtime, to inspect the current state of your program execution.
The execution starts then pauses.
Note that it took more time to start the execution compared to your previous standard execution.
Indeed, the debug environment must be prepared to process your breakpoints, and allow you, at these occasions, at runtime, to inspect the current state of your program execution.
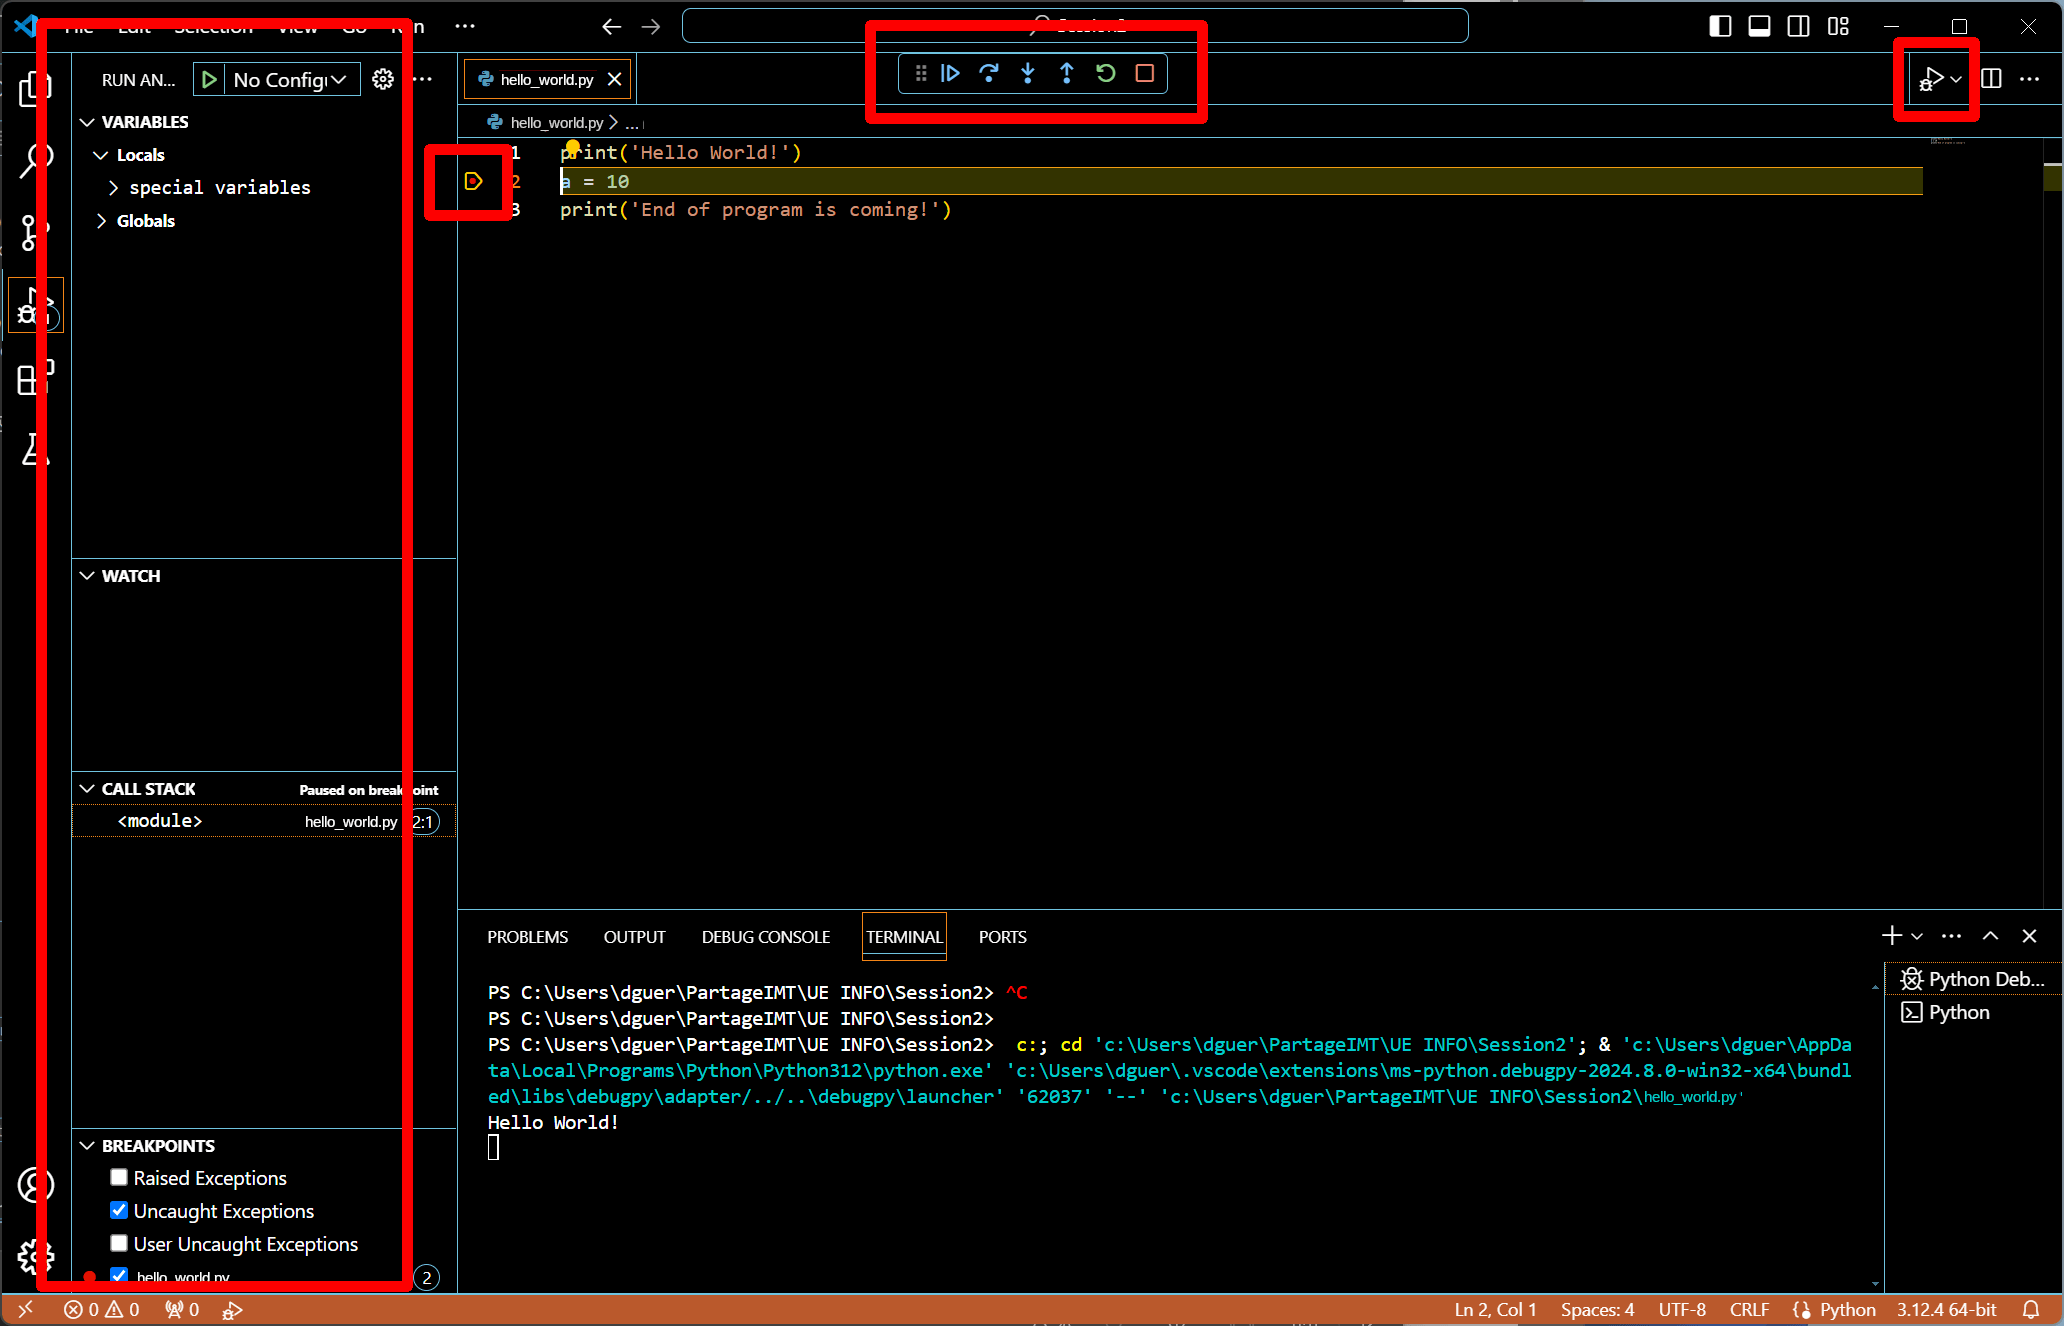
Several observations need to be made:
- In the activity bar, the button “Run and debug” (
 ) has been selected.
 - Logically, the primary sidebar changes to open the “Run and Debug” view, where inspecting the runtime environment is possible (e.g., variables values).
- The status bar reflects you are currently debugging a program: its color changes and a new icon, the “Run and Debug” one, appears on its left side.
- The terminal reveals the commands the IDE (and the Debug Extension) used to launch the debugging of the program.
- The terminal also shows that line 1 was executed as the string “Hello World!” was printed.
- In the script editor, a small yellow left-squared horizontal triangle (
 ) appears around the breakpoint red dot, indicating what will be the next line to be executed.
 - Finally, in the editor area, right to the
hello_world.pytab, a new set of icons is displayed, allowing you to control the execution flow of your program:
6.3 — Step by step execution
Now, we want to execute line 2, i.e., create a variable a and assign it the value 10.
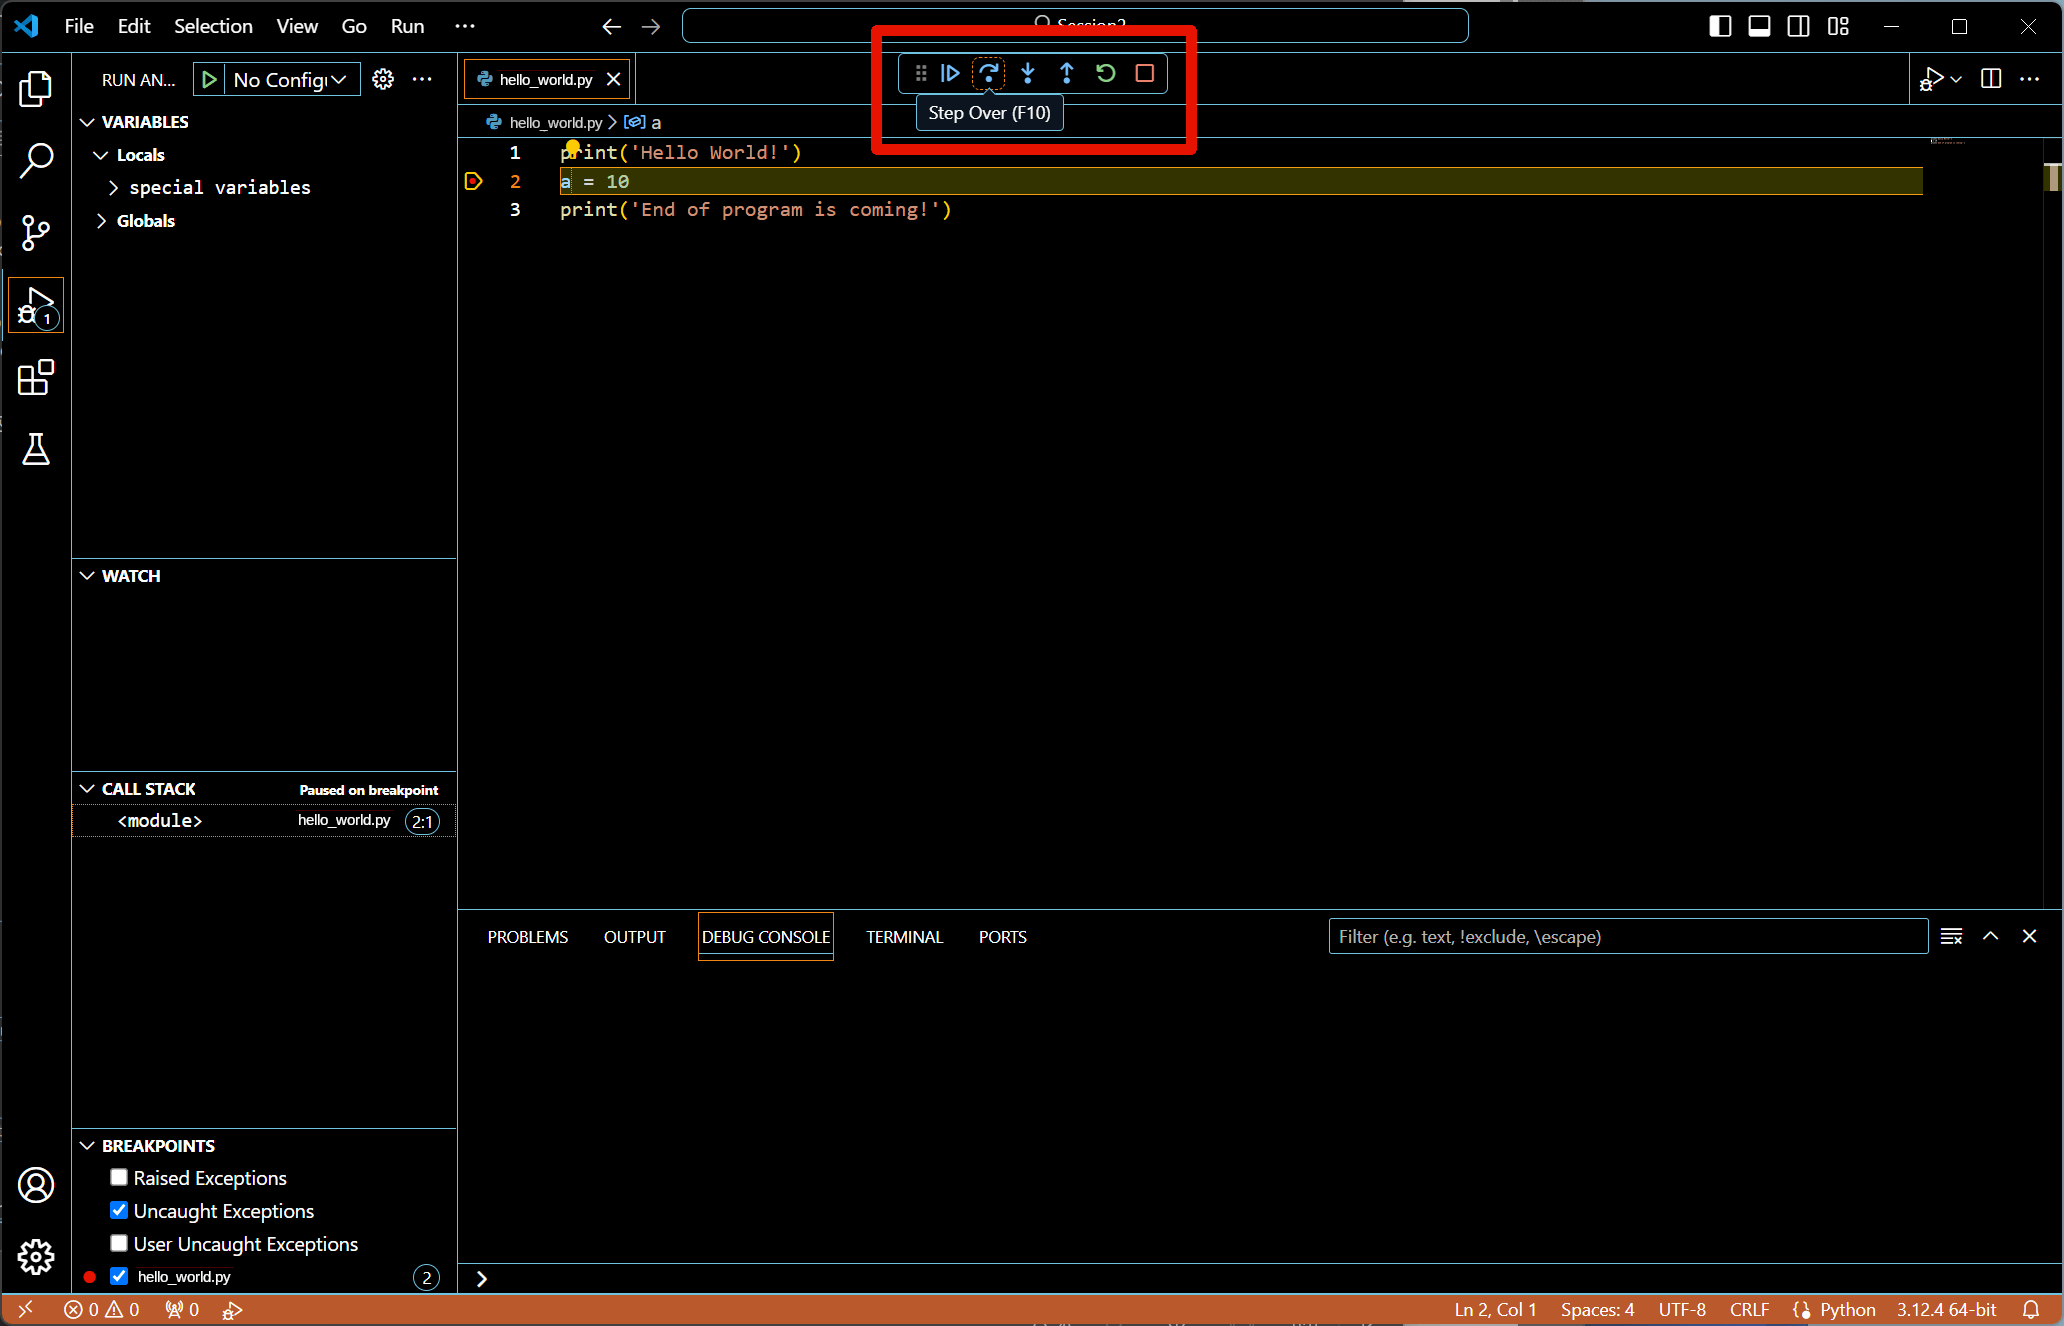 To do that, go to the new set of icons and make the mouse cursor hover over these buttons to find how they can control the execution flow.
As you will probably use them a lot, keep track of their keyboard shortcuts: that will spare a lot of time when debugging your programs.
Here we just want line 2 to be executed and then, the execution to pause before executing line 3, so just click on the “Step Over” button.
To do that, go to the new set of icons and make the mouse cursor hover over these buttons to find how they can control the execution flow.
As you will probably use them a lot, keep track of their keyboard shortcuts: that will spare a lot of time when debugging your programs.
Here we just want line 2 to be executed and then, the execution to pause before executing line 3, so just click on the “Step Over” button.
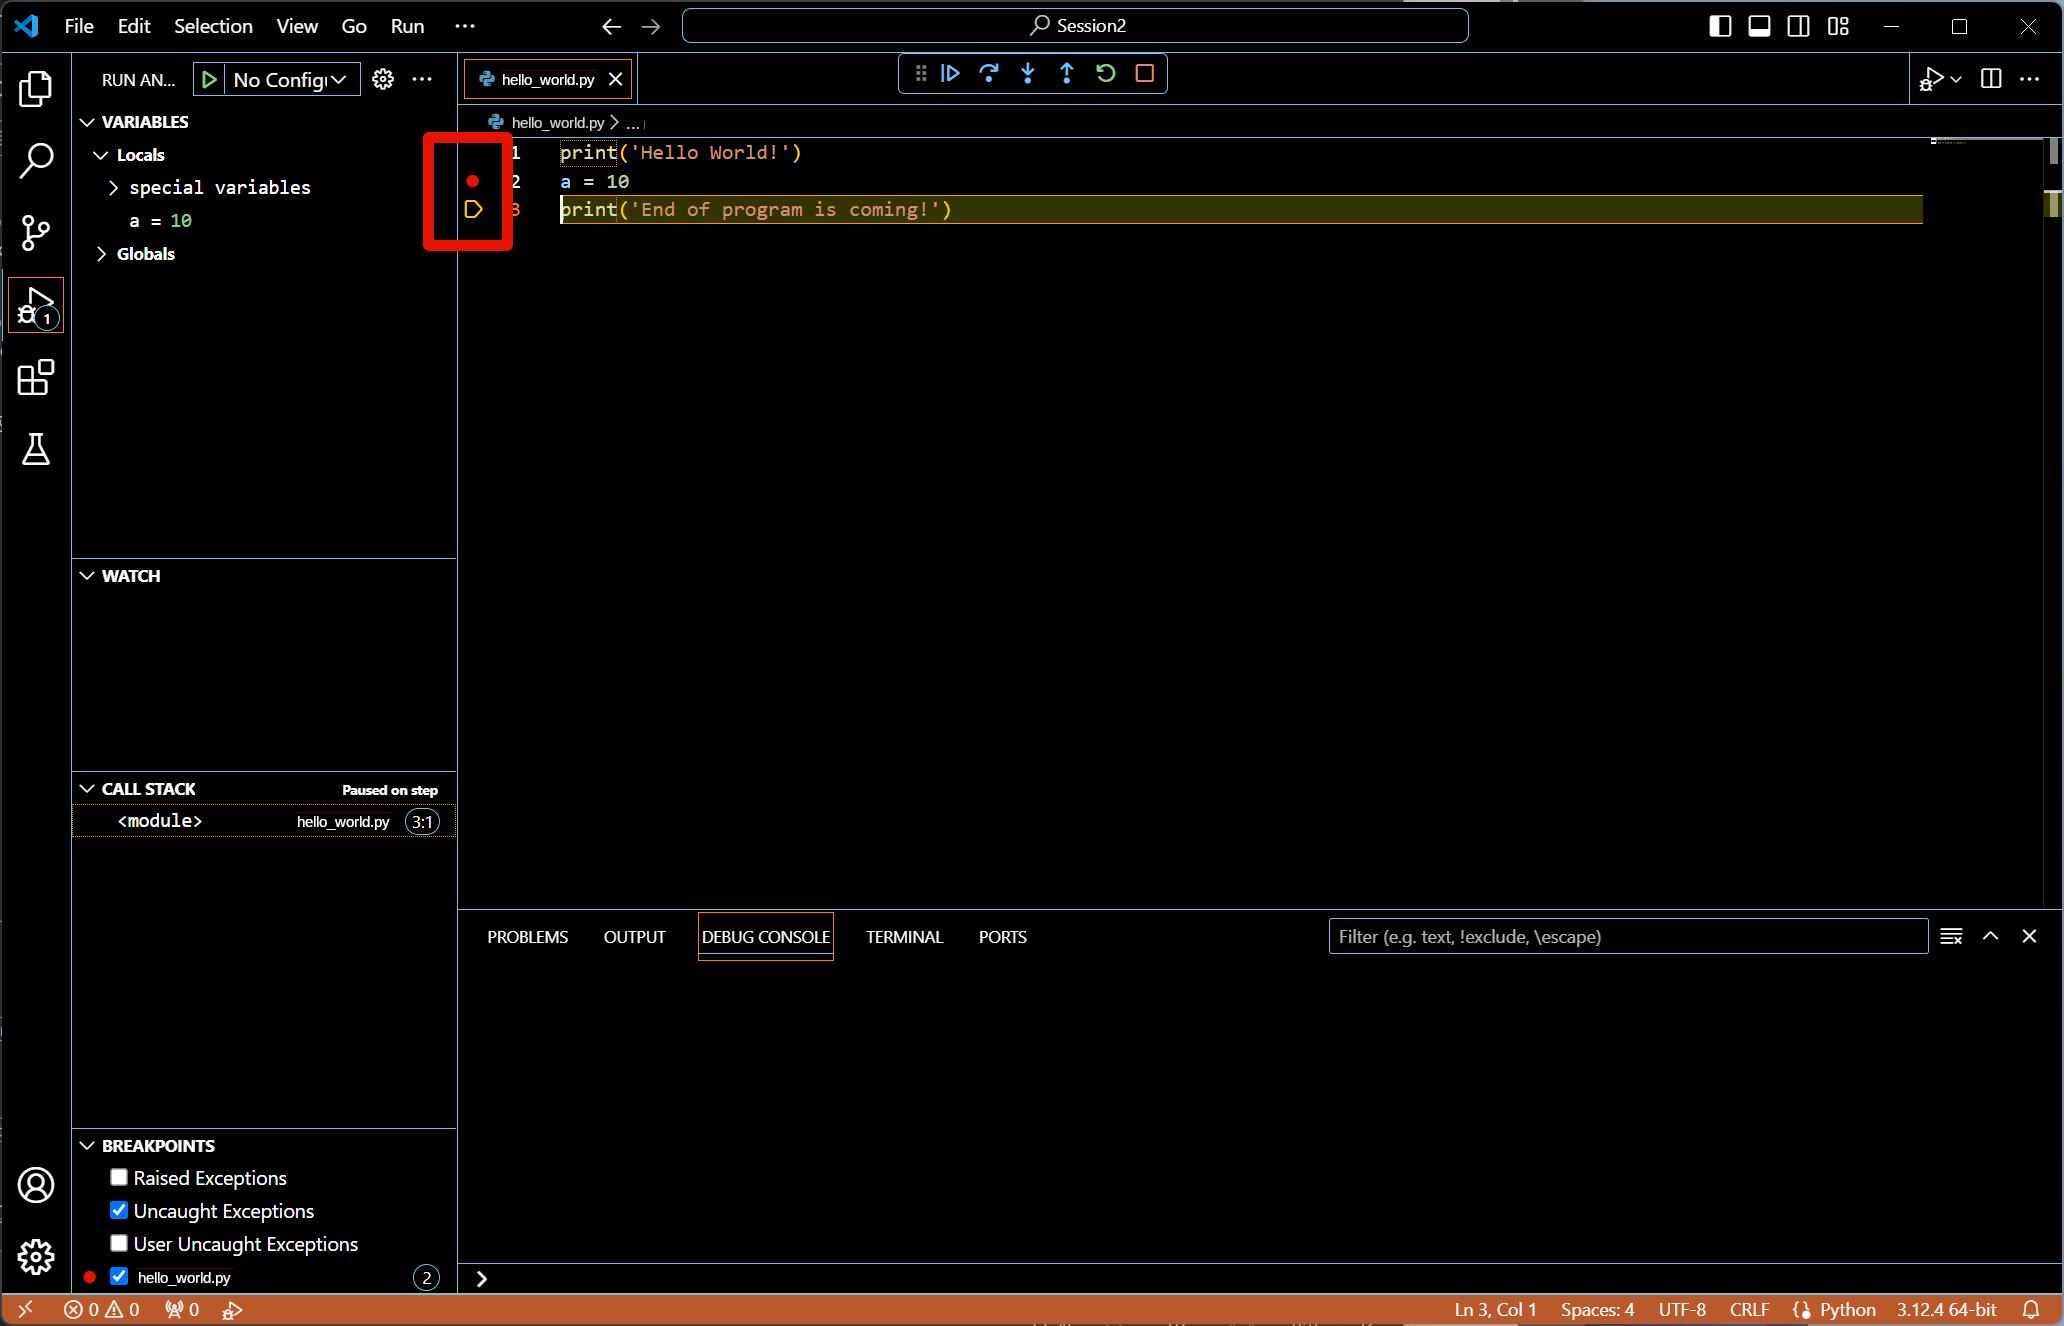 Once done, the small yellow left-squared horizontal triangle moved one step further, in front of line 3.
Tthat means line 2 has been executed, line 3 will be executed next.
Once done, the small yellow left-squared horizontal triangle moved one step further, in front of line 3.
Tthat means line 2 has been executed, line 3 will be executed next.
 How to check whether the variable
 a has been defined and correctly assigned?
In the primary sidebar, under the “Variables” category, you should find that a variable named a, has been created with its current value 10.
For debugging purposes, you may directly modify its value, to be taken into account for the rest of the execution.
After finishing this debugging session, you can also add a new line to your script (like a = 20) and monitor, step by step, the evolution of the existence (in the current scope) and value of the variable a.
6.4 — Ending the execution
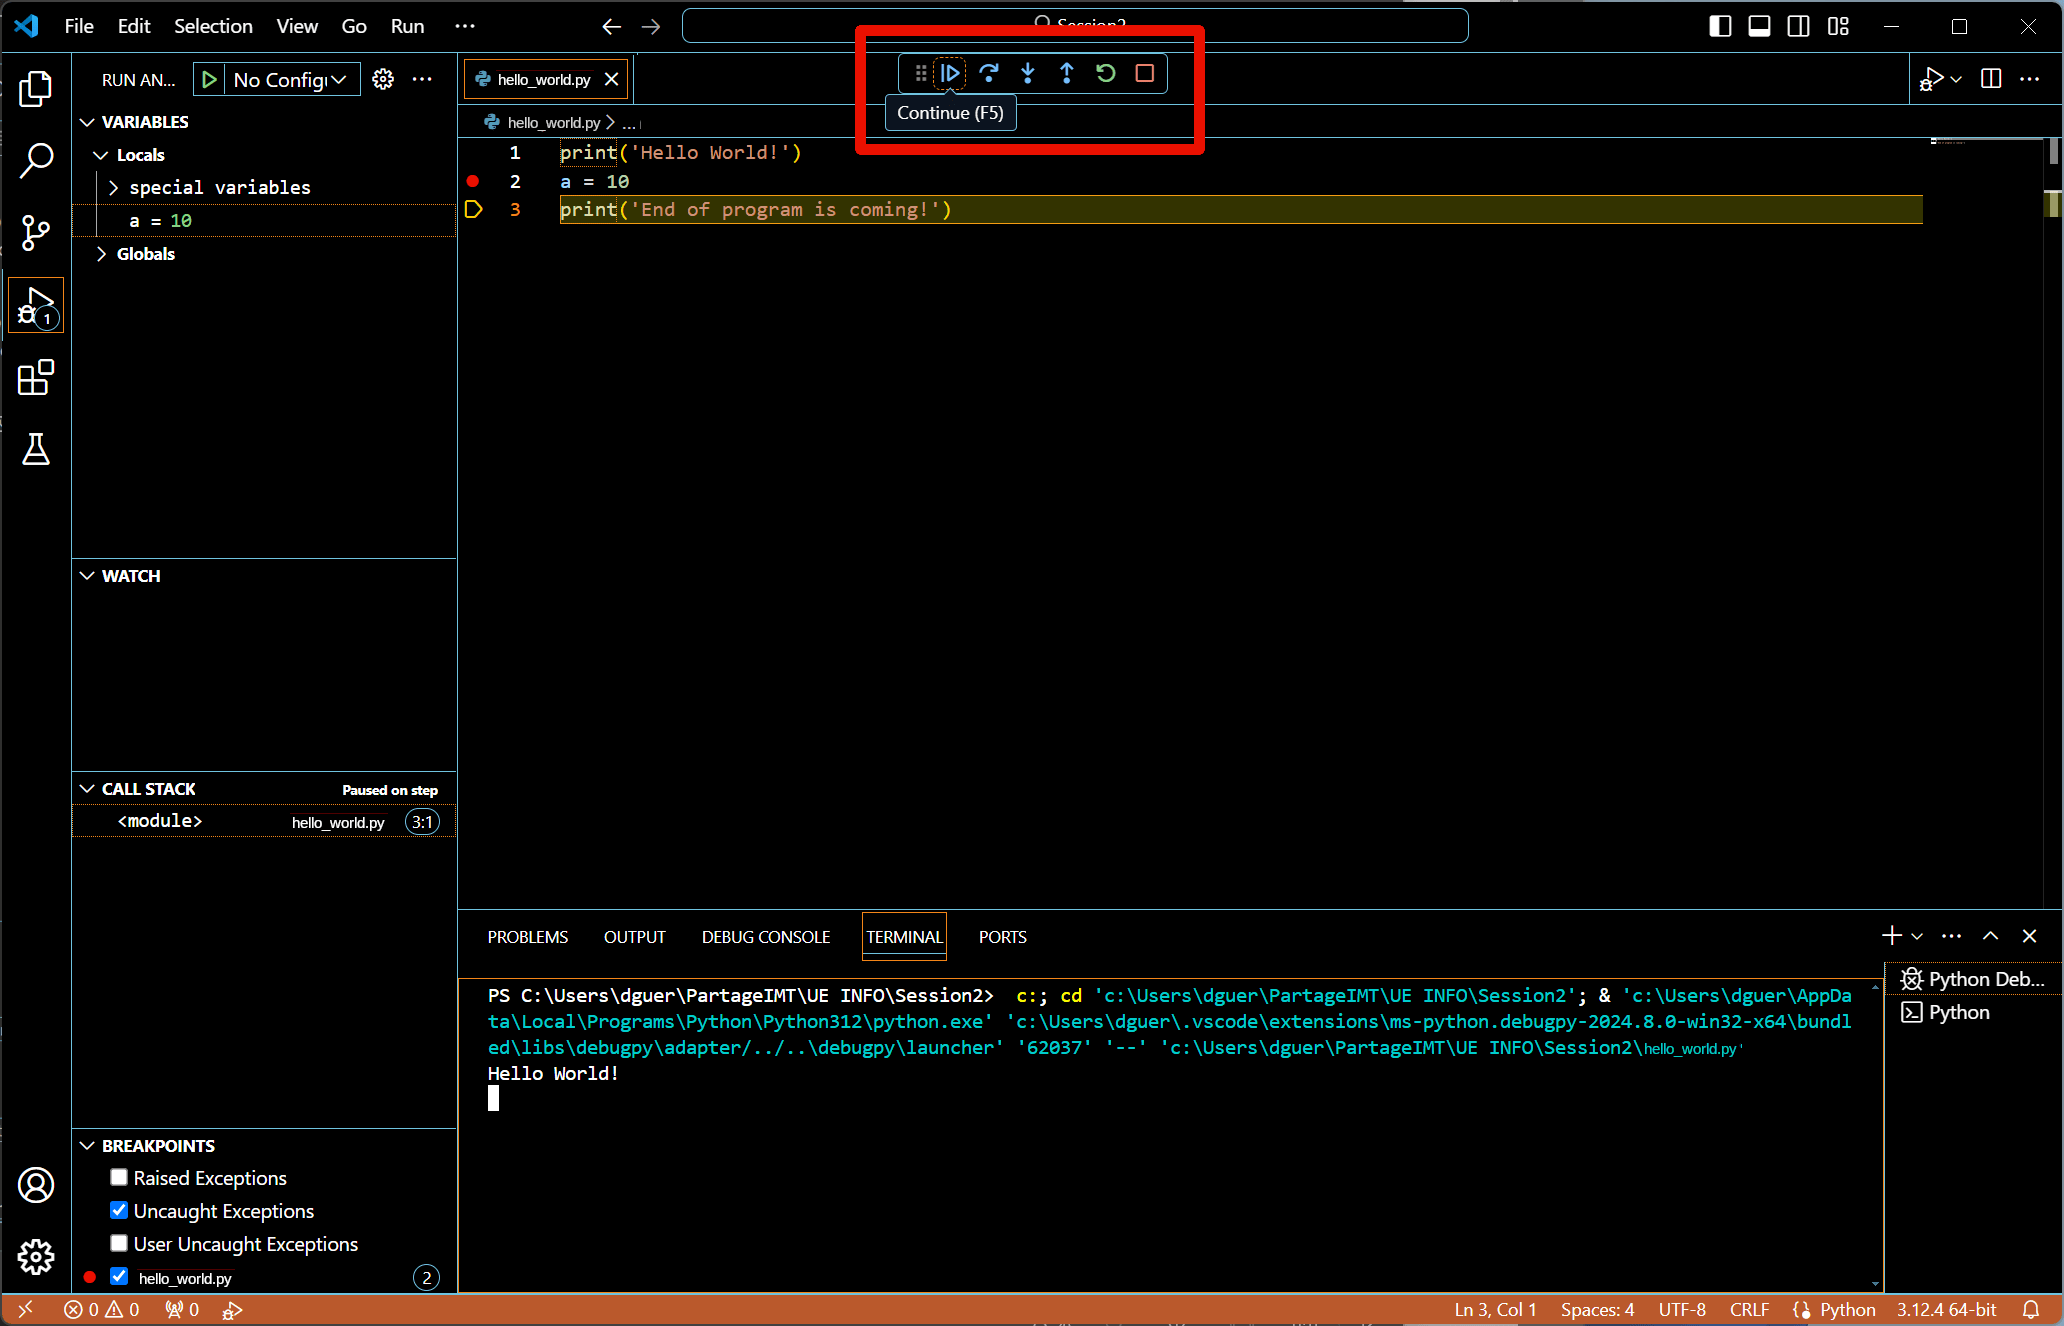 Now, we just want the execution to continue (no step by step) and go to the next breakpoint or to the end of the program (if there is no breakpoint remaining to be encountered during the execution).
To do so, just click on the continue button, in the debug toolbar.
Now, we just want the execution to continue (no step by step) and go to the next breakpoint or to the end of the program (if there is no breakpoint remaining to be encountered during the execution).
To do so, just click on the continue button, in the debug toolbar.
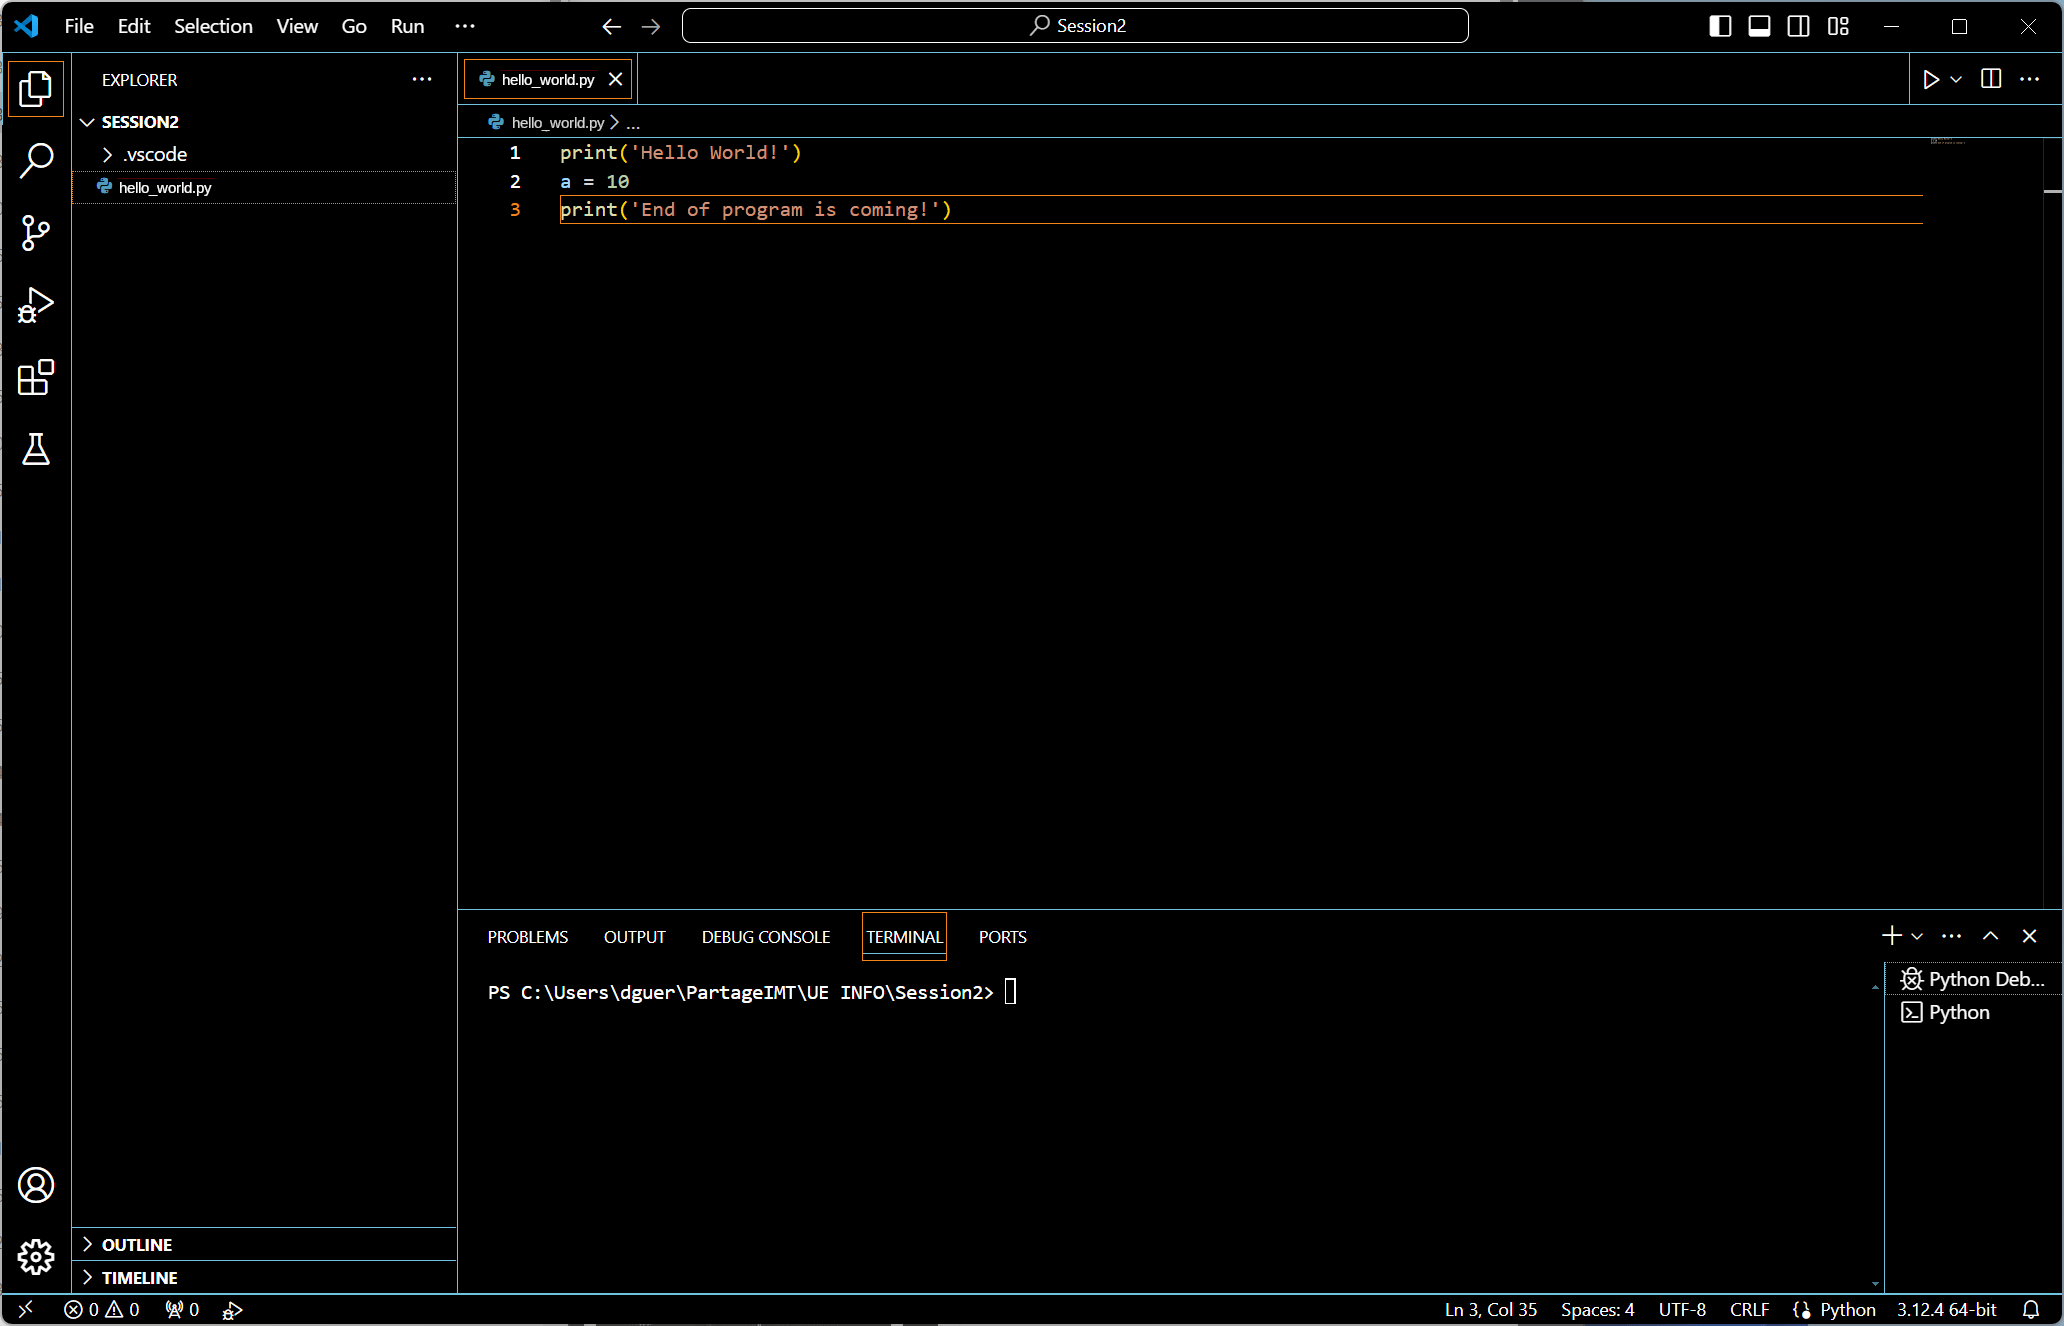
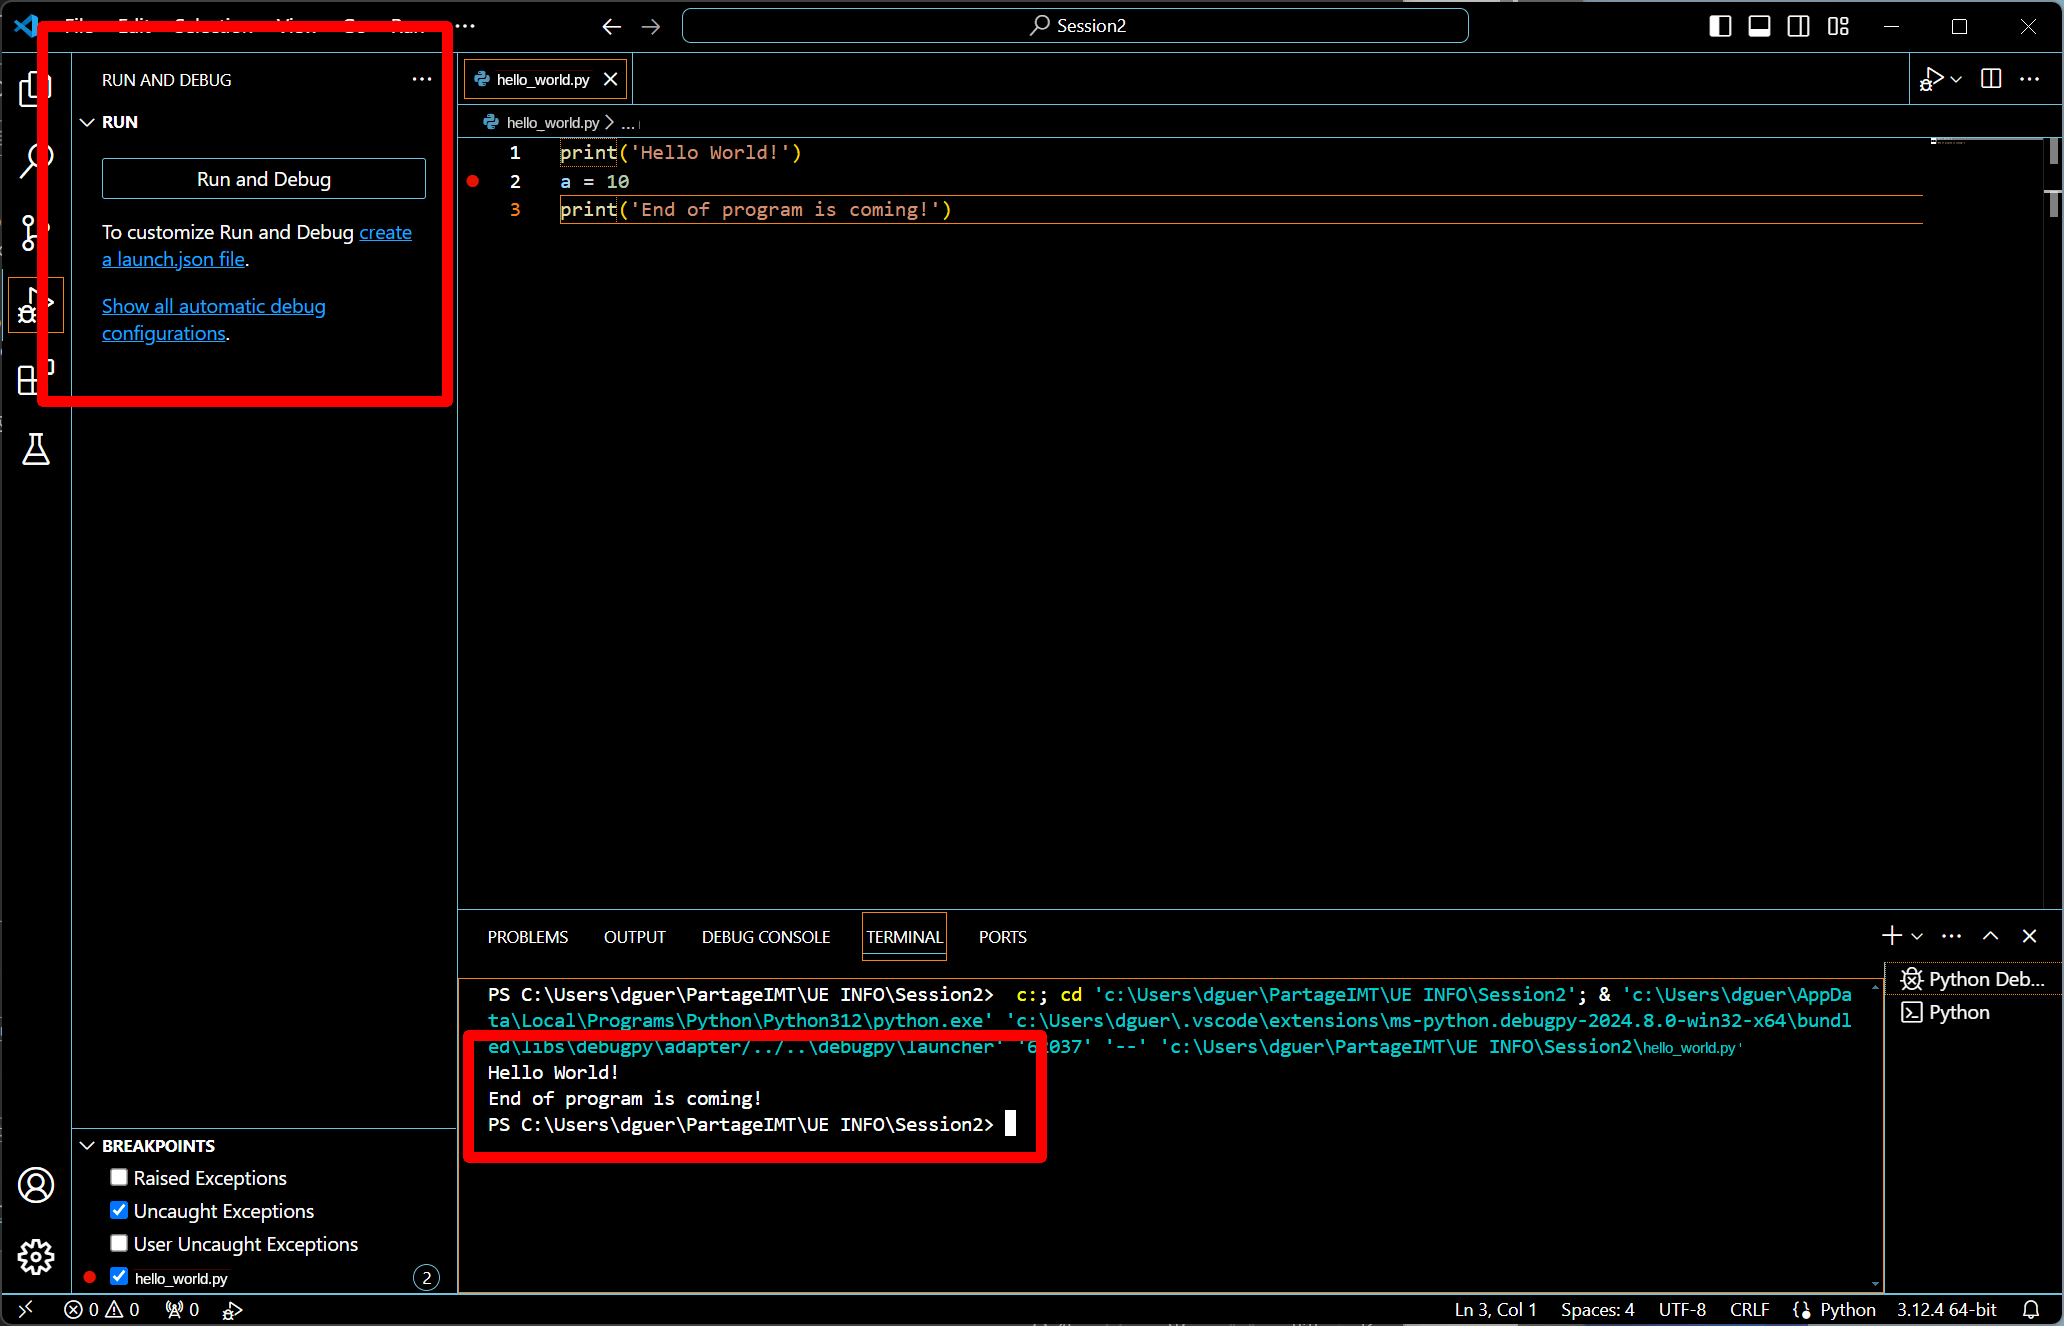 As the execution didn’t cross any breakpoint, it goes to the end of program, finishing the debug session:
Line 3 has been executed, printing “End of program is coming!” in the terminal.
The status bar took its original color back.
Logically, you cannot have a look at the values of your program variables anymore as, once the execution is completed, the runtime environment of your program does not exist anymore.
As the execution didn’t cross any breakpoint, it goes to the end of program, finishing the debug session:
Line 3 has been executed, printing “End of program is coming!” in the terminal.
The status bar took its original color back.
Logically, you cannot have a look at the values of your program variables anymore as, once the execution is completed, the runtime environment of your program does not exist anymore.
6.4 — Explore VSCode functionalities for debugging
You will find a lot of extra information about how to debug one program in the Visual Studio Code documentation:
- Defining conditional breakpoints, breakpoints that pause the execution of your program only if some conditions you specify, are verified.
- Defining specific configurations for launching your program according to your need: this is done through a new JSON file,
launch.json.
For Python debugging specificities, a specific page exists, where you learn:
- How to fill the
launch.jsonto create specific configurations for the Python debugger. - How to install a debugger debugpy that can be run from the command line.
- Why using virtual environment may be a good idea:
- Keeping track of the versions of all the installed Python interpeters and packages, may become tricky very quickly.
- Using separate Virtual environments allows you to fix, for each environment, a predefined list of versions for all these items.
Don’t hesitate to take a moment later after this activity to check these links!
Activity contents (part 3)
The objective of this third practical session is to gather the functionalities of all the tools we already saw (editor, interpreter) and new ones (debugger) into one software program named IDE (Integrated Development Environment).
Finishing the previous two parts of the activity is mandatory.
Here, you will install additional extensions to your Visual Studio Code instance in order to:
- Potentialy perform co-editing through LiveShare.
- Get some help from an AI engine (here GitHub Copilot)
7 — Install some extensions
As you may have guessed, VSCode has many useful extensions, for a lot of different purposes. Please install the following extensions, using the same procedure as earlier:
-
 Jupyter – This extension provides basic notebook support for language kernels that are supported in Jupyter Notebooks.
It allows any Python environment to be used as a Jupyter kernel.
However, this is not a Jupyter kernel: you must have a Python environment in which you’ve installed the Jupyter package.
This extension also installs 4 extra extensions for a better experience with Jupyter notebooks in Visual Studio Code.
For instance, the Jupyter Notebook Renderers extension that allows notebooks to output images like
Jupyter – This extension provides basic notebook support for language kernels that are supported in Jupyter Notebooks.
It allows any Python environment to be used as a Jupyter kernel.
However, this is not a Jupyter kernel: you must have a Python environment in which you’ve installed the Jupyter package.
This extension also installs 4 extra extensions for a better experience with Jupyter notebooks in Visual Studio Code.
For instance, the Jupyter Notebook Renderers extension that allows notebooks to output images like .png,.gif,.jpegand.svgimages. You will use this extension in the project. -
 Live Share – This extension enables you to collaboratively edit and debug with others in real time, regardless what programming languages you’re using or app types you’re building.
You will use this extension to work in groups.
Live Share – This extension enables you to collaboratively edit and debug with others in real time, regardless what programming languages you’re using or app types you’re building.
You will use this extension to work in groups. -
 GitHub Copilot & GitHub Copilot Chat – These extensions allow you to connect your Visual Studio Code instance to an AI technology, and use it from your IDE, to help you writing code, or even to produce code.
You should learn how to use such tools, as they are becoming a must have for any developer.
GitHub Copilot & GitHub Copilot Chat – These extensions allow you to connect your Visual Studio Code instance to an AI technology, and use it from your IDE, to help you writing code, or even to produce code.
You should learn how to use such tools, as they are becoming a must have for any developer.
Also, here is a short list of extensions that may help you during during your scholarship. Installing them is optional, you can come back to this list later:
-
 LaTeX Workshop – This extension provide core features for LaTeX typesetting.
However, this is not a LaTeX engine: you need a compatible LaTeX distribution to be running correctly on your system (TeX Live for instance).
You may then also use Visual Studio Code to edit your LaTeX files and produce your final documents.
LaTeX Workshop – This extension provide core features for LaTeX typesetting.
However, this is not a LaTeX engine: you need a compatible LaTeX distribution to be running correctly on your system (TeX Live for instance).
You may then also use Visual Studio Code to edit your LaTeX files and produce your final documents. -
 GitLab Workflow – When working with GitLab repositories, this allows you to integrate commands to VSCode.
 -
Many “cosmetic” extensions exists. You may want to have a look at “Todo Tree” or “Material Icon Theme” extensions, for instance, to design your own Visual Studio Code instance.
-
Other extensions useful for collaborative development or AI help will be installed in the next part of this activity.

Do not hesitate to try, use, evaluate and share with us, other extensions you find useful. We will complete this list to transmit your suggestions to the future students!
8 — Co-edit your files using Live Share
-
 Now that you have installed the Live Share extension, let’s use it to co-edit some code.
Look at the status bar where you see a new icon indicating the status of the Live Share sessions.
Now that you have installed the Live Share extension, let’s use it to co-edit some code.
Look at the status bar where you see a new icon indicating the status of the Live Share sessions.
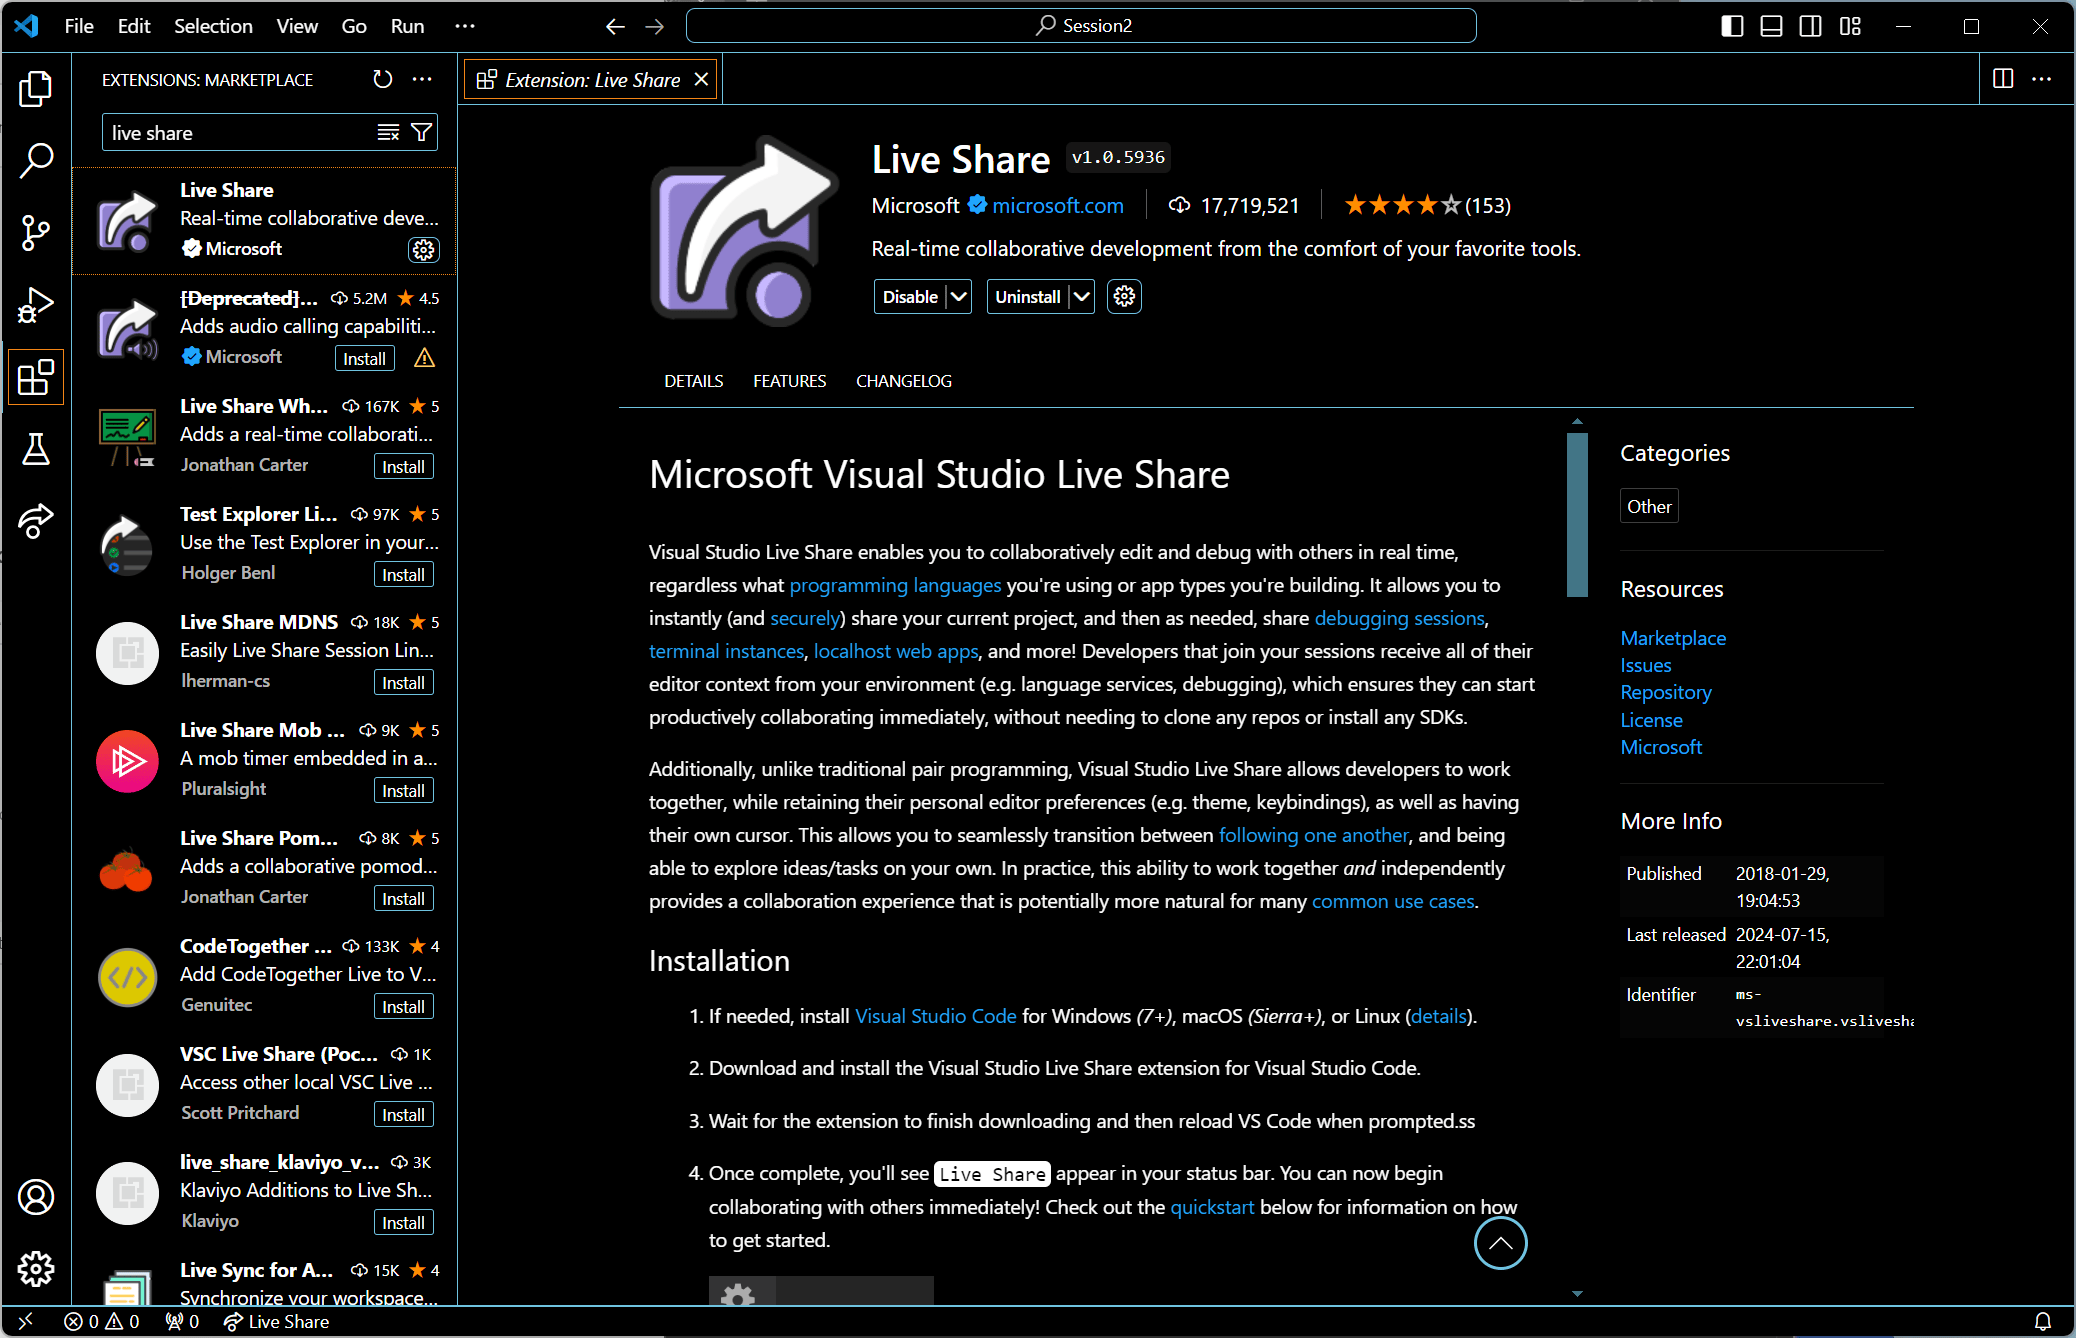
Choose a teammate, and then follow the guidelines given in the documentation pages to:
- Create a Live Share session.
- Invite your teammate as a guest.
- Co-edit a Python script.
- Run and debug it.
Do not forget to play the role of guest too, i.e., respond to an invitation to co-edit and execute a Python file.
Here are a few important remarks on LiveShare:
-
Live Share is not creating a repository where all the sources are versioned and shared between developers (like using GitHub or GitLab for instance). The developer that initiates the sharing allows all the guests to access (read and/or write) their own files, i.e., the ones on their own computer.
-
Once the LiveShare session closed, the guests do not get a copy of the edited files.
-
The guests remotely interact with your instance of Visual Studio Code: it is like if you had a second keyboard and mouse connected to your computer and controled independently. Thus, be sure to trust the guests you invite as they may have a lot of opportunities to make changes to your machine.
By default, VSCode comes with source control, which relies on Git. This offers an alternate way to work on a collaborative project. Git repositories like GitHub or GitLab are prevalent in real-world applications, and you will have to work on them during your scholarship.
For this semester, we have chosen to favor LiveShare for joint work. However, feel free to already use Git-based solutions if you want!
9 — Benefit of AI help using Copilot
Artificial intelligence (AI) tools have become prevalent in society. General purpose tools such as ChatGPT or Microsoft Copilot offer a conversational chat interface that lets you search for specific information, generate text such as emails and summaries, and create images based on text prompts you write. You can even ask these tools to write code in many widely used computer languages, including JavaScript, C, and Python, or to translate code from a language to another.
Assuming you know how to use it, this kind of tool will help you increase your productivity, and will save you a lot of time.
Without entering into details, these tools were trained on huge (i.e., really really really really huge) quantities of data. Through this process, they have learned how to translate an intention into a particular output, by generating an answer that is the most probable to a particular prompt. In particular, they have seen a lot of codes, and know what is a correct syntax and what is not, what is a potential code to realize an algorithm, etc.
GitHub Copilot is also an AI tool. However, contrary to general purpose AI models, it was trained on codes only. Therefore, at the time of writing this, it is more specialized for programming than its general counterparts.
Here is an example of what GitHub Copilot can do for you. You can check the Java code as well, which was generated using GPT4o (payed version of ChatGPT), asking for a translation of the Python code.
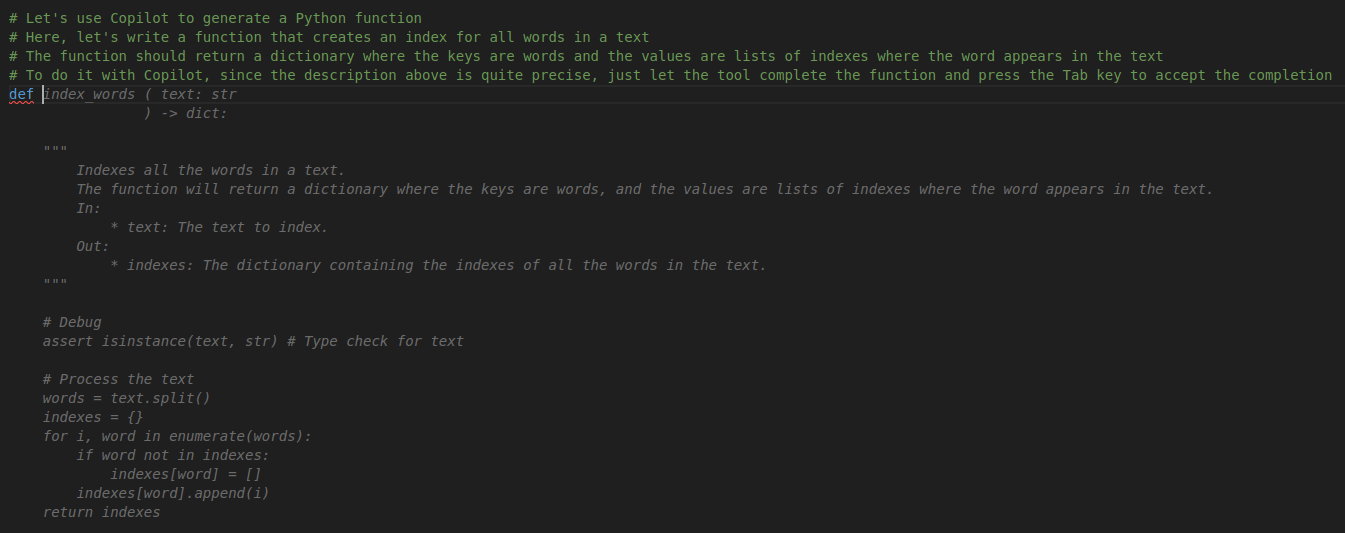
Let’s write a small test to check if the produced code works:
# Let's use Copilot to generate a Python function
# Here, let's write a function that creates an index for all words in a text
# The function should return a dictionary where the keys are words and the values are lists of indexes where the word appears in the text
# To do it with Copilot, since the description above is quite precise, just let the tool complete the function and press the Tab key to accept the completion
def index_words ( text: str
                ) -> dict:

    """
        Indexes all the words in a text.
        The function will return a dictionary where the keys are words, and the values are lists of indexes where the word appears in the text.
        In:
            * text: The text to index.
        Out:
            * indexes: The dictionary containing the indexes of all the words in the text.
    """

    # Debug
    assert isinstance(text, str) # Type check for text

    # Process the text
    words = text.split()
    indexes = {}
    for i, word in enumerate(words):
        if word not in indexes:
            indexes[word] = []
        indexes[word].append(i)
    return indexes

# Let's test the function
text = "Lorem ipsum dolor sit amet, consectetur adipiscing elit. Sed lacinia, nibh a tincidunt luctus, tortor nunc molestie ante, ut egestas est sapien quis orci. Nunc laoreet eget ipsum id rhoncus. Curabitur vel nibh bibendum, eleifend nibh gravida, tempus massa. Donec id felis blandit, pretium nisl ut, sagittis ligula. Curabitur vitae accumsan ex. Pellentesque interdum condimentum sem, eu aliquet arcu mollis ac. Mauris pellentesque lobortis mi, eget aliquam mauris gravida vel. Nulla quis dui vel arcu malesuada vulputate. Praesent nisi ex, tincidunt fermentum augue eu, cursus vehicula ipsum. Nam vel diam gravida, ultrices eros sed, cursus libero. Etiam maximus tincidunt metus in maximus."
index = index_words(text)
print(index)
// Needed imports
import java.util.ArrayList;
import java.util.HashMap;
import java.util.List;
import java.util.Map;
/**
* To run this code, you need to have Java installed on your computer, then:
* - Create a file named `Main.java` in a directory of your choice.
* - Copy this code in the file.
* - Open a terminal in the directory where the file is located.
* - Run the command `javac Main.java` to compile the code.
* - Run the command `java -ea Main` to execute the compiled code.
* Note: '-ea' is an option to enable assertions in Java.
*/
public class Main {
/**
* This function was translated from the Python code.
* This is also the case for the contents of the "main" function.
*
* @param text The text to index.
* @return The dictionary containing the indexes of all the words in the text.
*/
public static Map<String, List<Integer>> indexWords(String text) {
// Split the text into words
String[] words = text.split("\\s+");
// Create a map to store the indexes
Map<String, List<Integer>> indexes = new HashMap<>();
// Loop over the words and populate the index map
for (int i = 0; i < words.length; i++) {
String word = words[i];
// If the word is not yet in the map, add it
if (!indexes.containsKey(word)) {
indexes.put(word, new ArrayList<>());
}
// Append the current index to the list
indexes.get(word).add(i);
}
return indexes;
}
/**
* This is the entry point of your program.
* It contains the first codes that are going to be executed.
*
* @param args Command line arguments received.
*/
public static void main(String[] args) {
// Let's test the method
String text = "Lorem ipsum dolor sit amet, consectetur adipiscing elit. Sed lacinia, nibh a tincidunt luctus, tortor nunc molestie ante, ut egestas est sapien quis orci. Nunc laoreet eget ipsum id rhoncus. Curabitur vel nibh bibendum, eleifend nibh gravida, tempus massa. Donec id felis blandit, pretium nisl ut, sagittis ligula. Curabitur vitae accumsan ex. Pellentesque interdum condimentum sem, eu aliquet arcu mollis ac. Mauris pellentesque lobortis mi, eget aliquam mauris gravida vel. Nulla quis dui vel arcu malesuada vulputate. Praesent nisi ex, tincidunt fermentum augue eu, cursus vehicula ipsum. Nam vel diam gravida, ultrices eros sed, cursus libero. Etiam maximus tincidunt metus in maximus.";
Map<String, List<Integer>> index = indexWords(text);
System.out.println(index);
}
}When running the Python code, we get the following output:
{'Lorem': [0], 'ipsum': [1, 27], 'dolor': [2], 'sit': [3], 'amet,': [4], 'consectetur': [5], 'adipiscing': [6], 'elit.': [7], 'Sed': [8], 'lacinia,': [9], 'nibh': [10, 32, 35], 'a': [11], 'tincidunt': [12, 80, 98], 'luctus,': [13], 'tortor': [14], 'nunc': [15], 'molestie': [16], 'ante,': [17], 'ut': [18], 'egestas': [19], 'est': [20], 'sapien': [21], 'quis': [22, 71], 'orci.': [23], 'Nunc': [24], 'laoreet': [25], 'eget': [26, 65], 'id': [28, 40], 'rhoncus.': [29], 'Curabitur': [30, 48], 'vel': [31, 73, 88], 'bibendum,': [33], 'eleifend': [34], 'gravida,': [36, 90], 'tempus': [37], 'massa.': [38], 'Donec': [39], 'felis': [41], 'blandit,': [42], 'pretium': [43], 'nisl': [44], 'ut,': [45], 'sagittis': [46], 'ligula.': [47], 'vitae': [49], 'accumsan': [50], 'ex.': [51], 'Pellentesque': [52], 'interdum': [53], 'condimentum': [54], 'sem,': [55], 'eu': [56], 'aliquet': [57], 'arcu': [58, 74], 'mollis': [59], 'ac.': [60], 'Mauris': [61], 'pellentesque': [62], 'lobortis': [63], 'mi,': [64], 'aliquam': [66], 'mauris': [67], 'gravida': [68], 'vel.': [69], 'Nulla': [70], 'dui': [72], 'malesuada': [75], 'vulputate.': [76], 'Praesent': [77], 'nisi': [78], 'ex,': [79], 'fermentum': [81], 'augue': [82], 'eu,': [83], 'cursus': [84, 94], 'vehicula': [85], 'ipsum.': [86], 'Nam': [87], 'diam': [89], 'ultrices': [91], 'eros': [92], 'sed,': [93], 'libero.': [95], 'Etiam': [96], 'maximus': [97], 'metus': [99], 'in': [100], 'maximus.': [101]}{mollis=[59], ante,=[17], sem,=[55], vel.=[69], adipiscing=[6], est=[20], cursus=[84, 94], eleifend=[34], accumsan=[50], Pellentesque=[52], egestas=[19], augue=[82], nunc=[15], mi,=[64], orci.=[23], mauris=[67], maximus.=[101], id=[28, 40], Nulla=[70], molestie=[16], vel=[31, 73, 88], elit.=[7], ut=[18], lobortis=[63], Etiam=[96], luctus,=[13], in=[100], lacinia,=[9], fermentum=[81], vulputate.=[76], sed,=[93], eu=[56], Sed=[8], pellentesque=[62], vitae=[49], ipsum=[1, 27], amet,=[4], felis=[41], Curabitur=[30, 48], laoreet=[25], tempus=[37], Mauris=[61], ac.=[60], arcu=[58, 74], dolor=[2], bibendum,=[33], metus=[99], rhoncus.=[29], ex,=[79], vehicula=[85], ex.=[51], diam=[89], sit=[3], interdum=[53], a=[11], nisi=[78], tortor=[14], blandit,=[42], tincidunt=[12, 80, 98], nisl=[44], ipsum.=[86], ultrices=[91], condimentum=[54], aliquam=[66], massa.=[38], ut,=[45], Praesent=[77], nibh=[10, 32, 35], gravida,=[36, 90], Donec=[39], libero.=[95], Lorem=[0], aliquet=[57], malesuada=[75], pretium=[43], sapien=[21], Nunc=[24], dui=[72], quis=[22, 71], Nam=[87], eu,=[83], consectetur=[5], eget=[26, 65], sagittis=[46], ligula.=[47], gravida=[68], eros=[92], maximus=[97]}Note that the code generated above may be different from the one you get when testing. The reason is that GitHub Copilot takes into account your current session, how you tend to format your codes, etc.
For instance, let’s generate the same code in a new workspace. Here is what we get by default:

Thus, if you systematically write documentation/comments for your functions, it will take it into account, and will adapt to your practice. The cleaner the examples, the cleaner the generated code!
To make GitHub Copilot work in your IDE, it is not sufficient to install the extension. You also have to activate it. To do so, sign up for a free Student Developer Pack and follow indications.
Once done, to see how Copilot can interact with you while developing, you can follow the GitHub Copilot tutorial and start making your own experience.
To go further
Looks like this section is empty!
Anything you would have liked to see here? Let us know on the Discord server! Maybe we can add it quickly. Otherwise, it will help us improve the course for next year!
To go beyond
Looks like this section is empty!
Anything you would have liked to see here? Let us know on the Discord server! Maybe we can add it quickly. Otherwise, it will help us improve the course for next year!