Cette activité pratique a pour but de vous préparer au projet PyRat.
Elle consiste en deux grandes parties :
Vous allez installer le logiciel et écrire votre premier programme pour vous déplacer dans le labyrinthe.
Vous allez également mettre en place un dépôt Git, afin de travailler efficacement en groupe.
Puis, vous serez guidé(e)s dans l’écriture de votre premier programme PyRat.
Cette mise en place peut être assez longue, mais elle est essentielle pour bien attaquer le projet.
Si vous ne parvenez pas à tout faire dans la séance, terminez en dehors avant la prochaine.
N’oubliez pas que nous pouvons vous aider entre les séance via le serveur Discord du cours.
Vous devriez dès à présent le rejoindre si ça n’est pas déjà fait.
Important
Pensez à bien suivre les étapes décrites sur cette page dans l’ordre, en particulier pour l’installation de PyRat et la mise en place du dépôt Git.
Il y a parfois des petits détails importants qui, si vous lisez en diagonale, peuvent vous faire perdre beaucoup de temps.
À faire
Vous trouverez plus bas des boîtes “À faire” indiquant les étapes où vous devez agir.
Contenu de l’activité
1 — Où trouver PyRat ?
Le plus important à connaître est le site principal du logiciel PyRat, qui centralise tous les éléments de prise en main :
Documentation : Cette page regroupe les éléments de documentation sur comment installer et utiliser PyRat.
La documentation présente aussi l’API PyRat, c’est à dire les fonctions fournies par la bibliothèque.
Nous y avons également ajouté quelques tutoriels, qui constitueront la base de cette activité pratique.
Information
Comme pour la plupart des logiciels que vous rencontrerez dans votre vie, la documentation de PyRat est rédigée en anglais.
Si vous passez par des outils de traduction automatique, il peut arriver d’observer des petites différences avec les termes utilisés dans le cours.
N’hésitez pas à en discuter avec nous.
Important
Autre remarque, le code de PyRat est également rédigé en anglais.
Dans ce projet, nous vous demandons de produire vos codes, commentaires et documentations en anglais également.
C’est une pratique essentielle dans le métier d’ingénieur, où vous serez amené(e)s à travailler dans des contextes internationaux.
Voici également quelques liens secondaires, qui pourront vous être utiles plus tard :
PyPI : La page de référence pour l’installation de PyRat via pip.
GitHub : Ce dépôt GitHub contient les codes sources du logiciel PyRat.
Quand nous travaillons à une nouvelle version du logiciel, c’est là que nos modifications sont publiées.
GitHub issues : Les issues GitHub sont une sorte de forum, où sont discutés les possibles problèmes rencontrés par les utilisateurs lors de l’installation ou l’utilisation du logiciel.
C’est une bonne pratique de consulter cette page si vous rencontrez des difficultés.
2 — Préparer l’environnement du projet
Dans cette section, nous allons préparer l’environnement de travail pour le projet PyRat.
Pour cela, nous allons créer l’arborescence de dossiers suivante.
ueinfos5                # Là où vous stockez vos fichiers du cours d'informatique (adaptez à votre organisation)
|_ projet               # Un sous-dossier pour le projet PyRat (à créer dès maintenant)
|_ |_ venv_projet       # L'environnement virtuel (créé en 2.1)
|_ |_ pyrat_workspace   # Le workspace PyRat (créé en 2.2)
|_ |_ |_ games
|_ |_ |_ players
|_ |_ |_ README.md      # Le fichier de description du projet (créé en 2.3.2)
|_ |_ |_ .gitignore     # Un fichier qui indique à Git quoi synchroniser (créé en 2.3.3)
|_ ...
À faire
Créez un dossier projet vide là où vous stockez vos fichiers de cours d’informatique.
Puis, ouvrez un terminal et naviguez jusqu’à ce dossier.
Correction
Cliquez ici pour afficher la correction.
C’est assez direct.
Penser éventuellement à ne pas tout mettre en vrac sur le bureau.
Voici une bonne arborescence :
IMT
|_ S5
|_ |_ info
|_ |_ |_ projet
Dans ce projet, nous allons travailler avec l’IDE VSCode.
Vous pouvez en utiliser un autre si vous préférez, il vous suffira d’adapter les instructions.
1.1 — Créer un environnement virtuel Python
Afin de faciliter la séparation des dépendances d’un projet à l’autre, Python impose de passer par un environnement virtuel pour l’installation de bibliothèques logicielles.
Nous allons installer PyRat dans un tel environnement.
À faire
En utilisant le terminal ouvert précédemment, créez un environnement virtuel Python dans le dossier projet (par exemple nommé venv_projet).
Puis, activez cet environnement virtuel.
Correction
Cliquez ici pour afficher la correction.
Pour créer l’environnement virtuel : python3 -m venv venv_projet (adapter python3 en python ou py si nécessaire).
Pour l’activer :
Sous Linux/Mac : source venv_projet/bin/activate.
Sous Windows (PowerShell) : .\venv_projet\Scripts\Activate.ps1.
Sous Windows (cmd) : .\venv_projet\Scripts\activate.bat.
2.2 — Télécharger et installer PyRat
À présent, nous allons installer la bibliothèque PyRat dans l’environnement virtuel venv_projet activé précédemment.
À faire
Trouvez la page décrivant l’installation dans la documentation de PyRat, et suivez les instructions.
Quelques remarques importantes :
Pensez à bien activer l’environnement virtuel venv_projet avant d’installer PyRat.
L’installation de PyRat ne s’arrête pas au pip install pyrat-game, il faut aussi créer le workspace PyRat.
La commande correspondante est indiquée dans le guide d’installation.
Le workspace PyRat doit être créé dans le dossier projet, à côté de venv_projet (pas dedans).
La commande qui crée le dossier pyrat_workspace ajoute automatiquement ce dossier dans la variable d’environnement PATH de votre système.
Cela permet aux codes Python que vous écrirez de s’importer facilement entre eux.
Si vous déplacez ou renommez le dossier pyrat_workspace après sa création, vous devrez réparer cette variable d’environnement, comme expliqué dans cette issue.
Faites bien attention aux remarques plus haut.
En particulier, dans VSCode, ouvrez le dossier projet (pas pyrat_workspace).
Sans ça, VSCode ne détectera pas l’environnement virtuel.
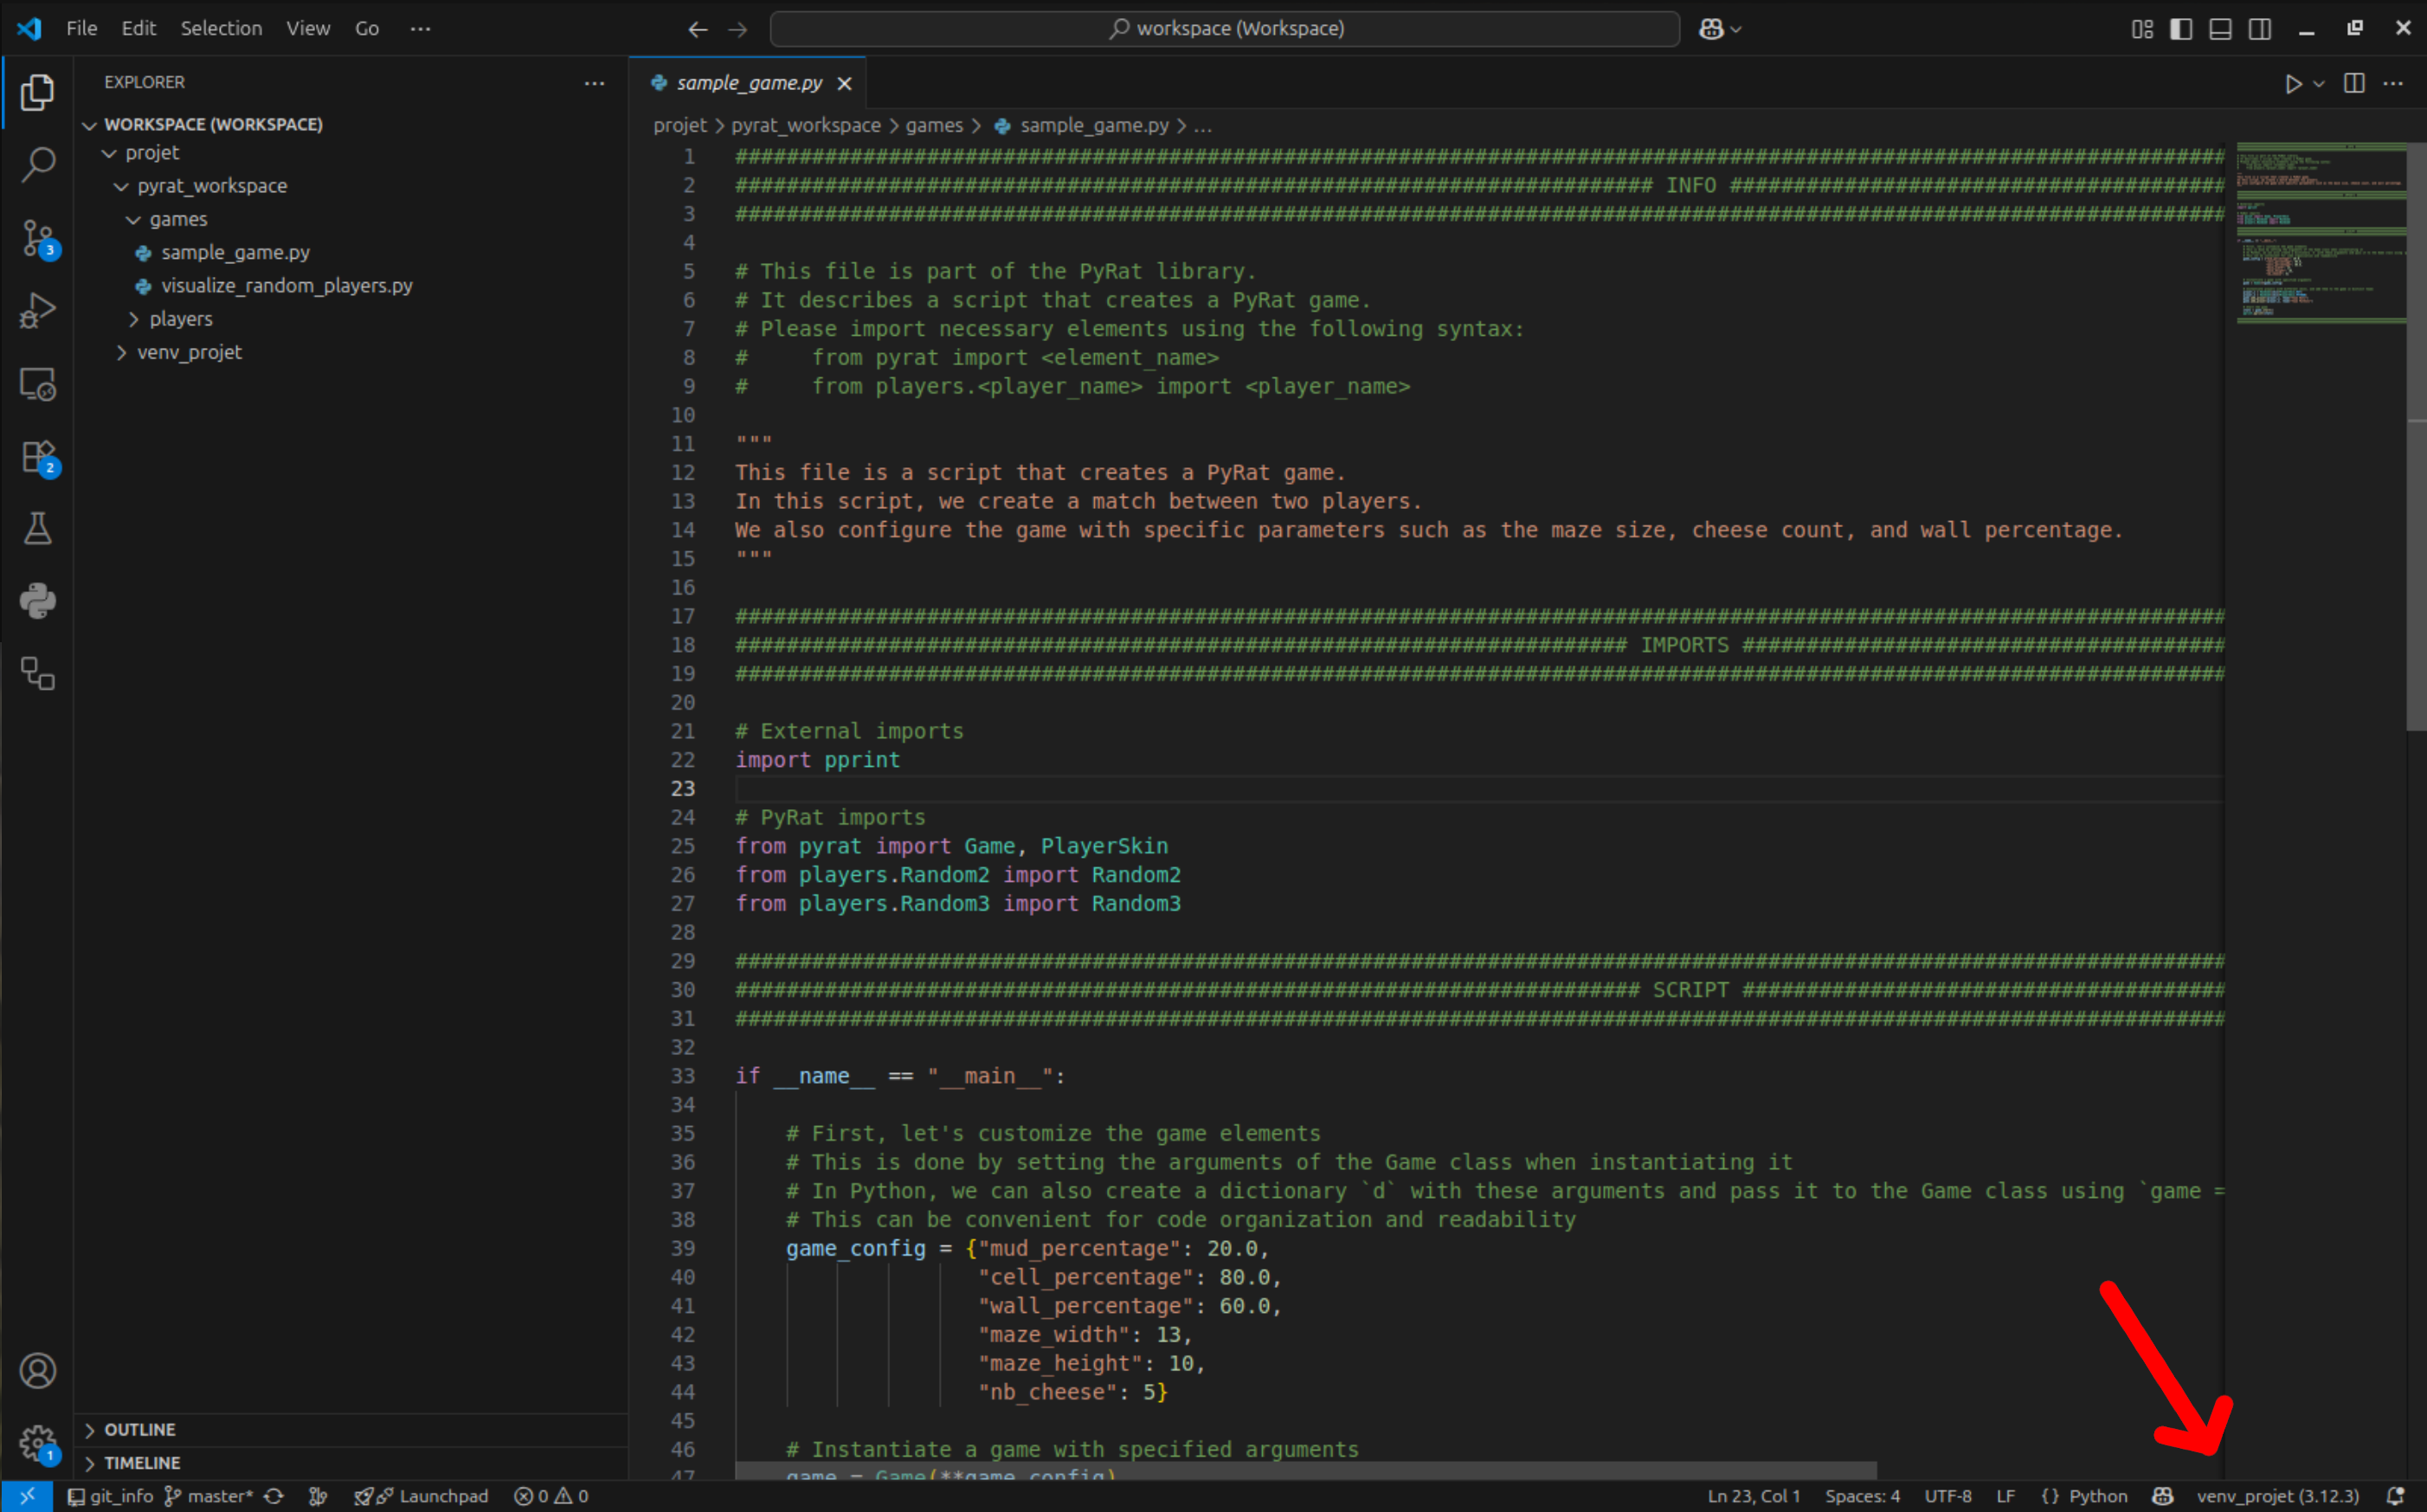
Une fois PyRat installé, démarrez VSCode, et ouvrez le dossier projet (celui qui contient venv_projet et pyrat_workspace).
Via l’arborescence à gauche, ouvrez le fichier games/sample_game.py.
Comme venv_projet apparaît dans les dossiers ouverts, VSCode détectera votre environnement virtuel, et vous proposera de l’utiliser automatiquement, comme indiqué par la flèche dans la capture d’écran ci-dessous.
S’il ne le fait pas, cliquez sur le numéro de version Python au bout de la flèche en bas à droite, et choisissez l’environnement virtuel venv_projet.
2.3 — Préparer le travail en groupe
Avant de démarrer cette activité pratique, vous avez dû former un trinôme.
Si ça n’est pas le cas, faites le maintenant, et informez votre enseignant(e) de sa composition.
On suppose également que vous avez déjà tous créé un compte sur Gitlab ou Github, et créé une clé SSH.
Si ça n’est pas le cas, revoilà le lien de la page sur le travail collaboratif avec Git vue en environnement.
2.3.1 — Mise en place du dépôt Git
À présent, nous allons faire en sorte que vous puissiez synchroniser votre dossier pyrat_workspace entre vous.
Avant de commencer, assurez -vous que chaque membre du groupe supprime un éventuel dossier __pycache__ dans pyrat_workspace/players.
Ce dossier est créé automatiquement par Python pour stocker des fichiers temporaires, mais il ne doit pas être versionné avec Git.
À faire
Une fois votre trinôme constitué, choisissez l’un(e) d’entre vous (appelons cette personne “Boss” le temps de cette section pour vous motiver à prendre ce rôle :) ), puis suivez les instructions ci-dessous.
Correction
Cliquez ici pour afficher la correction.
Juste suivre les instructions.
L’erreur la plus fréquente est que vous lisez trop vite, et que vous ne tapez pas exactement la bonne commande.
Quand vous clonez le dépôt, assurez-vous que le dossier cloné s’appelle bien pyrat_workspace, et qu’il est au même endroit que l’ancien.
Ce sera automatique si vous avez bien nommé le dépôt pyrat_workspace.
Si vous avez utilisé un nom différent, il faut absolument ajouter pyrat_workspace à la fin de la commande git clone, comme suit : git clone https://adresse.de.mon.depot.git pyrat_workspace.
En cas d’erreur comme quoi on ne peut pas importer players depuis un script dans games, c’est probablement que le workspace récupéré depuis Git n’est pas au même endroit que l’ancien, ou n’a plus le bon nom.
Dans ce cas, consulter cette issue.
Le/la boss crée un projet Git nommé pyrat_workspace (privé, sans README.md (décochez la case)), via Gitlab ou Github.
Important
Attention à bien nommer le projet pyrat_workspace.
Si vous l’appelez autrement (par exemple mon_workspace), les autres étudiant(e)s du groupe risquent de créer un dossier mon_workspace au lieu de pyrat_workspace lors du clonage, ce qui empêchera les imports Python de fonctionner correctement.
Le/la boss initialise ce dépôt grâce aux commandes suivantes :
# Dans un terminal, placez vous dans le dossier pyrat_workspace# Adaptez avec le bon chemincd \chemin\vers\pyrat_workspace
# Initialisez Git dans le dossier courantgit init --initial-branch=main
# Ajoutez le dépôt existant# Adaptez avec la bonne adressegit remote add origin https://adresse.de.mon.depot.git
# Ajoutez tous les fichiers du pyrat_workspacegit add .
# Créez un commit avec le nouveau contenugit commit -m "Initialisation du dépôt avec le workspace"# Poussez vers le serveurgit push -u origin main
# Dans un terminal, placez vous dans le dossier pyrat_workspace
# Adaptez avec le bon chemin
cd \chemin\vers\pyrat_workspace
# Initialisez Git dans le dossier courant
git init --initial-branch=main
# Ajoutez le dépôt existant
# Adaptez avec la bonne adresse
git remote add origin https://adresse.de.mon.depot.git
# Ajoutez tous les fichiers du pyrat_workspace
git add .
# Créez un commit avec le nouveau contenu
git commit -m "Initialisation du dépôt avec le workspace"# Poussez vers le serveur
git push -u origin main
# Dans un terminal, placez vous dans le dossier pyrat_workspace# Adaptez avec le bon chemincd /chemin/vers/pyrat_workspace
# Initialisez Git dans le dossier courantgit init --initial-branch=main
# Ajoutez le dépôt existant# Adaptez avec la bonne adressegit remote add origin https://adresse.de.mon.depot.git
# Ajoutez tous les fichiers du pyrat_workspacegit add .
# Créez un commit avec le nouveau contenugit commit -m "Initialisation du dépôt avec le workspace"# Poussez vers le serveurgit push -u origin main
Le/la boss invite les autres étudiants du groupe comme collaborateurs du projet via l’interface de Gitlab ou Github.
Information
C’est fini pour le boss (jusqu’à l’étape 5) !
Passons aux autres étudiant(e)s du groupe.
Chaque étudiant(e) non-boss supprime le dossier pyrat_workspace créé par PyRat pendant l’installation.
Puis, chacun(e) clone le dépôt au même endroit avec les commandes suivante :
# Dans un terminal, placez vous dans le dossier qui contenait le pyrat_workspace que vous venez de supprimer# Adaptez avec le bon chemincd \chemin\vers\le\dossier\parent\de\pyrat_workspace
# Clonez le dépôt# Adaptez avec la bonne adresse# Attention ! Gardez bien pyrat_workspace à la fin de la commande après le lien !git clone https://adresse.de.mon.depot.git pyrat_workspace
# Dans un terminal, placez vous dans le dossier qui contenait le pyrat_workspace que vous venez de supprimer
# Adaptez avec le bon chemin
cd \chemin\vers\le\dossier\parent\de\pyrat_workspace

# Clonez le dépôt
# Adaptez avec la bonne adresse
# Attention ! Gardez bien pyrat_workspace à la fin de la commande après le lien !
git clone https://adresse.de.mon.depot.git pyrat_workspace
# Dans un terminal, placez vous dans le dossier qui contenait le pyrat_workspace que vous venez de supprimer# Adaptez avec le bon chemincd /chemin/vers/le/dossier/parent/de/pyrat_workspace
# Clonez le dépôt# Adaptez avec la bonne adresse# Attention ! Gardez bien pyrat_workspace à la fin de la commande après le lien !git clone https://adresse.de.mon.depot.git pyrat_workspace
Cette commande devrait créer un nouveau dossier pyrat_workspace là où se trouvait celui que vous avez supprimé.
Important
Attention à ce que ce nouveau dossier soit bien au même endroit et s’appelle bien pyrat_workspace.
La raison est que ce chemin a été ajouté dans le PATH par PyRat, ce qui permettra à vos codes Python de s’importer facilement.
Information
C’est tout pour les non-boss !
Les instructions restantes concernent tout le monde.
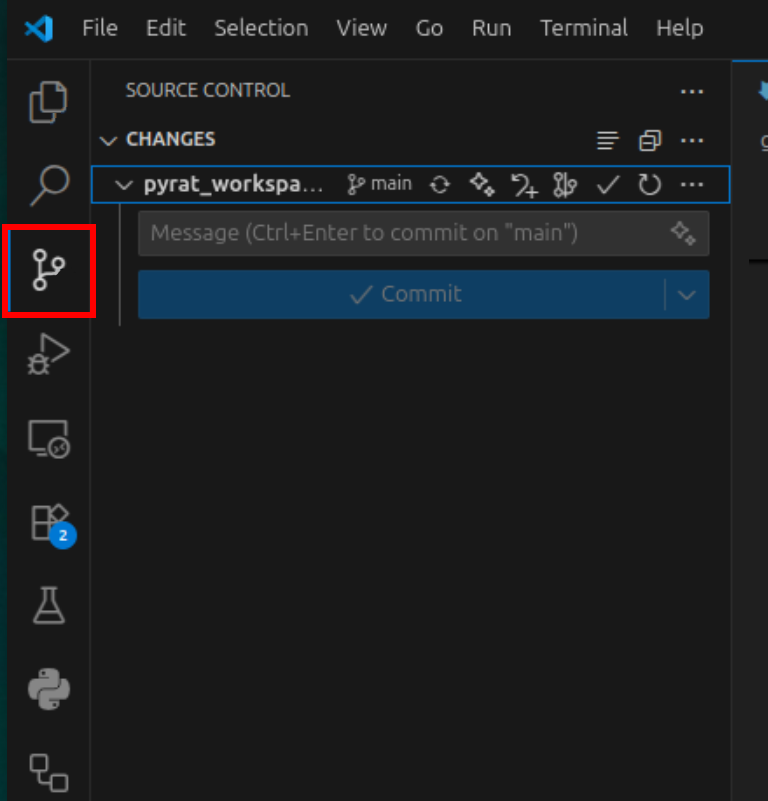
Vérifiez que vous avez bien le bon pyrat_workspace dans votre workspace VSCode.
Pour vous en rendre compte, cliquez sur le menu Source control à gauche.
Vous devriez voir que VSCode a automatiquement détecté votre dépôt Git, et vous propose de gérer vos add, commit, push, etc. directement via son interface.
Vérifiez que PyRat marche bien.
Démarrez le script sample_game.py dans le dossier pyrat_workspace/games et exécutez le.
Vous devriez voir une partie de PyRat se lancer, comme précédemment.
2.3.2 — Ajout d’un fichier README.md
Dans tout projet informatique, il est important d’avoir un petit fichier qui explique succinctement (ou pas) à quoi sert le projet.
On appelle ce fichier un “README”, et on y trouve généralement les adresses de contact des auteurs, les instructions d’utilisation du projet, etc.
Sur les dépôts Git, ce fichier s’appelle classiquement README.md, car on rédige son contenu en Markdown, un langage permettant de formater du texte.
Si vous avez déjà utilisé des outils comme Discord, (ou Mattermost, Slack, etc.), c’est généralement ce langage qui est utilisé pour mettre du texte en gras, italique, etc.
À faire
Choisissez l’un(e) d’entre vous qui n’était pas le/la Boss, et appelons cet étudiant(e) “Big Boss” (le temps de cette section, ne prenez pas la grosse tête tout de suite).
Puis, suivez les instructions ci-dessous.
Correction
Cliquez ici pour afficher la correction.
Le/la Big Boss fait un add et un commit du fichier README.md, puis un push.
Les autres font un pull.
N’hésitez pas à tout faire via l’interface VSCode si vous préférez.
Le/la Big Boss crée un fichier README.md dans son workspace PyRat, comme indiqué plus haut.
Une fois le fichier créé, le/la Big Boss y copie-colle le texte suivant (changez les éléments entre <...> par le bon contenu), et sauvegarde le fichier.
# Description

This is the repository of a PyRat workspace created following instructions [https://hub.imt-atlantique.fr/ueinfo-fise1a/s5/project/session1/practical](provided here).
It is used to store the codes developed during the PyRat project by the aforementioned students during year 1 at IMT Atlantique.

- <First name> <Name> <mail@imt-atlantique.fr>
- <First name> <Name> <mail@imt-atlantique.fr>
- <First name> <Name> <mail@imt-atlantique.fr>

# Repository documentation

<You can write stuff here later>
À présent, votre objectif est de manipuler Git (via l’interface VSCode ou la ligne de commande) pour que :
Le fichier README.md apparaisse sur le dépôt.
Chaque étudiant du groupe ait une vue locale à jour du dépôt dans son workspace.
2.3.3 — Ajout d’un fichier .gitignore
Quand on réalise un projet avec Git, il faut uniquement versionner les fichiers intéressants (le code, la documentation, éventuellement certaines données, etc.), mais pas les fichiers qui permettent l’exécution du projet (environnement virtuel, fichiers temporaires, etc.).
Pour cela, on peut mettre à la racine du dépôt un fichier nommé .gitignore, dans lequel on liste tous les fichiers et dossiers à ignorer par Git.
À faire
L’étudiant(e) qui n’a pas encore dirigé le groupe devient le/la Méga Boss.
Puis, suivez les instructions ci-dessous.
Correction
Cliquez ici pour afficher la correction.
Le/la Méga Boss fait un add et un commit du fichier .gitignore, puis un push.
Les autres font un pull.
N’hésitez pas à tout faire via l’interface VSCode si vous préférez.
Puis, en vous inspirant de ce que vous avez fait pour le fichier README.mdplus haut, arrangez vous pour que :
Le fichier .gitignore apparaisse sur le dépôt.
Chaque étudiant du groupe ait une vue locale à jour du dépôt dans son workspace.
3 — C’est parti !
3.1 — Se familiariser avec PyRat
A ce stade, tout est prêt pour commencer le projet !
Découvrons à présent en quoi consiste le logiciel PyRat.
Avant d’attaquer la création de programmes PyRat, étudiez les liens suivants :
Découverte de PyRat : Ce lien présente PyRat dans les grandes lignes, à savoir le contenu de pyrat_workspace et de la bibliothèque Python pyrat-game, les élements de jeu, etc.
Tutoriels de base : Sur cette page, nous vous proposons quelques tutoriels à suivre, qui détaillent les programmes PyRat fournis par défaut dans le pyrat_workspace, et vous expliquent comment customiser les éléments de jeu.
3.2 — Votre premier programme PyRat
L’objectif de cette activité pratique est d’écrire vos premiers codes PyRat, c’est à dire :
Un joueur, sous la forme d’un fichier héritant de la classe Player, décrit dans un fichier du dossier pyrat_workspace/players.
Un script, qui lance une partie avec votre joueur, décrit dans un fichier du dossier pyrat_workspace/games.
L’un des problèmes de Random4 (que Random3 avait déjà) est que, si le rat arrive dans une zone du labyrinthe où il a visité toutes les cases voisines, il tente de rejoindre une case non visitée en se déplaçant aléatoirement. À partir de là, le rat reprend sa stratégie d’exploration.
On pourrait améliorer cet aspect du programme en gardant en mémoire notre trajectoire, c’est à dire la suite de cases parcourues jusqu’au tour en cours.
Ainsi, en arrivant sur une case dont on a déjà visité toutes les cases voisines, il suffirait de revenir en arrière le long de la trajectoire parcourue.
Si on arrive sur une case dont on a déjà visité tous les voisins, on recommence, etc.
À un moment, à force de revenir sur ses pas, le rat finira par arriver sur une case ayant au moins une case voisine inexplorée, et pourra reprendre sa quête de fromage.
3.2.2 — Création du joueur
À faire
Faites une copie du fichier Random4.py (dans le dossier players), et renommez le nouveau fichier Random5.py (dans le même dossier).
Faites toutes les modifications nécessaires pour que ce nouveau fichier décrive une classe nommée Random5.
Correction
Cliquez ici pour afficher la correction.
Pour le moment, juste copier Random4.py en Random5.py et renommer la classe.
Penser à adapter la doc aussi éventuellement.
Ne vous préoccupez pas du comportement du joueur pour le moment, on cherche juste à créer un programme utilisable qui ne crashe pas.
3.2.3 — Création de la partie
À faire
Créez un fichier visualize_random5.py dans le dossier games de votre pyrat_workspace.
Ce fichier doit effectuer les opérations détaillées ci-dessous.
Correction
Cliquez ici pour afficher la correction.
Le programme devrait ressembler à ça :
#################################################################################################################################### INFO ####################################################################################################################################"""
This program is a solution to the practical session 1 of the PyRat project:
https://hub.imt-atlantique.fr/ueinfo-fise1a/s5/project/session1/practical/
"""################################################################################################################################### IMPORTS ################################################################################################################################### External importsimport pprint
# PyRat importsfrom pyrat import Game
from players.Random5 import Random5
################################################################################################################################### SCRIPT ###################################################################################################################################if __name__ =="__main__":
# Instantiate a game with a few arguments game_config = {"mud_percentage": 0.0,
"maze_width": 13,
"maze_height": 10,
"nb_cheese": 1,
"random_seed": 42,
"trace_length": 1000}
# Instantiate a game with specified arguments game = Game(**game_config)
# Instantiate the player player = Random5()
game.add_player(player)
# Start the game stats = game.start()
pprint.pprint(stats)
####################################################################################################################################################################################
Importer la classe Random5 que vous venez de créer.
Créer une partie de PyRat (une instance de la classe Game), contenant 1 morceau de fromage.
Pensez aussi à mettre une valeur élevée à l’argument trace_length pour vérifier plus tard que le rat revient bien sur ses traces.
Instancier un joueur de la classe Random5, et l’ajouter à la partie.
Démarrer la partie.
Information
Inspirez vous des tutoriels PyRat, ainsi que des exemples donnés par défaut dans pyrat_workspace/games.
3.2.4 — Implémentez la stratégie
À faire
Maintenant que vous avez un script visualize_random5.py qui lance une partie de PyRat avec le joueur Random5, adaptez le code de Random5.py pour que le rat suive la stratégie décrite plus haut.
Correction
Cliquez ici pour afficher la correction.
Le programme devrait ressembler à ça :
#################################################################################################################################### INFO ####################################################################################################################################"""
This program is a solution to the practical session 1 of the PyRat project:
https://hub.imt-atlantique.fr/ueinfo-fise1a/s5/project/session1/practical/
"""################################################################################################################################### IMPORTS ################################################################################################################################### External importsimport random
# PyRat importsfrom pyrat import Player, Maze, GameState, Action
################################################################################################################################### CLASSES ##################################################################################################################################classRandom5 (Player):
"""
*(This class inherits from* ``Player`` *).*
This player is an improvement of the ``Random4`` player.
A limitation of ``Random4`` is that it gets stuck in areas when all neighbors have been visited.
To avoid this, we keep track of the trajectory of the player, and when we are stuck, we go back to the last cell in the trajectory.
"""################################################################################### CONSTRUCTOR ###################################################################################def__init__ ( self,
*args: object,
**kwargs: object
) ->None:
"""
Initializes a new instance of the class.
Here, in addition to the attributes developed in the ``Random4`` player, we also create an attribute for our trajectory.
Args:
args: Arguments to pass to the parent constructor.
kwargs: Keyword arguments to pass to the parent constructor.
"""# Inherit from parent class super().__init__(*args, **kwargs)
# We create an attribute to keep track of visited cells# We will initialize it in the ``preprocessing()`` method to allow the game to be reset# Otherwise, the set would keep the cells visited in previous games self.visited_cells =None# We also create an attribute for the reduced maze self.reduced_maze =None# We create an attribute for the player's trajectory self.trajectory =None################################################################################### PYRAT METHODS ###################################################################################defpreprocessing ( self,
maze: Maze,
game_state: GameState,
) ->None:
"""
*(This method redefines the method of the parent class with the same name).*
This method is called once at the beginning of the game.
Here, we use it to create a reduced maze that contains only the cells that are not dead-ends.
We define a dead-end as a cell that has only one neighbor and does not contain cheese or the player.
Note that this is not the best way to define a dead-end, but it is a simple one.
Args:
maze: An object representing the maze in which the player plays.
game_state: An object representing the state of the game.
"""# Initialize visited cells self.visited_cells = set()
# Reduce the maze my_location = game_state.player_locations[self.get_name()]
self.reduced_maze = self.remove_dead_ends(maze, [my_location] + game_state.cheese)
# Initialize the trajectory self.trajectory = [my_location]
##################################################################################defturn ( self,
maze: Maze,
game_state: GameState,
) -> Action:
"""
*(This method redefines the method of the parent class with the same name).*
It is called at each turn of the game.
It returns an action to perform among the possible actions, defined in the ``Action`` enumeration.
We also update the set of visited cells at each turn.
Now, we work with the reduced maze to find the next action.
Args:
maze: An object representing the maze in which the player plays.
game_state: An object representing the state of the game.
Returns:
One of the possible actions.
"""# Mark current cell as visited my_location = game_state.player_locations[self.get_name()]
if my_location notin self.visited_cells:
self.visited_cells.add(my_location)
# Add current location to trajectory self.trajectory.append(my_location)
# Return an action action = self.find_next_action(self.reduced_maze, game_state)
return action
################################################################################### OTHER METHODS ###################################################################################deffind_next_action ( self,
maze: Maze,
game_state: GameState,
) -> Action:
"""
This method returns an action to perform among the possible actions, defined in the ``Action`` enumeration.
Here, the action is chosen randomly among those that don't hit a wall, and that lead to an unvisited cell if possible.
If no such action exists, we come back to the last cell in the trajectory and pop it.
Args:
maze: An object representing the maze in which the player plays.
game_state: An object representing the state of the game.
Returns:
One of the possible actions that leads to a valid neighbor.
"""# Go to an unvisited neighbor in priority my_location = game_state.player_locations[self.get_name()]
neighbors = maze.get_neighbors(my_location)
unvisited_neighbors = [neighbor for neighbor in neighbors if neighbor notin self.visited_cells]
if len(unvisited_neighbors) >0:
neighbor = random.choice(unvisited_neighbors)
# If there is no unvisited neighbor, go back in the trajectory# We pop the last cell in the trajectory, which is the current cell# Then, we pop again to get the previous cell, which is where we want to go backelse:
self.trajectory.pop()
neighbor = self.trajectory.pop()
# Retrieve the corresponding action action = maze.locations_to_action(my_location, neighbor)
return action
##################################################################################defremove_dead_ends ( self,
maze: Maze,
locations_to_keep: list[tuple[int, int]]
) -> Maze:
"""
This method returns a new maze that contains only the cells that are not dead-ends.
A dead-end is defined as a cell that has only one neighbor and does not contain cheese or the player.
Args:
maze: An object representing the maze in which the player plays.
locations_to_keep: A list of locations to keep in the reduced maze.
Returns:
A new maze with only the cells that are not dead-ends.
"""# Initialize the reduced maze as the original one# We do not need to make a copy of the maze, as the game sends a copy of the maze at each turn. updated_maze = maze
# Iteratively remove dead-ends from the maze# We still keep dead ends that contain locations to keep removed_something =Truewhile removed_something:
removed_something =Falsefor vertex in updated_maze.get_vertices():
if len(updated_maze.get_neighbors(vertex)) ==1and vertex notin locations_to_keep:
updated_maze.remove_vertex(vertex)
removed_something =True# Return the updated mazereturn updated_maze
####################################################################################################################################################################################
N’hésitez pas à lancer régulièrement votre script visualize_random5.py, par exemple pour afficher la trajectoire parcourue, ou pour vérifier que votre code ne crashe pas.
Vous devriez obtenir un rat qui se comporte comme suit.
En particulier, il ne devrait pas aller dans des culs de sac (amélioration apportée par Random4), et devrait revenir sur ses pas quand toutes les cases voisines sont déjà visitées.
3.2.5 — Évaluez la stratégie
Maintenant que vous avez une nouvelle stratégie, il faut se poser la question de si elle est vraiment efficace.
Pour cela, une approche possible est de la comparer à d’autres méthodes.
À faire
Adaptez le script evaluate_random_players.py fourni à la fin du tutoriel pour ajouter votre joueur Random5 aux quatre autres.
Quelles conclusions tirez-vous ?
Discutez-en avec votre enseignant(e) !
Correction
Cliquez ici pour afficher la correction.
Voici une adaptation du script evaluate_random_players.py.
Nous prenons un peu d’avance en incluant également les programmes développés plus bas.
#################################################################################################################################### INFO ####################################################################################################################################"""
This program is a solution to the practical session 1 of the PyRat project:
https://hub.imt-atlantique.fr/ueinfo-fise1a/s5/project/session1/practical/
"""################################################################################################################################### IMPORTS ################################################################################################################################### External importsimport tqdm.auto as tqdm
import matplotlib.pyplot as pyplot
import scipy.stats as scstats
# PyRat importsfrom pyrat import Game, GameMode
from players.Random1 import Random1
from players.Random2 import Random2
from players.Random3 import Random3
from players.Random4 import Random4
from players.Random5 import Random5
from players.Random6 import Random6
from players.Random7 import Random7
################################################################################################################################### SCRIPT ###################################################################################################################################if __name__ =="__main__":
# Determines how many games will be played for each player nb_games =1000# Customize the game elements game_config = {"mud_percentage": 0.0,
"nb_cheese": 1,
"game_mode": GameMode.SIMULATION}
# Run the games for each player class players = [Random1(), Random2(), Random3(), Random4(), Random5(), Random6(), Random7()]
results = {player.get_name(): [] for player in players}
for player in players:
for seed in tqdm.tqdm(range(nb_games), desc=player.get_name()):
# Make the game with given seed game = Game(random_seed=seed, **game_config)
game.add_player(player)
stats = game.start()
# Store the number of turns needed results[player.get_name()].append(stats["turns"])
# Visualization of cumulative curves of numbers of turns taken per program max_turn = max([max(results[player]) for player in results])
pyplot.figure(figsize=(10, 5))
for player in results:
turns = [0] + sorted(results[player]) + [max_turn]
games_completed_per_turn = [len([turn for turn in results[player] if turn <= t]) *100.0/ nb_games for t in turns]
pyplot.plot(turns, games_completed_per_turn, label=player)
pyplot.title("Comparison of turns needed to complete all %d games"% (nb_games))
pyplot.xlabel("Turns per game")
pyplot.ylabel("% of games completed")
pyplot.xscale("log")
pyplot.legend()
pyplot.savefig("evaluate_random_players.png")
# Formal statistics to check if these curves are statistically significantfor i, player_1 in enumerate(results):
for j, player_2 in enumerate(results):
if j > i:
test_result = scstats.mannwhitneyu(results[player_1], results[player_2], alternative="two-sided")
print("Mann-Whitney U test between turns of program '%s' and of program '%s':"% (player_1, player_2), test_result)
####################################################################################################################################################################################
En exécutant ce script, on obtient le graphique suivant :
Et on obtient les résultats suivants pour les tests statistiques :
Mann-Whitney U test between turns of program 'Random1' and of program 'Random2':
MannwhitneyuResult(statistic=np.float64(629444.0), pvalue=np.float64(1.193805368295762e-23))

Mann-Whitney U test between turns of program 'Random1' and of program 'Random3':
MannwhitneyuResult(statistic=np.float64(777997.5), pvalue=np.float64(8.474324515868948e-103))

Mann-Whitney U test between turns of program 'Random1' and of program 'Random4':
MannwhitneyuResult(statistic=np.float64(803477.5), pvalue=np.float64(3.946294369720488e-122))

Mann-Whitney U test between turns of program 'Random1' and of program 'Random5':
MannwhitneyuResult(statistic=np.float64(896372.5), pvalue=np.float64(6.578900822721211e-207))

Mann-Whitney U test between turns of program 'Random1' and of program 'Random6':
MannwhitneyuResult(statistic=np.float64(974073.0), pvalue=np.float64(3.710534971663599e-295))

Mann-Whitney U test between turns of program 'Random1' and of program 'Random7':
MannwhitneyuResult(statistic=np.float64(971377.0), pvalue=np.float64(8.137790587846432e-292))

Mann-Whitney U test between turns of program 'Random2' and of program 'Random3':
MannwhitneyuResult(statistic=np.float64(675221.0), pvalue=np.float64(6.101481042673725e-42))

Mann-Whitney U test between turns of program 'Random2' and of program 'Random4':
MannwhitneyuResult(statistic=np.float64(709365.5), pvalue=np.float64(4.059310828048741e-59))

Mann-Whitney U test between turns of program 'Random2' and of program 'Random5':
MannwhitneyuResult(statistic=np.float64(830148.5), pvalue=np.float64(3.563466221925198e-144))

Mann-Whitney U test between turns of program 'Random2' and of program 'Random6':
MannwhitneyuResult(statistic=np.float64(954534.5), pvalue=np.float64(1.642204139083212e-271))

Mann-Whitney U test between turns of program 'Random2' and of program 'Random7':
MannwhitneyuResult(statistic=np.float64(950008.5), pvalue=np.float64(3.715566915390973e-266))

Mann-Whitney U test between turns of program 'Random3' and of program 'Random4':
MannwhitneyuResult(statistic=np.float64(543162.0), pvalue=np.float64(0.0008304016572701611))

Mann-Whitney U test between turns of program 'Random3' and of program 'Random5':
MannwhitneyuResult(statistic=np.float64(691584.0), pvalue=np.float64(8.519425633784984e-50))

Mann-Whitney U test between turns of program 'Random3' and of program 'Random6':
MannwhitneyuResult(statistic=np.float64(925934.5), pvalue=np.float64(1.0825651827569589e-238))

Mann-Whitney U test between turns of program 'Random3' and of program 'Random7':
MannwhitneyuResult(statistic=np.float64(916785.0), pvalue=np.float64(1.2737098944078e-228))

Mann-Whitney U test between turns of program 'Random4' and of program 'Random5':
MannwhitneyuResult(statistic=np.float64(644933.5), pvalue=np.float64(3.1172422904019286e-29))

Mann-Whitney U test between turns of program 'Random4' and of program 'Random6':
MannwhitneyuResult(statistic=np.float64(916347.0), pvalue=np.float64(3.6742404350271064e-228))

Mann-Whitney U test between turns of program 'Random4' and of program 'Random7':
MannwhitneyuResult(statistic=np.float64(905822.5), pvalue=np.float64(7.305777365442017e-217))

Mann-Whitney U test between turns of program 'Random5' and of program 'Random6':
MannwhitneyuResult(statistic=np.float64(891258.5), pvalue=np.float64(9.574270851465981e-202))

Mann-Whitney U test between turns of program 'Random5' and of program 'Random7':
MannwhitneyuResult(statistic=np.float64(877888.0), pvalue=np.float64(2.5564688168315526e-188))

Mann-Whitney U test between turns of program 'Random6' and of program 'Random7':
MannwhitneyuResult(statistic=np.float64(468236.5), pvalue=np.float64(0.01379698799921949))
D’après la courbe et les tests, on observe que Random5 prend significativement ($p \ll 0.01$) moins de tours en moyenne que les autres programmes.
C’est donc une amélioration pertinente du point de vue des résultats.
Cela dit, on n’a pas mesuré les impacts en terme de temps de calcul et de coût énergétique, donc il faudrait pousser un peu plus les analyses pour voir si c’est à garder.
Pour aller plus loin
4 — Le joueur Random6
4.1 — Description de la stratégie
Quand Random5 arrive à un croisement amenant à plusieurs cases voisines non visitées, le rat choisit une case aléatoirement parmi celles-ci et s’y dirige.
Imaginons le cas trivial où il n’y a aucun mur, on se dit alors que les directions se rapprochant le plus du fromage (à vol d’oiseau) sont les plus intéressantes.
Comme en PyRat on bouge sur une grille, mieux vaut aller vers le nord ou l’est si le fromage est au nord-est.
Une stratégie intéressante serait alors de trier les cases voisines non visitées par ordre croissant de distance au fromage, et de privilégier la première.
À faire
Quel est l’impact du nombre de murs sur cette stratégie et son intérêt par rapport à une orientation aléatoire ?
Correction
Cliquez ici pour afficher la correction.
Plus on a de murs, plus il faudra faire des chemins détournés pour aller au fromage.
Donc la stratégie deviendra probablement moins efficace.
4.2 — Implémentez et évaluez la stratégie
À faire
En vous inspirant de ce que vous avez fait pour Random5, créez un joueur Random6 (et un script dans games pour le tester), qui implémente la stratégie guidée par l’emplacement du fromage.
Correction
Cliquez ici pour afficher la correction.
Le programme devrait ressembler à ça :
#################################################################################################################################### INFO ####################################################################################################################################"""
This program is a solution to the practical session 1 of the PyRat project:
https://hub.imt-atlantique.fr/ueinfo-fise1a/s5/project/session1/practical/
"""################################################################################################################################### IMPORTS ################################################################################################################################### PyRat importsfrom pyrat import Player, Maze, GameState, Action
################################################################################################################################### CLASSES ##################################################################################################################################classRandom6 (Player):
"""
*(This class inherits from* ``Player`` *).*
This player is an improvement of the ``Random5`` player.
A limitation of ``Random5`` is that it gives equal importance to all unvisited neighbors.
However, some may reduce the distance to the cheese, while others may increase it.
"""################################################################################### CONSTRUCTOR ###################################################################################def__init__ ( self,
*args: object,
**kwargs: object
) ->None:
"""
Initializes a new instance of the class.
Args:
args: Arguments to pass to the parent constructor.
kwargs: Keyword arguments to pass to the parent constructor.
"""# Inherit from parent class super().__init__(*args, **kwargs)
# We create an attribute to keep track of visited cells# We will initialize it in the ``preprocessing()`` method to allow the game to be reset# Otherwise, the set would keep the cells visited in previous games self.visited_cells =None# We also create an attribute for the reduced maze self.reduced_maze =None# We create an attribute for the player's trajectory self.trajectory =None################################################################################### PYRAT METHODS ###################################################################################defpreprocessing ( self,
maze: Maze,
game_state: GameState,
) ->None:
"""
*(This method redefines the method of the parent class with the same name).*
This method is called once at the beginning of the game.
Here, we use it to create a reduced maze that contains only the cells that are not dead-ends.
We define a dead-end as a cell that has only one neighbor and does not contain cheese or the player.
Note that this is not the best way to define a dead-end, but it is a simple one.
Args:
maze: An object representing the maze in which the player plays.
game_state: An object representing the state of the game.
"""# Initialize visited cells self.visited_cells = set()
# Reduce the maze my_location = game_state.player_locations[self.get_name()]
self.reduced_maze = self.remove_dead_ends(maze, [my_location] + game_state.cheese)
# Initialize the trajectory self.trajectory = [my_location]
##################################################################################defturn ( self,
maze: Maze,
game_state: GameState,
) -> Action:
"""
*(This method redefines the method of the parent class with the same name).*
It is called at each turn of the game.
It returns an action to perform among the possible actions, defined in the ``Action`` enumeration.
We also update the set of visited cells at each turn.
Now, we work with the reduced maze to find the next action.
Args:
maze: An object representing the maze in which the player plays.
game_state: An object representing the state of the game.
Returns:
One of the possible actions.
"""# Mark current cell as visited my_location = game_state.player_locations[self.get_name()]
if my_location notin self.visited_cells:
self.visited_cells.add(my_location)
# Add current location to trajectory self.trajectory.append(my_location)
# Return an action action = self.find_next_action(self.reduced_maze, game_state)
return action
################################################################################### OTHER METHODS ###################################################################################deffind_next_action ( self,
maze: Maze,
game_state: GameState,
) -> Action:
"""
This method returns an action to perform among the possible actions, defined in the ``Action`` enumeration.
Here, the action is chosen by prioritizing unvisited neighbors that reduce the distance to the closest cheese.
If no such action exists, we come back to the last cell in the trajectory and pop it.
Args:
maze: An object representing the maze in which the player plays.
game_state: An object representing the state of the game.
Returns:
One of the possible actions that leads to a valid neighbor.
"""# Go to an unvisited neighbor in priority# We sort the unvisited neighbors by their Euclidean distance to the closest cheese my_location = game_state.player_locations[self.get_name()]
neighbors = maze.get_neighbors(my_location)
unvisited_neighbors = [neighbor for neighbor in neighbors if neighbor notin self.visited_cells]
if len(unvisited_neighbors) >0:
# Find the closest cheese in case there are multiple my_x, my_y = maze.i_to_rc(my_location)
distances_player_cheese = {}
for cheese in game_state.cheese:
cheese_x, cheese_y = maze.i_to_rc(cheese)
distances_player_cheese[cheese] = ((my_x - cheese_x) **2+ (my_y - cheese_y) **2) **0.5 closest_cheese = min(distances_player_cheese, key=distances_player_cheese.get)
closest_cheese_x, closest_cheese_y = maze.i_to_rc(closest_cheese)
# Compute distances to the closest cheese for each unvisited neighbor distances_neighbor_cheese = {}
for neighbor in unvisited_neighbors:
neighbor_x, neighbor_y = maze.i_to_rc(neighbor)
distances_neighbor_cheese[neighbor] = ((neighbor_x - closest_cheese_x) **2+ (neighbor_y - closest_cheese_y) **2) **0.5# Choose the neighbor that reduces the distance to the closest cheese the most neighbor = min(distances_neighbor_cheese, key=distances_neighbor_cheese.get)
# If there is no unvisited neighbor, go back in the trajectory# We pop the last cell in the trajectory, which is the current cell# Then, we pop again to get the previous cell, which is where we want to go backelse:
self.trajectory.pop()
neighbor = self.trajectory.pop()
# Retrieve the corresponding action action = maze.locations_to_action(my_location, neighbor)
return action
##################################################################################defremove_dead_ends ( self,
maze: Maze,
locations_to_keep: list[tuple[int, int]]
) -> Maze:
"""
This method returns a new maze that contains only the cells that are not dead-ends.
A dead-end is defined as a cell that has only one neighbor and does not contain cheese or the player.
Args:
maze: An object representing the maze in which the player plays.
locations_to_keep: A list of locations to keep in the reduced maze.
Returns:
A new maze with only the cells that are not dead-ends.
"""# Initialize the reduced maze as the original one# We do not need to make a copy of the maze, as the game sends a copy of the maze at each turn. updated_maze = maze
# Iteratively remove dead-ends from the maze# We still keep dead ends that contain locations to keep removed_something =Truewhile removed_something:
removed_something =Falsefor vertex in updated_maze.get_vertices():
if len(updated_maze.get_neighbors(vertex)) ==1and vertex notin locations_to_keep:
updated_maze.remove_vertex(vertex)
removed_something =True# Return the updated mazereturn updated_maze
####################################################################################################################################################################################
Vous devriez observer quelque chose comme ça :
À faire
Puis, complétez le script evaluate_random_players.py pour ajouter votre joueur Random6 aux cinq autres.
Un avis sur les résultats observés ?
Correction
Cliquez ici pour afficher la correction.
Le programme devrait ressembler à ça :
#################################################################################################################################### INFO ####################################################################################################################################"""
This program is a solution to the practical session 1 of the PyRat project:
https://hub.imt-atlantique.fr/ueinfo-fise1a/s5/project/session1/practical/
"""################################################################################################################################### IMPORTS ################################################################################################################################### External importsimport pprint
# PyRat importsfrom pyrat import Game
from players.Random6 import Random6
################################################################################################################################### SCRIPT ###################################################################################################################################if __name__ =="__main__":
# Instantiate a game with a few arguments game_config = {"mud_percentage": 0.0,
"maze_width": 13,
"maze_height": 10,
"nb_cheese": 1,
"random_seed": 42,
"trace_length": 1000}
# Instantiate a game with specified arguments game = Game(**game_config)
# Instantiate the player player = Random6()
game.add_player(player)
# Start the game stats = game.start()
pprint.pprint(stats)
####################################################################################################################################################################################
D’après la courbe et les tests, on observe que Random6 prend significativement ($p \ll 0.01$) moins de tours en moyenne que Random5.
C’est donc une amélioration pertinente du point de vue des résultats.
4.3 — Les cas limites
On se posait précédemment la question de si le nombre de murs pouvait poser problème.
À faire
Faites varier ce nombre pour évaluer la densité au delà de laquelle Random6 n’est pas significativement meilleur que Random5.
Le plus efficace est de créer un script dans le dossier games pour tester ça dans une boucle qui augmente progressivement la densité de murs.
Correction
Cliquez ici pour afficher la correction.
Voici un script qui permet d’étudier l’impact du pourcentage de murs sur les performances relatives de Random5 et Random6 :
#################################################################################################################################### INFO ####################################################################################################################################"""
This program is a solution to the practical session 1 of the PyRat project:
https://hub.imt-atlantique.fr/ueinfo-fise1a/s5/project/session1/practical/
"""################################################################################################################################### IMPORTS ################################################################################################################################### External importsimport tqdm.auto as tqdm
import matplotlib.pyplot as pyplot
import scipy.stats as scstats
# PyRat importsfrom pyrat import Game, GameMode
from players.Random5 import Random5
from players.Random6 import Random6
################################################################################################################################### SCRIPT ###################################################################################################################################if __name__ =="__main__":
# Determines how many games will be played for each player nb_games =1000# Define the wall percentages to test wall_percentages = [0.0, 10.0, 20.0, 30.0, 40.0, 50.0, 60.0, 70.0, 80.0, 90.0, 100.0]
# Customize the game elements game_config = {"mud_percentage": 0.0,
"nb_cheese": 1,
"game_mode": GameMode.SIMULATION}
# Run the games for each player class players = [Random5(), Random6()]
results = {walls: {player.get_name(): [] for player in players} for walls in wall_percentages}
for walls in wall_percentages:
print(f"Wall percentage: {walls}%")
for player in players:
for seed in tqdm.tqdm(range(nb_games), desc=player.get_name()):
# Make the game with given seed game = Game(random_seed=seed, wall_percentage=walls, **game_config)
game.add_player(player)
stats = game.start()
# Store the number of turns needed results[walls][player.get_name()].append(stats["turns"])
# Visualization of cumulative curves of numbers of turns taken per program max_turn = max([max(results[walls][player]) for walls in results for player in results[walls]])
pyplot.figure(figsize=(10, 5))
for (i_player, player) in enumerate(results[walls]):
for (i_walls, walls) in enumerate(results):
turns = [0] + sorted(results[walls][player]) + [max_turn]
games_completed_per_turn = [len([turn for turn in results[walls][player] if turn <= t]) *100.0/ nb_games for t in turns]
pyplot.plot(turns,
games_completed_per_turn,
label="%s (walls=%.1f%%)"% (player, walls),
linestyle="-"if i_player ==0else"--",
color=pyplot.cm.viridis(i_walls / (len(results) -1)))
pyplot.title("Comparison of turns needed to complete all %d games"% (nb_games))
pyplot.xlabel("Turns per game")
pyplot.ylabel("% of games completed")
pyplot.xscale("log")
pyplot.legend(bbox_to_anchor=(1.05, 1), loc="upper left", ncol=2)
pyplot.tight_layout()
pyplot.savefig("walls_impact_on_random5_random6.png")
# Plot statistical significance as a function of wall percentage p_values = []
for walls in results:
stat, p_value = scstats.mannwhitneyu(results[walls]["Random5"], results[walls]["Random6"], alternative="greater")
p_values.append(p_value)
pyplot.figure(figsize=(10, 5))
pyplot.plot(wall_percentages, p_values, marker='o')
pyplot.axhline(y=0.05, color='r', linestyle='--', label='Significance threshold (0.05)')
pyplot.title("Statistical significance of Random6 vs Random5")
pyplot.xlabel("Wall percentage")
pyplot.ylabel("p-value (Mann-Whitney U test)")
pyplot.yscale("log")
pyplot.legend()
pyplot.savefig("walls_impact_on_random5_random6_p_values.png")
####################################################################################################################################################################################
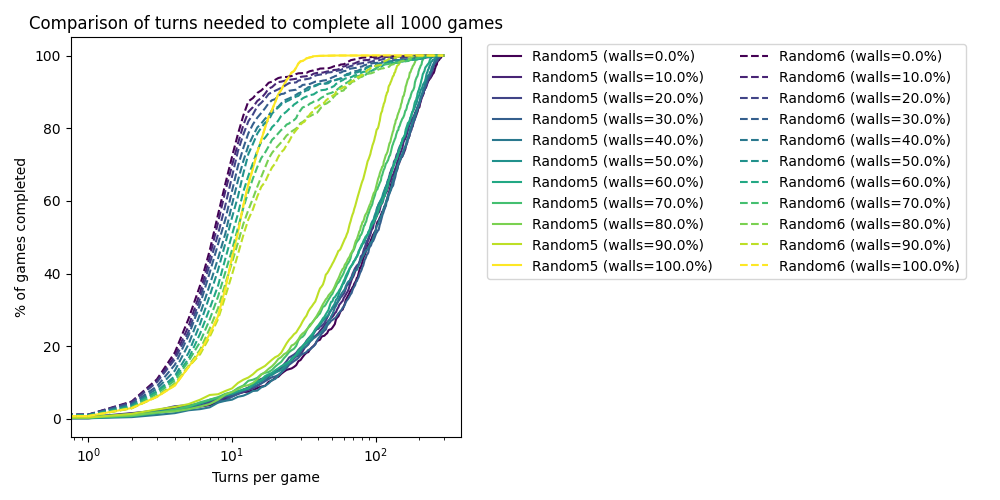
On observe les courbes suivantes en sortie, pour 1000 parties jouées par programme et par pourcentage de murs :
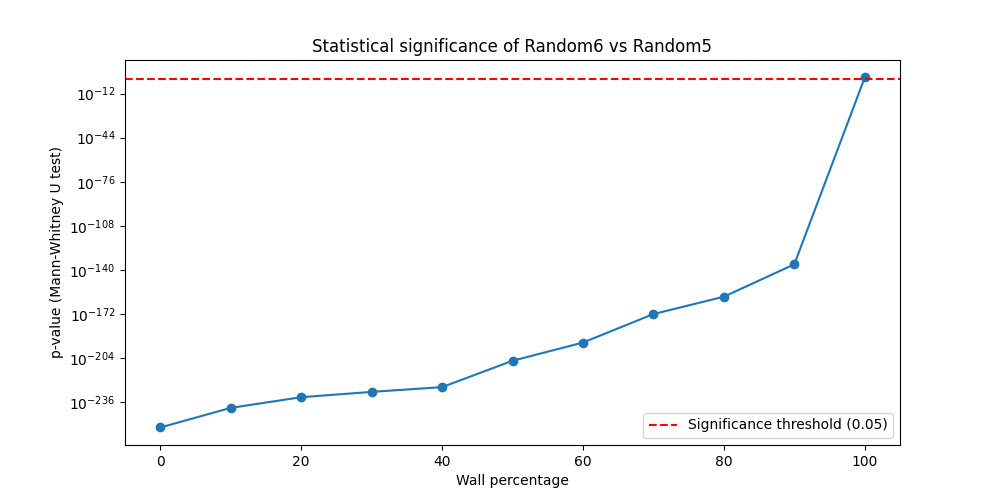
Le script affiche également la significativité statistique des différences observées entre les deux programmes en fonction du pourcentage de murs :
On observe que le script Random6 est significativement meilleur que Random5 dans à peu près toutes les configurations, même si l’écart diminue avec le pourcentage de murs qui augmente.
On avait déjà parlé de significativité dans le tutoriel, n’hésitez pas à relire cette partie.
4.4 — Remarques
Si vous avez suivi toutes les étapes, vous devriez vous rendre compte que votre programme ne comporte plus d’aléatoire du tout !
À faire
Pensez à faire un peu de ménage dans les dépendances de votre fichier Random6.py (qui est du coup assez mal nommé) en enlevant import random.
Correction
Cliquez ici pour afficher la correction.
Normalement, on n’a plus besoin de import random dans Random6.py, donc on peut l’enlever.
Idéalement, on devrait aussi renommer le fichier et la classe pour refléter le fait que ce n’est plus un programme aléatoire.
Une autre remarque est que la distance Euclidéenne utilisée pour trier les voisins non visités ne prend pas en compre la topologie du labyrinthe, ni la boue.
Cela s’observe dans la vidéo plus haut, où on voit bien que la portion de chemin 82 -> 95 -> 94 aurait été plus courte que 82 -> 81 -> 94.
Il faudra donc passer à des stratégies plus intelligentes pour trouver des chemins plus courts.
Pour aller encore plus loin
5 — Le joueur Random7
La plupart du temps, le fromage va se trouver en diagonale par rapport au rat (par exemple au nord-ouest).
Conceptuellement, dans un labyrinthe sans murs, ça ne change pas grand chose d’aller au nord puis à l’ouest, ou d’aller à l’ouest puis au nord.
La boue dans le labyrinthe change toutefois cette équivalence.
C’est un phénomène que nous avons décrit dans les remarques sur Random6plus haut.
On pourrait donc améliorer Random6 comme suit : si deux actions réduisent la distance au fromage, on privilégie celle qui amène à la case suivante en un minimum de tours.
À faire
Comme précédemment, créez un joueur Random7 qui implémente cette stratégie, ainsi qu’un script pour lancer une partie avec.
Correction
Cliquez ici pour afficher la correction.
Le programme devrait ressembler à ça :
#################################################################################################################################### INFO ####################################################################################################################################"""
This program is a solution to the practical session 1 of the PyRat project:
https://hub.imt-atlantique.fr/ueinfo-fise1a/s5/project/session1/practical/
"""################################################################################################################################### IMPORTS ################################################################################################################################### PyRat importsfrom pyrat import Player, Maze, GameState, Action
################################################################################################################################### CLASSES ##################################################################################################################################classRandom7 (Player):
"""
*(This class inherits from* ``Player`` *).*
This player is an improvement of the ``Random6`` player.
A limitation of ``Random6`` is that it can enter mud by goint north then west, while going west then north would avoid the mud.
We improve this by checking weights leading to cells that reduce the distance to the closest cheese.
"""################################################################################### CONSTRUCTOR ###################################################################################def__init__ ( self,
*args: object,
**kwargs: object
) ->None:
"""
Initializes a new instance of the class.
Args:
args: Arguments to pass to the parent constructor.
kwargs: Keyword arguments to pass to the parent constructor.
"""# Inherit from parent class super().__init__(*args, **kwargs)
# We create an attribute to keep track of visited cells# We will initialize it in the ``preprocessing()`` method to allow the game to be reset# Otherwise, the set would keep the cells visited in previous games self.visited_cells =None# We also create an attribute for the reduced maze self.reduced_maze =None# We create an attribute for the player's trajectory self.trajectory =None################################################################################### PYRAT METHODS ###################################################################################defpreprocessing ( self,
maze: Maze,
game_state: GameState,
) ->None:
"""
*(This method redefines the method of the parent class with the same name).*
This method is called once at the beginning of the game.
Here, we use it to create a reduced maze that contains only the cells that are not dead-ends.
We define a dead-end as a cell that has only one neighbor and does not contain cheese or the player.
Note that this is not the best way to define a dead-end, but it is a simple one.
Args:
maze: An object representing the maze in which the player plays.
game_state: An object representing the state of the game.
"""# Initialize visited cells self.visited_cells = set()
# Reduce the maze my_location = game_state.player_locations[self.get_name()]
self.reduced_maze = self.remove_dead_ends(maze, [my_location] + game_state.cheese)
# Initialize the trajectory self.trajectory = [my_location]
##################################################################################defturn ( self,
maze: Maze,
game_state: GameState,
) -> Action:
"""
*(This method redefines the method of the parent class with the same name).*
It is called at each turn of the game.
It returns an action to perform among the possible actions, defined in the ``Action`` enumeration.
We also update the set of visited cells at each turn.
Now, we work with the reduced maze to find the next action.
Args:
maze: An object representing the maze in which the player plays.
game_state: An object representing the state of the game.
Returns:
One of the possible actions.
"""# Mark current cell as visited my_location = game_state.player_locations[self.get_name()]
if my_location notin self.visited_cells:
self.visited_cells.add(my_location)
# Add current location to trajectory self.trajectory.append(my_location)
# Return an action action = self.find_next_action(self.reduced_maze, game_state)
return action
################################################################################### OTHER METHODS ###################################################################################deffind_next_action ( self,
maze: Maze,
game_state: GameState,
) -> Action:
"""
This method returns an action to perform among the possible actions, defined in the ``Action`` enumeration.
Here, the action is chosen by prioritizing unvisited neighbors that reduce the distance to the closest cheese.
If no such action exists, we come back to the last cell in the trajectory and pop it.
Args:
maze: An object representing the maze in which the player plays.
game_state: An object representing the state of the game.
Returns:
One of the possible actions that leads to a valid neighbor.
"""# Go to an unvisited neighbor in priority# We sort the unvisited neighbors by their Euclidean distance to the closest cheese my_location = game_state.player_locations[self.get_name()]
neighbors = maze.get_neighbors(my_location)
unvisited_neighbors = [neighbor for neighbor in neighbors if neighbor notin self.visited_cells]
if len(unvisited_neighbors) >0:
# Find the closest cheese in case there are multiple my_x, my_y = maze.i_to_rc(my_location)
distances_player_cheese = {}
for cheese in game_state.cheese:
cheese_x, cheese_y = maze.i_to_rc(cheese)
distances_player_cheese[cheese] = ((my_x - cheese_x) **2+ (my_y - cheese_y) **2) **0.5 closest_cheese = min(distances_player_cheese, key=distances_player_cheese.get)
closest_cheese_x, closest_cheese_y = maze.i_to_rc(closest_cheese)
# Compute distances to the closest cheese for each unvisited neighbor distances_neighbor_cheese = {}
for neighbor in unvisited_neighbors:
neighbor_x, neighbor_y = maze.i_to_rc(neighbor)
distances_neighbor_cheese[neighbor] = ((neighbor_x - closest_cheese_x) **2+ (neighbor_y - closest_cheese_y) **2) **0.5# Among neighbors that reduce the distance to the closest cheese, choose the closest one from current location# If no neighbor reduces the distance to the closest cheese, we do as Random6 valid_neighbors = {neighbor: maze.get_weight(my_location, neighbor) for neighbor in unvisited_neighbors if distances_neighbor_cheese[neighbor] < distances_player_cheese[closest_cheese]}
if len(valid_neighbors) >0:
neighbor = min(valid_neighbors, key=valid_neighbors.get)
else:
neighbor = min(distances_neighbor_cheese, key=distances_neighbor_cheese.get)
# If there is no unvisited neighbor, go back in the trajectory# We pop the last cell in the trajectory, which is the current cell# Then, we pop again to get the previous cell, which is where we want to go backelse:
self.trajectory.pop()
neighbor = self.trajectory.pop()
# Retrieve the corresponding action action = maze.locations_to_action(my_location, neighbor)
return action
##################################################################################defremove_dead_ends ( self,
maze: Maze,
locations_to_keep: list[tuple[int, int]]
) -> Maze:
"""
This method returns a new maze that contains only the cells that are not dead-ends.
A dead-end is defined as a cell that has only one neighbor and does not contain cheese or the player.
Args:
maze: An object representing the maze in which the player plays.
locations_to_keep: A list of locations to keep in the reduced maze.
Returns:
A new maze with only the cells that are not dead-ends.
"""# Initialize the reduced maze as the original one# We do not need to make a copy of the maze, as the game sends a copy of the maze at each turn. updated_maze = maze
# Iteratively remove dead-ends from the maze# We still keep dead ends that contain locations to keep removed_something =Truewhile removed_something:
removed_something =Falsefor vertex in updated_maze.get_vertices():
if len(updated_maze.get_neighbors(vertex)) ==1and vertex notin locations_to_keep:
updated_maze.remove_vertex(vertex)
removed_something =True# Return the updated mazereturn updated_maze
####################################################################################################################################################################################
À faire
Puis, complétez le script evaluate_random_players.py pour l’ajouter aux autres.
Est-ce que cet ajout améliore significativement les performances moyennes par rapport à Random6 ?
Correction
Cliquez ici pour afficher la correction.
Le programme devrait ressembler à ça :
#################################################################################################################################### INFO ####################################################################################################################################"""
This program is a solution to the practical session 1 of the PyRat project:
https://hub.imt-atlantique.fr/ueinfo-fise1a/s5/project/session1/practical/
"""################################################################################################################################### IMPORTS ################################################################################################################################### External importsimport pprint
# PyRat importsfrom pyrat import Game
from players.Random7 import Random7
################################################################################################################################### SCRIPT ###################################################################################################################################if __name__ =="__main__":
# Instantiate a game with a few arguments game_config = {"mud_percentage": 0.0,
"maze_width": 13,
"maze_height": 10,
"nb_cheese": 1,
"random_seed": 42,
"trace_length": 1000}
# Instantiate a game with specified arguments game = Game(**game_config)
# Instantiate the player player = Random7()
game.add_player(player)
# Start the game stats = game.start()
pprint.pprint(stats)
####################################################################################################################################################################################
D’après la courbe et les tests, on observe une petite dégradation, mais le test statistique ne permet pas de conclure que c’est significativement moins bon ($p > 0.01$).
Ça vaudrait le coup de tester ce que ça donne avec plus de boue et moins de murs, il est possible que ça change un peu les conclusions.
6 — Suivre le mur
On dit parfois que quand on est perdu dans un labyrinthe, il suffit de poser une main sur un mur, et d’avancer sans jamais décoller sa main.
On teste ?
À faire
Prenez quelques minutes pour essayer d’imaginer les cas où cette stratégie peut fonctionner, pour partir d’une case et arriver au morceau de fromage.
Une fois que vous avez identifié ce qui marche, créez un script dans games pour créer ce contexte, puis créez un joueur pour réaliser cette stratégie.
Correction
Cliquez ici pour afficher la correction.
Pour que la stratégie fonctionne, il faut qu’il existe un mur continu entre la position initiale et le fromage.
C’est par exemple le cas si on se place sur le bord du labyrinthe et que le fromage touche le bord.
Au contraire, on aura des soucis si le fromage est au milieu du labyrinthe, sans mur adjacent.
Idem pour le joueur qui, s’il commence sans mur adjacent ou touchant un mur qui n’amène pas au fromage, ne pourra jamais le trouver.
Testons en forçant les positions des joueurs et du fromage.
Voici un script de jeu qui crée un labyrinthe sans trous (pour garantir que la case 0 existe) et en plaçant le joueur en bas à droite et le fromage en haut à gauche :
#################################################################################################################################### INFO ####################################################################################################################################"""
This program is a solution to the practical session 1 of the PyRat project:
https://hub.imt-atlantique.fr/ueinfo-fise1a/s5/project/session1/practical/
"""################################################################################################################################### IMPORTS ################################################################################################################################### External importsimport pprint
# PyRat importsfrom pyrat import Game, StartingLocation
from players.WallFollower import WallFollower
################################################################################################################################### SCRIPT ###################################################################################################################################if __name__ =="__main__":
# Instantiate a game with a few arguments game_config = {"mud_percentage": 0.0,
"wall_percentage": 70.0,
"cell_percentage": 100.0,
"fixed_cheese": [0],
"maze_width": 13,
"maze_height": 10,
"random_seed": 42,
"trace_length": 1000}
# Instantiate a game with specified arguments game = Game(**game_config)
# Instantiate the player player = WallFollower()
game.add_player(player, location=StartingLocation.BOTTOM_RIGHT)
# Start the game stats = game.start()
pprint.pprint(stats)
####################################################################################################################################################################################
Et voici un joueur qui suit le mur à sa droite :
#################################################################################################################################### INFO ####################################################################################################################################"""
This program is a solution to the practical session 1 of the PyRat project:
https://hub.imt-atlantique.fr/ueinfo-fise1a/s5/project/session1/practical/
"""################################################################################################################################### IMPORTS ################################################################################################################################### PyRat importsfrom pyrat import Player, Maze, GameState, Action
################################################################################################################################### CLASSES ##################################################################################################################################classWallFollower (Player):
"""
*(This class inherits from* ``Player`` *).*
This player follows a wall by always keeping its right hand on the wall.
"""################################################################################### CONSTRUCTOR ###################################################################################def__init__ ( self,
*args: object,
**kwargs: object
) ->None:
"""
Initializes a new instance of the class.
Args:
args: Arguments to pass to the parent constructor.
kwargs: Keyword arguments to pass to the parent constructor.
"""# Inherit from parent class super().__init__(*args, **kwargs)
# We remember the previous action performed self.previous_action = Action.NOTHING
################################################################################### PYRAT METHODS ###################################################################################defpreprocessing ( self,
maze: Maze,
game_state: GameState,
) ->None:
"""
*(This method redefines the method of the parent class with the same name).*
This method is called once at the beginning of the game.
Here, we initialize the previous action to one that leads to a wall.
Args:
maze: An object representing the maze in which the player plays.
game_state: An object representing the state of the game.
"""# Initialize last action to one that leads to a wall my_location = game_state.player_locations[self.get_name()]
for action in [Action.EAST, Action.NORTH, Action.WEST, Action.SOUTH]:
if self.action_hits_wall(maze, my_location, action):
self.previous_action = action
break##################################################################################defturn ( self,
maze: Maze,
game_state: GameState,
) -> Action:
"""
*(This method redefines the method of the parent class with the same name).*
It is called at each turn of the game.
It returns an action to perform among the possible actions, defined in the ``Action`` enumeration.
We return an action that allows to keep the wall on the right.
Args:
maze: An object representing the maze in which the player plays.
game_state: An object representing the state of the game.
Returns:
One of the possible actions.
"""# Actions order depends on the last action performed actions_order = []
if self.previous_action == Action.NORTH:
actions_order = [Action.EAST, Action.NORTH, Action.WEST, Action.SOUTH]
elif self.previous_action == Action.EAST:
actions_order = [Action.SOUTH, Action.EAST, Action.NORTH, Action.WEST]
elif self.previous_action == Action.SOUTH:
actions_order = [Action.WEST, Action.SOUTH, Action.EAST, Action.NORTH]
elif self.previous_action == Action.WEST:
actions_order = [Action.NORTH, Action.WEST, Action.SOUTH, Action.EAST]
# Test actions in an order that allows to keep the wall on the right my_location = game_state.player_locations[self.get_name()]
for action in actions_order:
ifnot self.action_hits_wall(maze, my_location, action):
self.previous_action = action
return action
# If all actions hit a wall, we don't movereturn Action.NOTHING
################################################################################### OTHER METHODS ###################################################################################defaction_hits_wall ( self,
maze: Maze,
current_location: int,
action: Action,
) -> bool:
"""
This method indicates whether the given action from the current location hits a wall.
Args:
maze: An object representing the maze in which the player plays.
current_location: The current location of the player.
action: The action to perform.
Returns:
True if the action hits a wall, False otherwise.
"""# Check where the action would lead current_location_row, current_location_col = maze.i_to_rc(current_location)
target_location_row, target_location_col = current_location_row, current_location_col
if action == Action.NORTH:
target_location_row -=1elif action == Action.SOUTH:
target_location_row +=1elif action == Action.WEST:
target_location_col -=1elif action == Action.EAST:
target_location_col +=1# If the target exists, check if we can go thereif maze.rc_exists(target_location_row, target_location_col):
target_location = maze.rc_to_i(target_location_row, target_location_col)
returnnot maze.has_edge(current_location, target_location)
# Target does not exist, so we hit a wallreturnTrue####################################################################################################################################################################################
Vous devriez observer un comportement comme celui-ci :
7 — Factoriser tout ça
Maintenant que vous avez codé 7 programmes aléatoires, vous devez vous apercevoir qu’il y a un certain nombre de redondances dans vos codes.
En particulier, la fonction remove_dead_ends(...) introduite à partir de Random4 apparaît probablement dans tous les fichiers développés par la suite, vu que ce pré-traitement est relativement indépendant de la stratégie de déplacement.
Maintenant, imaginons que vous découvriez une erreur dans le code de cette fonction. Pour la corriger, il va falloir fouiller dans tous vos fichiers pour changer toutes les copies de remove_dead_ends(...). C’est problématique, car vous allez perdre du temps, et peut-être introduire de nouvelles erreurs sans faire exprès…
À faire
Prenez un moment pour réfléchir aux contenus de vos programmes aléatoires. Comment pourriez-vous exploiter le paradigme orienté objet pour mieux organiser tout ça ?
Est-ce que votre nouvelle organisation permet également de factoriser des éléments développés pour le programme qui suit le mur ?
Correction
Cliquez ici pour afficher la correction.
Pour mieux organiser :
Créer une classe Random, si possible abstraite (hériter de abc.ABC), et y mettre les éléments communs aux programmes aléatoires.
Changer la relation d’héritage des programmes 1 à 7 pour hériter de Random.
Comme la simplification de labyrinthe par remove_dead_ends() est plus liée au labyrinthe qu’au joueur, ça pourrait être bien de définir une classe MazeWrapper.
Cette classe aurait un attribut maze initialisé avec ce qui est reçu lors de l’appel de preprocessing() (pas un héritage, car le maze reçu par preprocessing est une instance d’une classe enfant de Maze, et il y en a plusieurs possibles).
Ensuite, mettre remove_dead_ends() dans MazeWrapper et adapter les codes.
Et pour suivre le mur :
Ça pourrait valoir le coup de créer une classe MyPlayer qui agrège les éléments communs à tous les programmes développés en cours.
Pas dit que ça serve tout de suite, mais peut-être plus tard, si on définit des trucs communs à tous les joueurs.